
BASIC Level III (1983)
- Pages
- 178
- Source
- scanned, BASIC_Level_III_1983_Au.pdf
- Per page
- about 27 KB — only what you read
- Text layer
- yes — searchable
Operating manual for the John Sands Sega SC3000 Personal Computer
John Sands
^50
I

I
I
V
BASIC LEVEL
10
Operator's Manual
for
the John Sands Sega
SC-3000
Personal Computer
John
Sands
SEGA
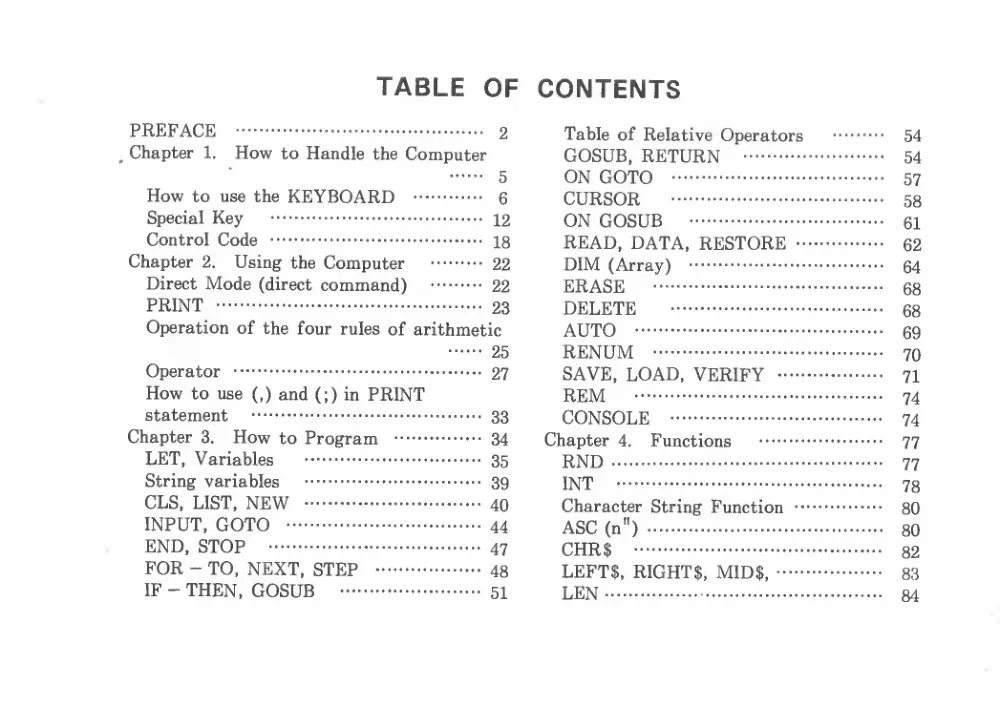
TABLE OF
PREFACE
2
^ Chapter
1.
How to Handle the Computer
5
How to use the KEYBOARD
6
Special Key
12
Control Code
18
Chapter
2.
Using the Computer
22
Direct Mode (direct command)
22
PRINT
23
Operation of the four rules of arithmetic
25
Operator
27
How to use
(,) and (;) in PRINT
statement
33
Chapter
3.
How to Program
34
LET, Variables
35
String variables
39
CLS, LIST, NEW
40
INPUT, GOTO
44
END, STOP
47
FOR - TO, NEXT, STEP
48
IF - THEN, GOSUB
51
CONTENTS
Table of Relative Operators
54
GOSUB, RETURN
54
ON GOTO
57
CURSOR
58
ON GOSUB
61
READ, DATA, RESTORE
62
DIM (Array)
64
ERASE
68
DELETE
68
AUTO
69
RENUM
70
SAVE, LOAD, VERIFY
71
REM
74
CONSOLE
74
Chapter
4.
Functions
77
RND
77
INT
78
Character String Function
80
ASC (n")
80
CHR$
82
LEFT$, RIGHT$, MID$,
83
LEN
84
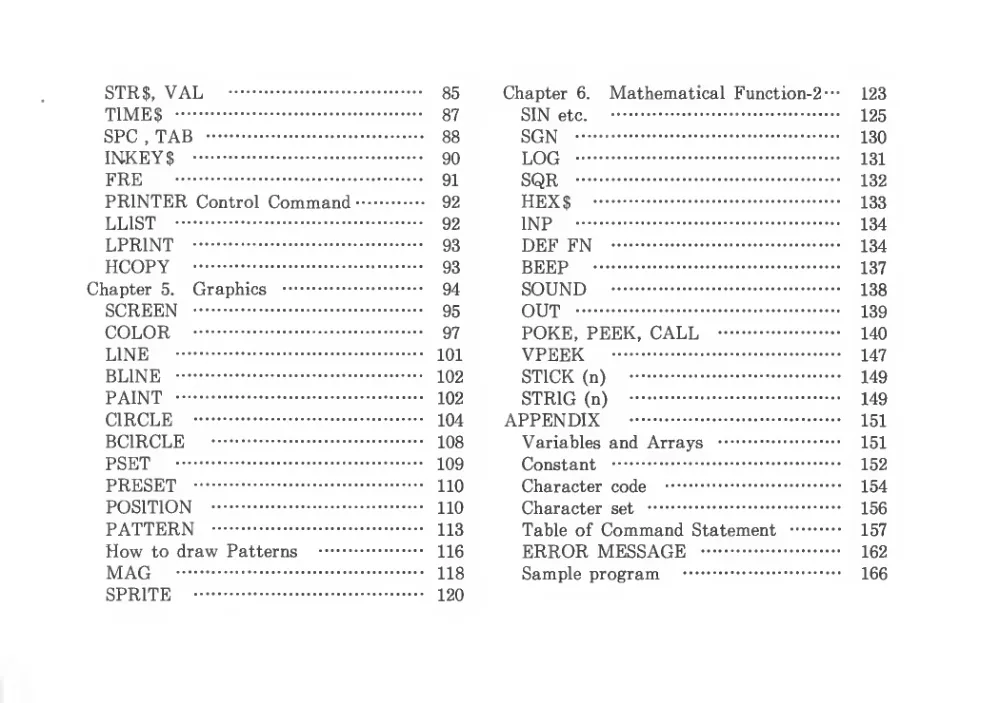
STR$, VAL
85
TIMES
87
SPC
, TAB
88
INKEYS
90
FRE
91
PRINTER Control Command
92
LLIST
92
LPRINT
93
HCOPY
93
Chapter
5.
Graphics
94
SCREEN
95
COLOR
97
LINE
101
BLINE
102
PAINT
102
CIRCLE
104
BCIRCLE
108
PSET
109
PRESET
110
POSITION
110
PATTERN
113
How to draw Patterns
116
MAG
118
SPRITE
120
Chapter
6.
Mathematical Function-2'"
123
SIN etc.
125
SGN
130
LOG
131
SQR
132
HEX$
133
INP
134
DEF FN
134
BEEP
137
SOUND
138
OUT
139
POKE, PEEK, CALL
140
VPEEK
147
STICK (n)
149
STRIG (n)
149
APPENDIX
151
Variables and Arrays
151
Constant
152
Character code
154
Character set
156
Table of Command Statement
157
ERROR MESSAGE
162
Sample program
166
Published by
John Sands
Electronics
Division of John Sands Limited
6 Bay Street Port Melbourne
Victoria 3207 Australia
Telephone
(03) 645 3333
Telex AA 34206
First Edition 1983
Copyright
(&> 1983 Sega
Enterprises
Ltd.
All
rights reserved.
No part of
this publication may be reproduced,
stored
in
a
retrieval system,
or transmitted
in any form or by any means,
electronic,
mechanical, photocopying,
recording or otherwise
without the prior written permission
of Sega
Enterprises
Ltd.
through John Sands
Electronics.
-
-
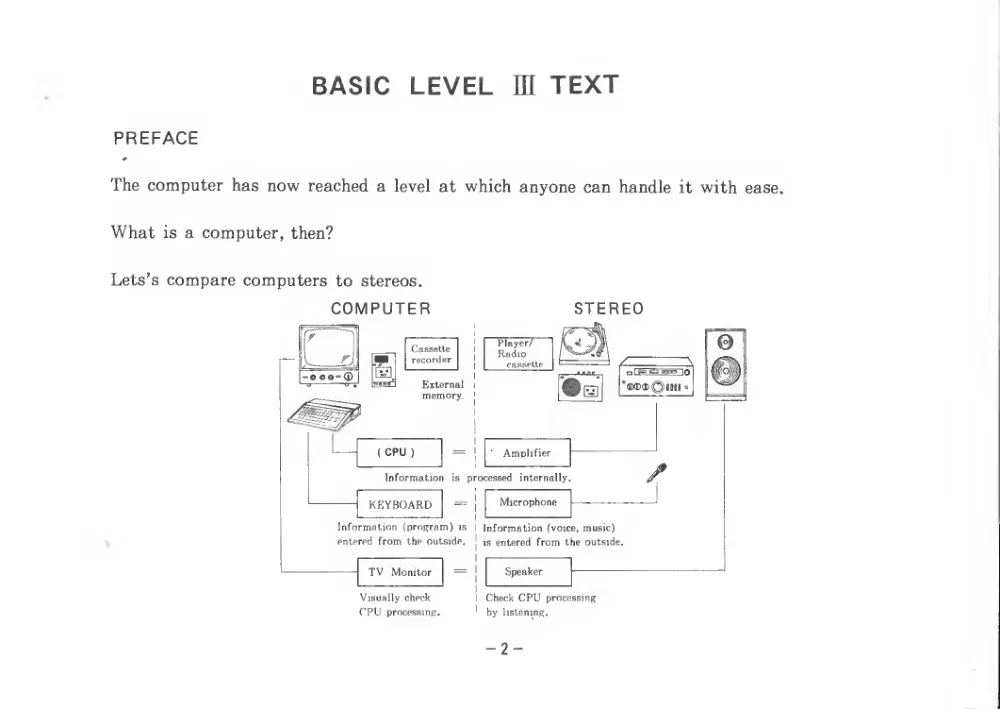
BASIC LEVEL
HI TEXT
PREFACE
The computer has now reached a level at which anyone can handle
it with ease.
What
is a computer, then?
Lets’s compare computers to stereos.
COMPUTER
•000=“®
Cassette
recorder
External
memory.
STEREO
L
{ CPU
)
1
Amplifier
1
Information
is
processed
internally.
KEYBOARD
1
Microphone
Information (program)
is
entered from
the outside.
TV
Monitor
information (voice, music)
is entered from the outside,
Speaker
Visually check
CPU
processing.
Check CPU processing
by
listening.
-2-
The above figure shows the computer mechanism. When information (program) is entered
from the outside, results are displayed on the TV screen.
Although there are various kinds of program languages available, the BASIC language
is
the most common language for personal computers.
Some of the things we can do by using the BASIC language
are:
1) Computing
2) Filing of statements and data.
3) Drawing of patterns and graphics.
4) Enjoying games and music.
It
is to your advantage to become familiar with the BASIC language so that you will be
able
to get the most out of your computer
The term “language” sounds difficult, however, the BASIC language does not have too many
commands to be remembered. You can write programs using only a few of these commands,
and as you become more confident you can begin using more commands.
Firstly, operate the keys while referring to the text. You will probably find some errors.
Do not worry about errors, persevere, and continue to operate the keys.
- 3 -
Very soon, you will find that the computer will become a most easy-going and reliable
friend.
- 4 -
Chapter
1. How
to
Handle
the
Computer
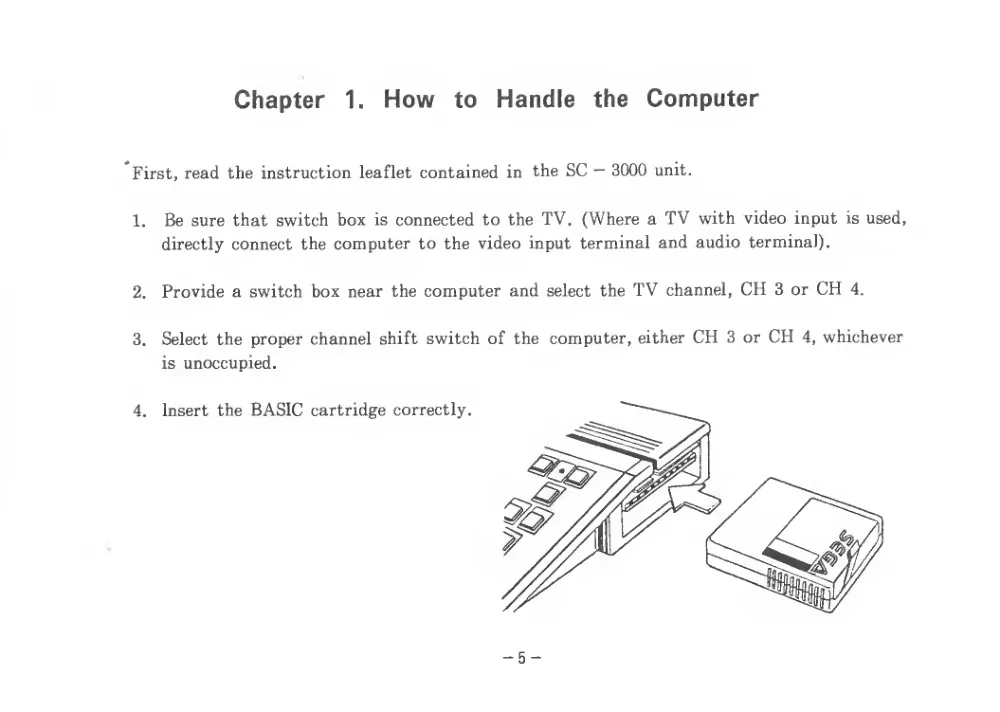
First, read the instruction leaflet contained
in
the SC — 3000 unit.
1.
Be sure that switch box
is connected to the TV. (Where a TV with video input
is used,
directly connect the computer to the video input terminal and audio terminal).
2.
Provide a switch box near the computer and select the TV channel, CH 3 or CH
4.
3.
Select the proper channel shift switch of the computer, either CH 3 or CH
4, whichever
is unoccupied.
4.
Insert the BASIC cartridge correctly.
- 5 -
5.
After connections are complete, check the cable connections.
If cable connections are correct, turn the TV power on.
Then, also turn the computer power on.
How to Use the KEYBOARD
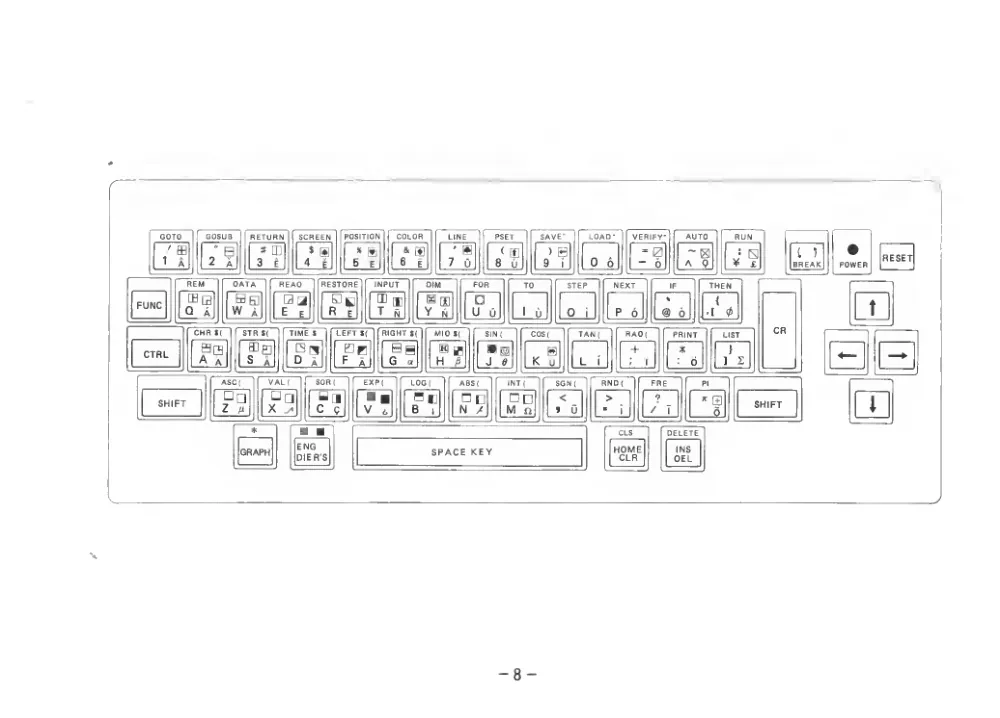
The KEYBOARD has keys on which
letters, numerics, Dieresis characters
( foreign language
)
and symbols are written.
Some keys have 4 characters or displays.
Example
:
/ffl
1
A
Key layout and spacing are the same as in typewriters.
So, you can push the keys with your fingers easily.
Try to press the keys
first.
- 6 -
Push keys of
/
ffl
1
^
I
A
and then
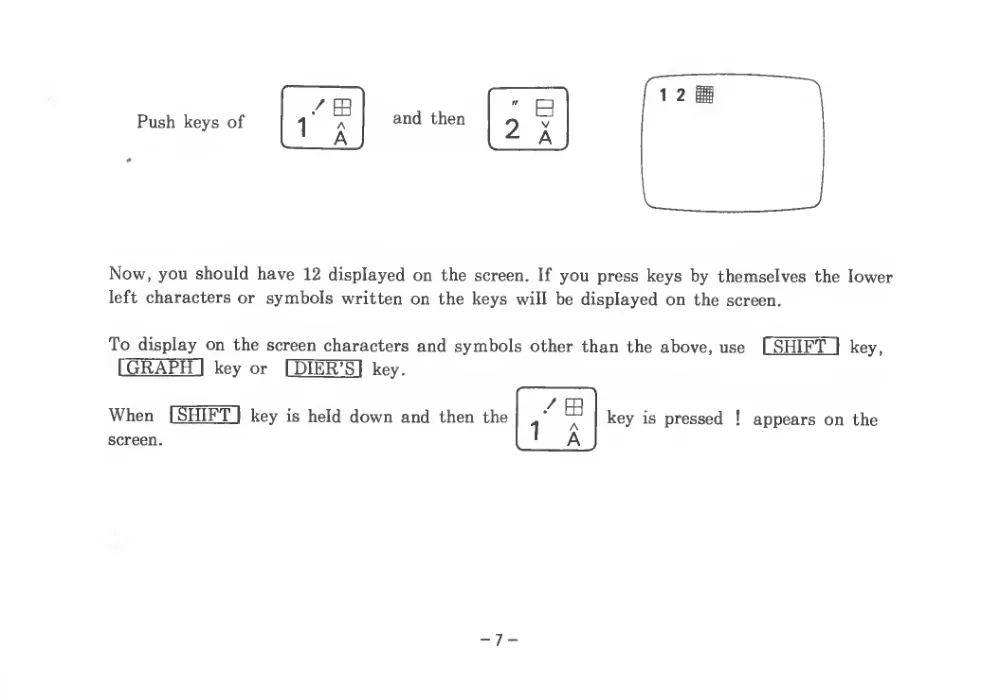
Now, you should have 12 displayed on the screen.
If you press keys by themselves the lower
left characters or symbols written on the keys will be displayed on the screen.
To display on the screen characters and symbols other than the above, use
I SHIFT
I
key,
I graph! key or
I PIER’S
I
key.
When
I SHIFT
I key
is held down and then the
screen.
/
ffl
AA
key
is pressed
!
appears on the
- 7 -
GOTO
GOSUB
RETURN
SCREEN
POSITION
COLOR
LINE
PSET
SAVE"
LOAD-
VERIFY-
AUTO
RUN
•
POWER
'
ffl
1
A
2'?
«
3
g
s m
4
E
X a
5
E
8*
ffl
6
E
1
• B
1
2
C
^ m
8
u
) 0
9
I
0
6
S-o
"1
-la
A
Q
‘ S
¥
£
1
^
BREAK
RESET
- 8 -
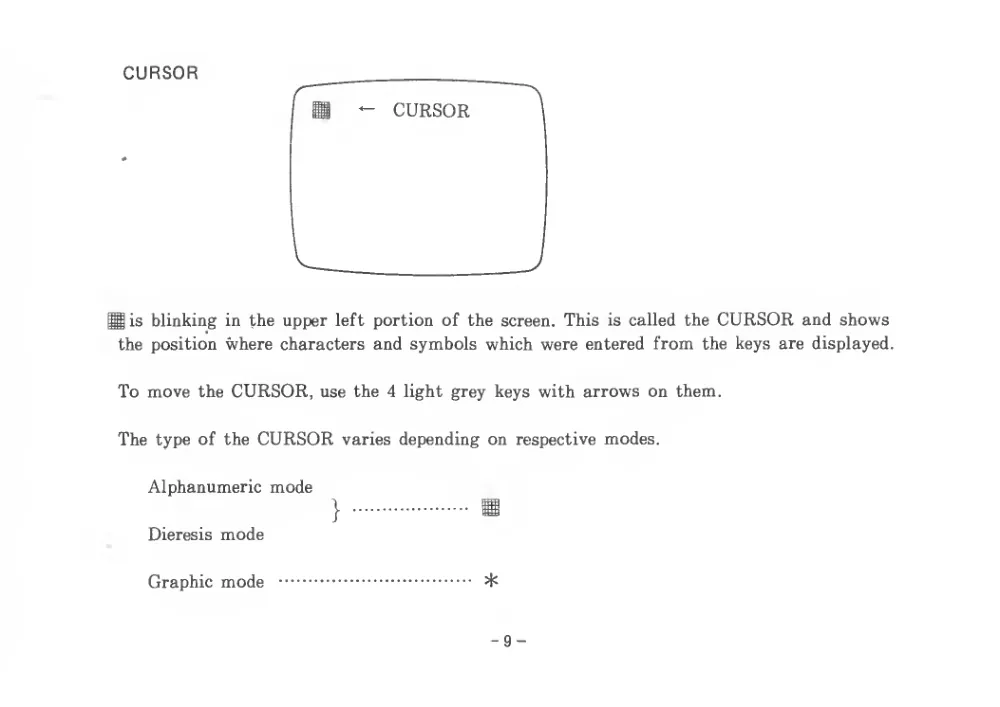
CURSOR
His blinking
in the upper
left portion of the screen. This
is called the CURSOR and shows
the position where characters and symbols which were entered from the keys are displayed.
To move the CURSOR, use the 4 light grey keys with arrows on them.
The type of the CURSOR varies depending on respective modes.
Alphanumeric mode
Dieresis mode
Graphic mode
- 9 -
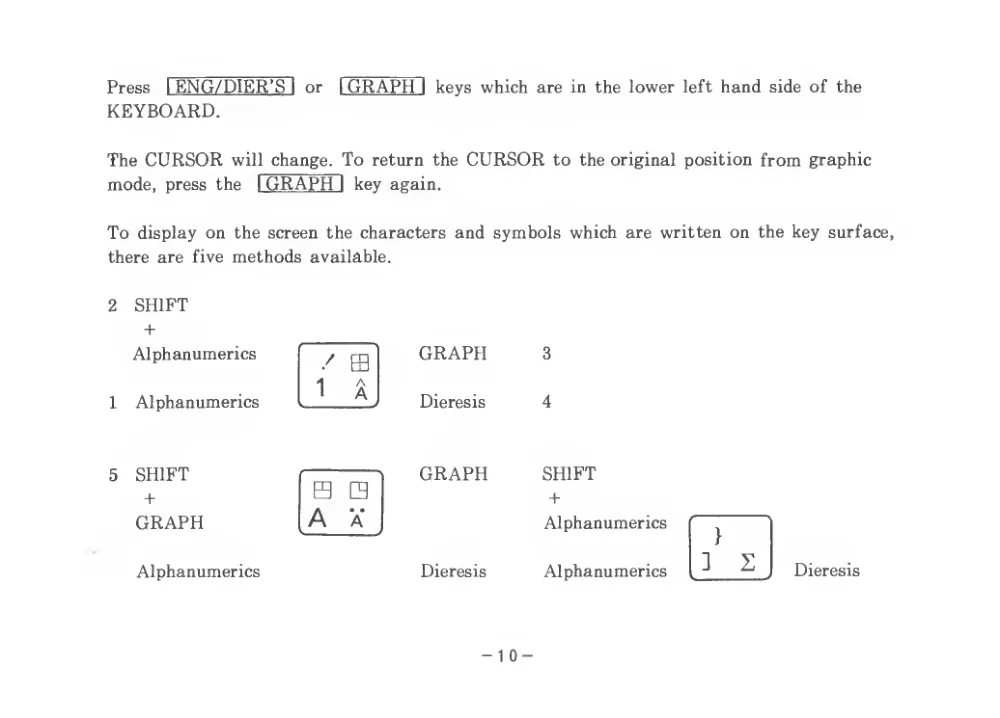
Press
I ENG/DIER’S
I or
I GRAPHi keys which are in the lower left hand side of the
KEYBOARD.
The CURSOR will change. To return the CURSOR to the original position from graphic
mode, press the
I GRAPHi key again.
To display on the screen the characters and symbols which are written on the key surface,
there are five methods available.
2
SHIFT
+
Alphanumerics
1
Alphanumerics
5
SHIFT
+
GRAPH
Alphanumerics
/
ffl
GRAPH
Dieresis
B
A
A
GRAPH
Dieresis
SHIFT
+
Alphanumerics
Alphanumerics
}
]
z
Dieresis
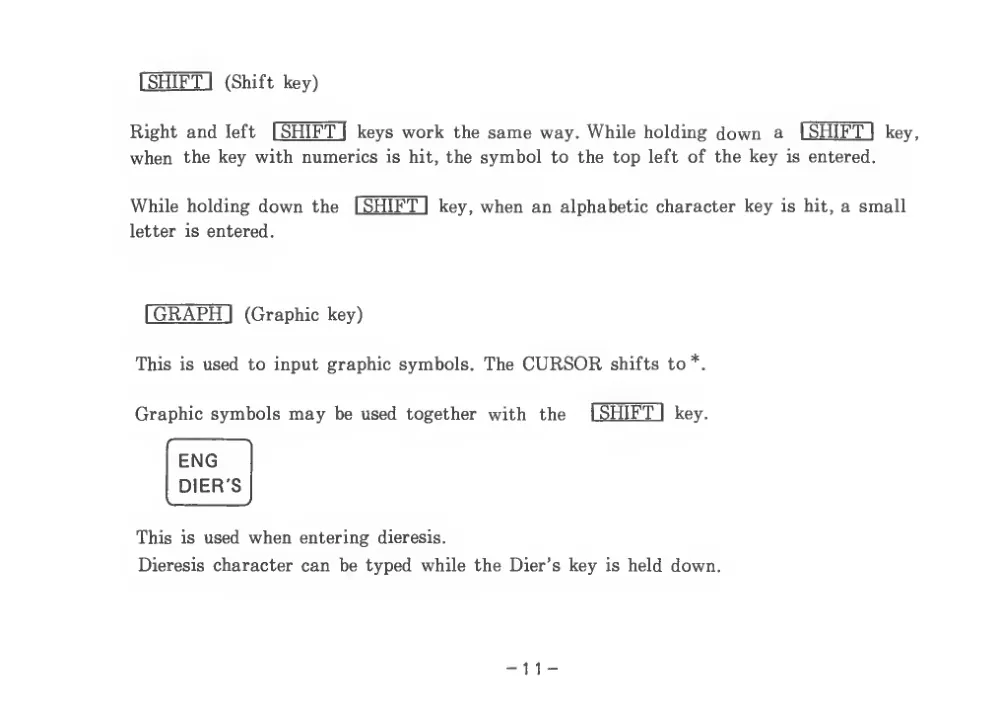
I SHIFT
I
(Shift key)
Right and left
I SHIFT
I
keys work the same way. While holding down
a
I SHIFT
I
key,
when
the key with numerics
is hit, the symbol to the top left of the key
is entered.
While holding down the
I SHIFT
I
key, when an alphabetic character key
is hit, a small
letter
is entered.
I GRAPH~I
(Graphic key)
This
is used to input graphic symbols. The CURSOR shifts to*.
Graphic symbols may be used together with
the
I SHIFT
I
key.
ENG
DIER’S
This
is used when entering dieresis.
Dieresis character can be typed while the Dier’s key
is held down.
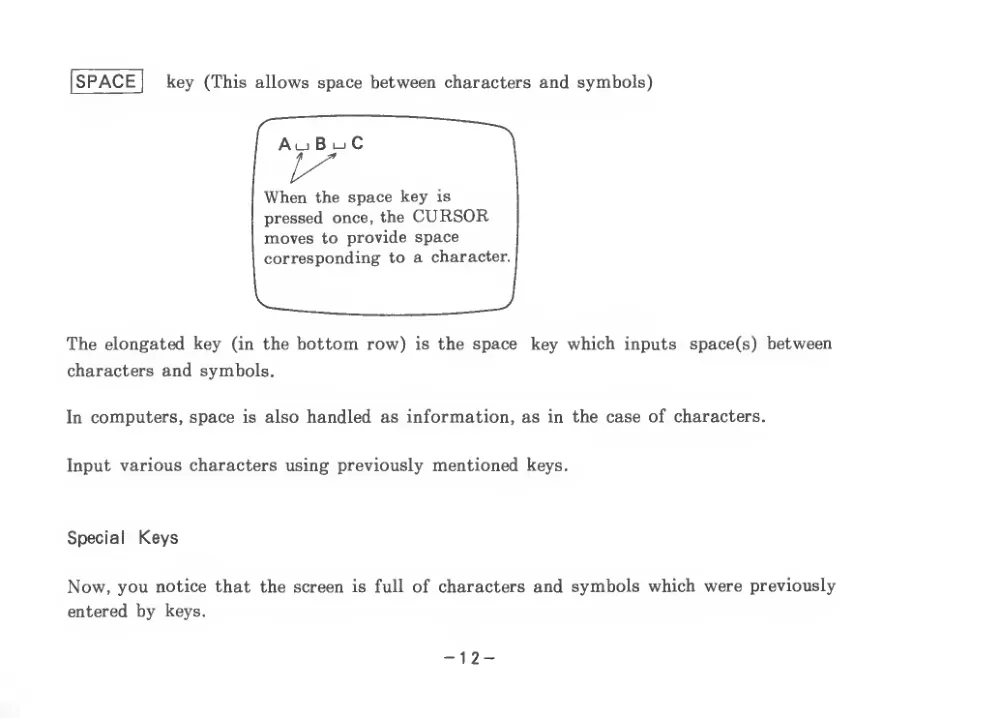
SPACE
key (This allows space between characters and symbols)
A i_j B
1—1 C
When the space key
is
pressed once, the CURSOR
moves to provide space
corresponding to a character.
The elongated key
(in the bottom row)
is the space
key which inputs
space(s) between
characters and symbols.
In computers, space
is also handled as information, as in the case of characters.
Input various characters using previously mentioned keys.
Special
Keys
Now, you notice that the screen
is
full of characters and symbols which were previously
entered by
keys.
It’s no use leaving unwanted characters and symbols on the screen.
We can clear the whole screen, using the following key.
I HOME/CLR~l
(Home/Clear)
When this key
is pressed, characters on the screen are erased and the CURSOR returns to
the upper
left
“home”
position. Use this key whenever you want to clear the screen.
When
I HOME/CLR
I key
is pressed while holding down the
I SHIFT
I
key, the screen will
remain uncleared but the CURSOR returns to the home position.
I CR
I
(Carriage Return) or (Return)
In computers, even
if characters are on the screen these are not stored inside the computer
until the
I CR
I key
is pressed.
Input any character and press the
I CR
I
key. You notice a Syntax Error displayed on the
screen.
Instructions for computers need to be written a certain way.
This
is called the computer Syntax.
If this Syntax
is wrong,
errors will occur.
For errors, refer to the error message table in the appendix.
I INS/DELTI
(Insert/Delete)
The
I INS/DEL
I
key
is used when deleting or adding characters one by one.
INS
(Insert) refers to the addition of characters.
del
(Delete) refers to the deletion of characters.
When @
[B]
is typed by mistake instead of
0
[b]
0
the CURSOR will move backward by one character
if the
I INS/DFTTI
key
is pressed, and then character E
is erased. Here, press D and a correction has been made
to A B C
D.
Press
I INS/DEL
I
key, and the CURSOR
moves
to the left by one space.
Press key D.
D enters.
- 14 -
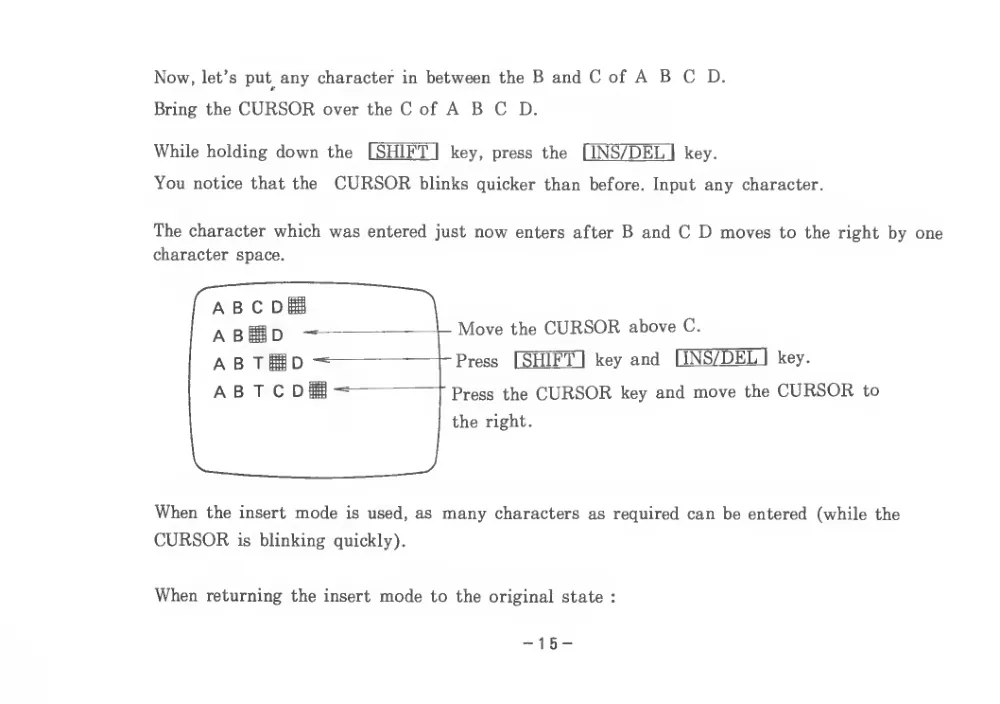
Now, let’s put any character in between the B and C of A B C
D.
Bring the CURSOR over the C of A B C
D.
While holding down the
I SHIFT
I
key, press the
I INS/DElTI
key.
You notice that the
CURSOR blinks quicker than before. Input any character.
The character which was entered just now enters after B and C D moves to the right by one
character space.
When the insert mode
is used, as many characters as required can be entered
(while the
CURSOR
is blinking quickly).
When returning the insert mode to the original state
:
- 15 -
1 .
Press
I CR
I
key.
2.
Press a CURSOR control key, (one of the light grey keys with arrows).
3.
Press
I SHIFT
I
+
I INS/DET,
I
key.
By pressing either one of the above
keys, the normal condition
is restored. When the program
is corrected, the MEMORY inside cannot be rewritten unless the
I CR
I key
is pressed.
Confirm this by actually operating the keys.
FUNC
(Function)
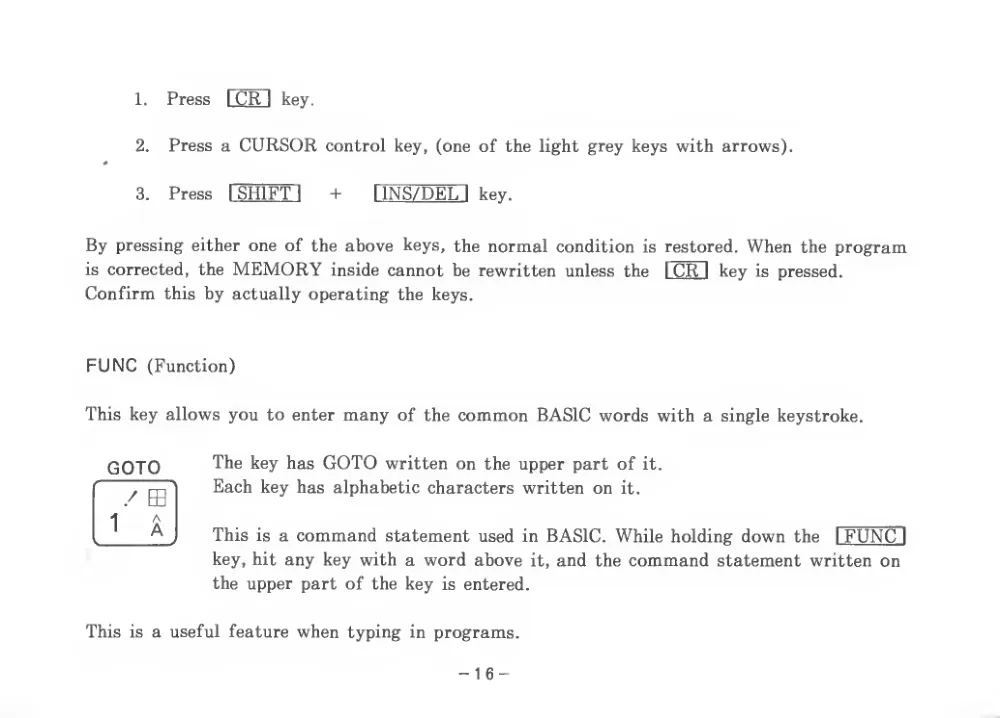
This key allows you to enter many of the common BASIC words with a single keystroke.
The key has GOTO written on the upper part of
it.
Each key has alphabetic characters written on
it.
This
is a command statement used in BASIC. While holding down the
I FUNC
I
key, hit any key with a word above
it, and the command statement written on
the upper part of the key
is entered.
This
is a useful feature when typing in programs.
GOTO
./
ffl
1
X
- 16 -
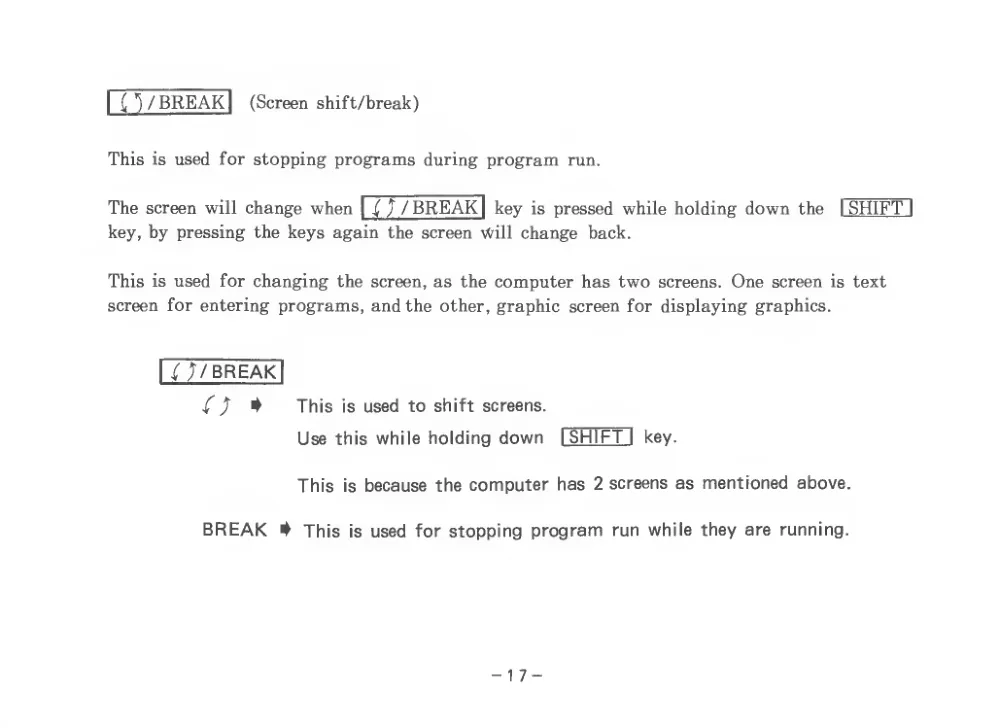
I
( V BREAK I
(Screen shift/break)
This
is used for stopping programs during program run.
The screen will change when IQ/ BREAK
| key
is pressed while holding down the
I SHIFT
I
key, by pressing the keys again the screen ^ill change
back.
This
is used for changing the screen, as the computer has two screens. One screen
is text
screen for entering programs, and the other, graphic screen for displaying graphics.
i: J/break|
{ )
^
This
is used to shift screens.
Use this while holding down
I SHIFT
I
key.
This
is because the computer has 2 screens as mentioned above.
BREAK
#
This
is used for stopping program run while they are running.
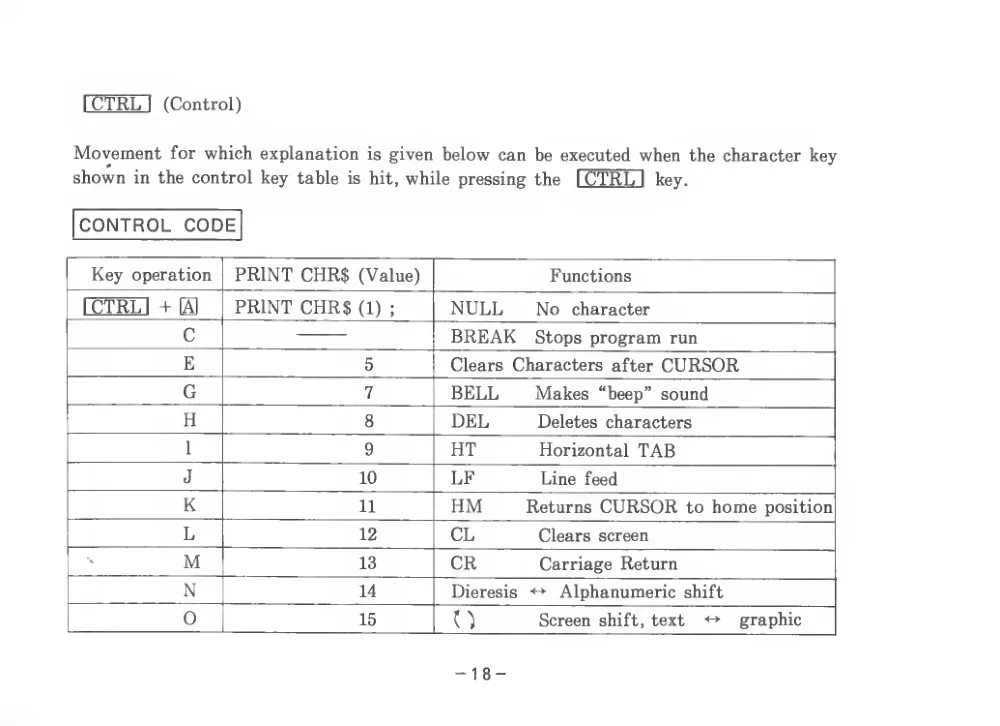
I CTRL
I
(Control)
Movement for which explanation
is given below can be executed when the character key
shown in the control key table
is hit, while pressing the
I CTRL
I
key.
CONTROL CODE
Key operation
PRINT CHR$ (Value)
Functions
ICTRLI +
[A]
PRINT CHR$ (1)
:
NULL
No
character
C
BREAK
Stops program run
E
5
Clears Characters after CURSOR
G
7
BELL
Makes “beep” sound
H
8
DEL
Deletes characters
1
9
HT
Horizontal TAB
J
10
LF
Line feed
K
11
HM
Returns CURSOR to home position
L
12
CL
Clears screen
M
13
CR
Carriage Return
N
14
Dieresis
<->
Alphanumeric shift
0
15
Screen shift, text
graphic
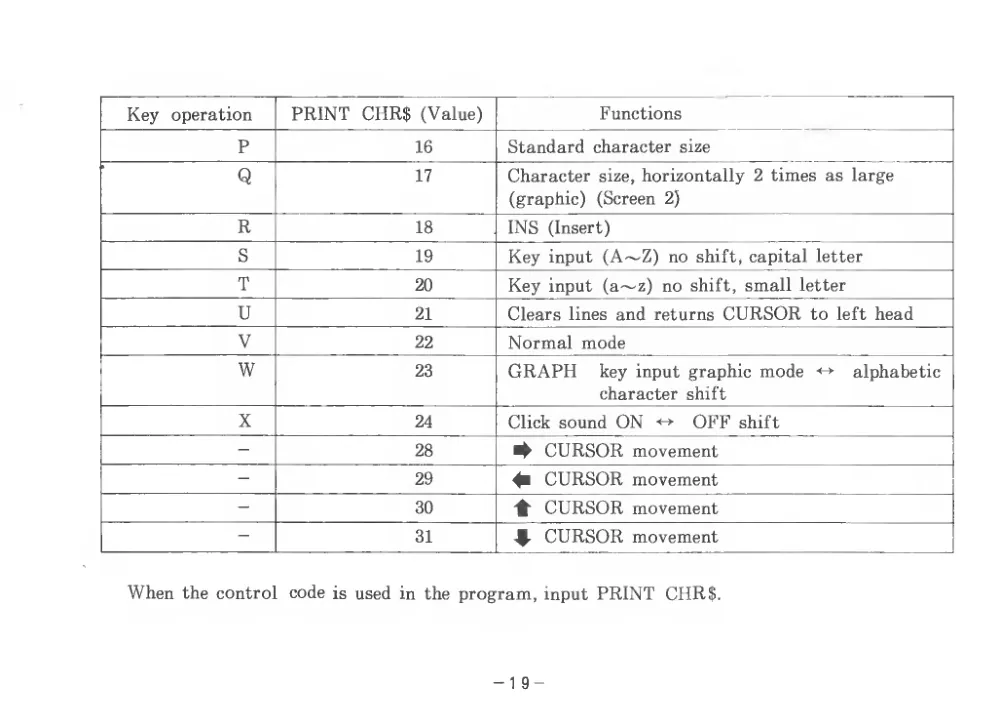
Key
operation
PRINT CHR$ (Value)
Functions
P
16
Standard character size
Q
17
Character
size, horizontally 2 times as large
(graphic)
(Screen
2)
R
18
INS
(Insert)
S
19
Key input (A~Z) no shift, capital
letter
T
20
Key input (a~z) no shift, small letter
U
21
Clears lines and returns CURSOR to
left head
V
22
Normal mode
W
23
GRAPH
key input graphic mode
<->
alphabetic
character shift
X
24
Click sound ON
OFF shift
-
28
CURSOR movement
-
29
^ CURSOR movement
-
30
CURSOR movement
-
31
CURSOR movement
When the control
code is used in the program, input PRINT CHR$.
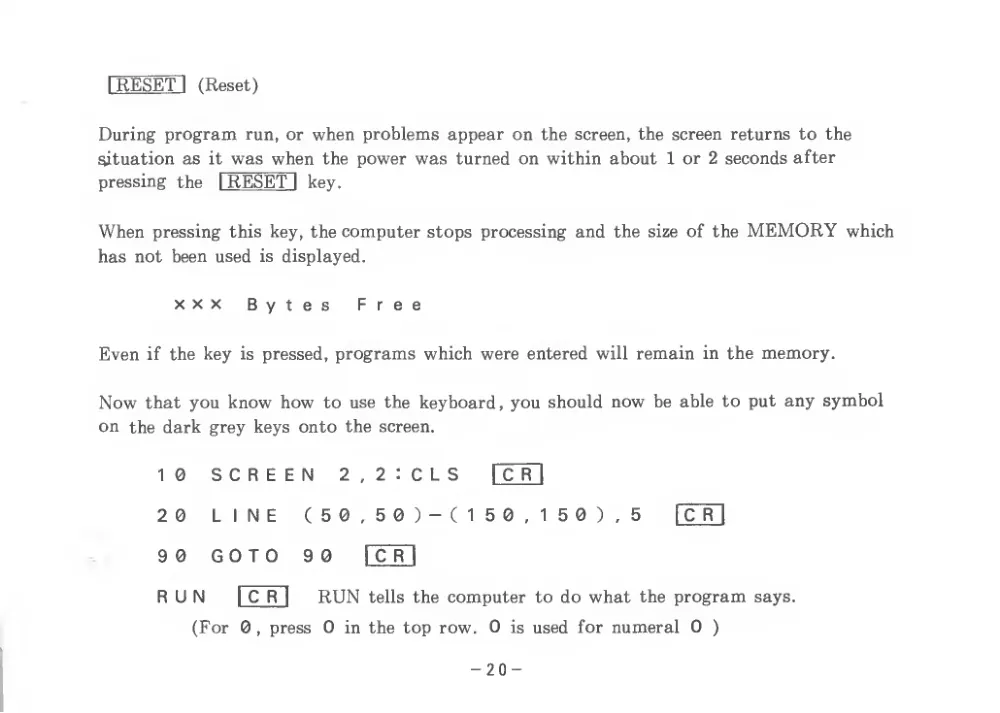
I RESET
I
(Reset)
During program run, or when problems appear on the screen, the screen returns to the
situation as
it was when the power was turned on within about
1 or 2 seconds after
pressing the
I RESET
I
key.
When pressing this key, the computer stops processing and the size of the MEMORY which
has not been used
is displayed.
XXX
Bytes
Free
Even
if the key
is pressed, programs which were entered will remain in the memory.
Now that you know how to use the keyboard, you should now be able to put any symbol
on
the dark grey keys onto the screen.
10
SCREEN
2,2:CLS
| C R
|
20
LINE
(50,50)-(150,150),5
|C R
I
90
GOTO
90
1 C R
RUN
I C R
I
RUN
tells the computer to do what the program says.
(For 0, press 0
in the top row. 0
is used for numeral 0
)
- 20 -
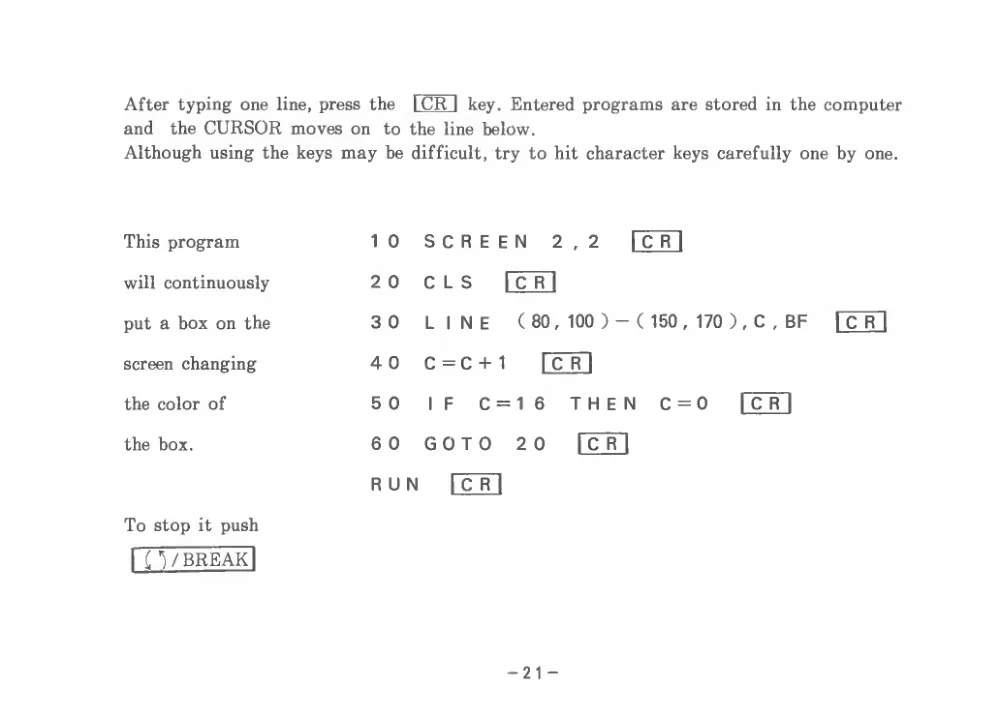
After typing one
line, press the
I CR
I
key. Entered programs are stored in the computer
and
the CURSOR moves on
to the
line below.
Although using the keys may be difficult, try to hit character keys carefully one by one.
This program
1 0
SCREEN
2,2
|CR|
will continuously
2 0
C L S
1 C R
1
put a box on the
3 0
LINE
( 80, 100
) -
( 150, 170
)
, C
, BF
screen changing
4 0
c = c +
i
rcTl
the color of
5 0
IF
C=1 6
THEN
C=0
IXE]
the box.
6 0
GOTO
2 0
IC R
RUN
To stop
it push
1
( VbreakI
-21
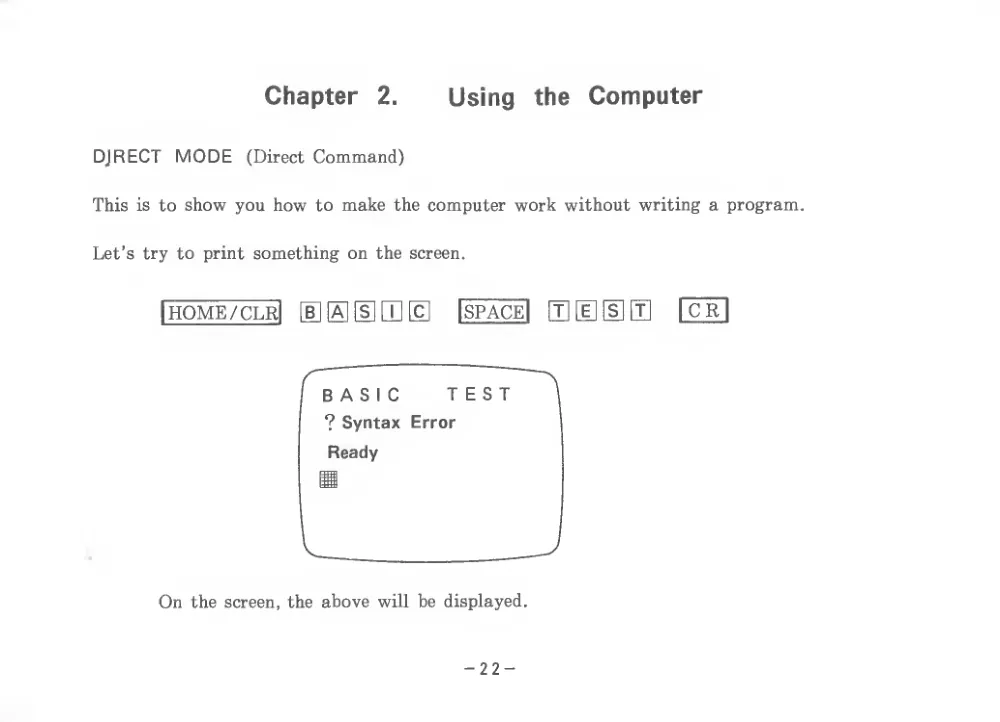
Chapter
2.
Using
the
Computer
DJRECT MODE
(Direct Command)
This
is to show you how to make the computer work without writing a program.
Let’s try to print something on the screen.
Ihome/clrI IIHUEDE
Ispace I
[I][l][s][I]
|cr
On the screen, the above will be displayed.
- 22 -
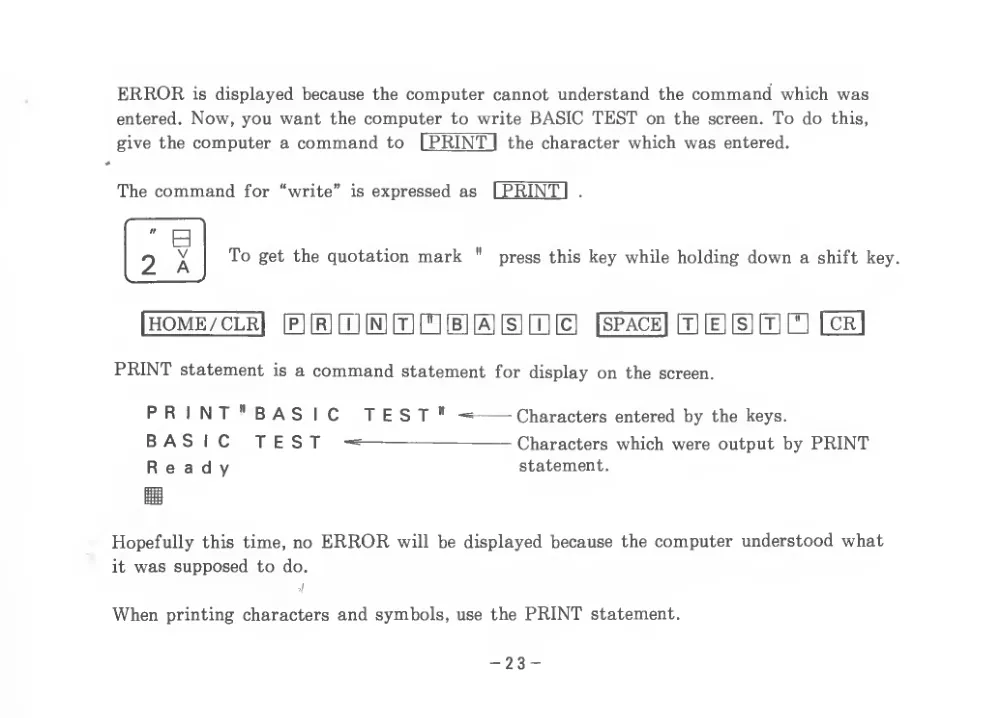
ERROR
is displayed because the computer cannot understand the command which was
entered. Now, you want the computer to write BASIC TEST on the screen. To do this,
give the computer a command to
I PRINT
I
the character which was entered.
The command for
“write”
is expressed as
I PRINT
I
.
To get the quotation mark
"
press this key while holding down a shift key.
iHOME/CLRl
[P] [R] dJ [N] E
0 ® Q] 0
|SPACE| PH [eI ^ HI H fc^
PRINT statement
is a command statement for display on the screen.
PRINT"BASIC
test"
-=
Characters entered by the keys.
BASIC
TEST
Characters which were output by PRINT
Ready
statement.
Hopefully this time, no ERROR will be displayed because the computer understood what
it was supposed to do.
J
When printing characters and symbols, use the PRINT statement.
- 23 -
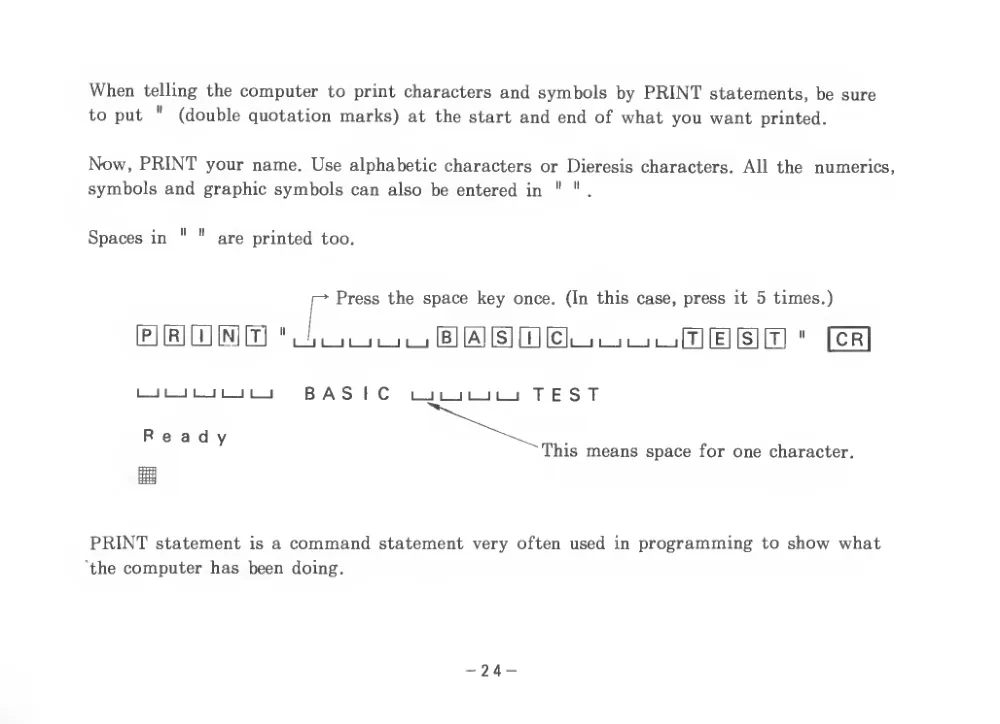
When telling the computer to print characters and symbols by PRINT statements, he sure
to put
"
(double quotation marks) at the start and end of what you want printed.
Now, PRINT your name. Use alphabetic characters or Dieresis characters. All the
numerics,
symbols and graphic symbols can also be entered in
"
"
.
Spaces in
"
"
are printed too.
Press the space key once.
(In this case, press
it 5 times.)
[E0LDE1E
'' LijL_IL_ll_JL_J lI]0[I][I][3L_IL_.L_IL_l[T][l][S][t]
"
I
II
II
I
I
I
I
I
BASIC
I
II
II
II
I TEST
Ready
This means space for one character.
PRINT statement
is a command statement very often used in programming to show what
the computer has been doing.
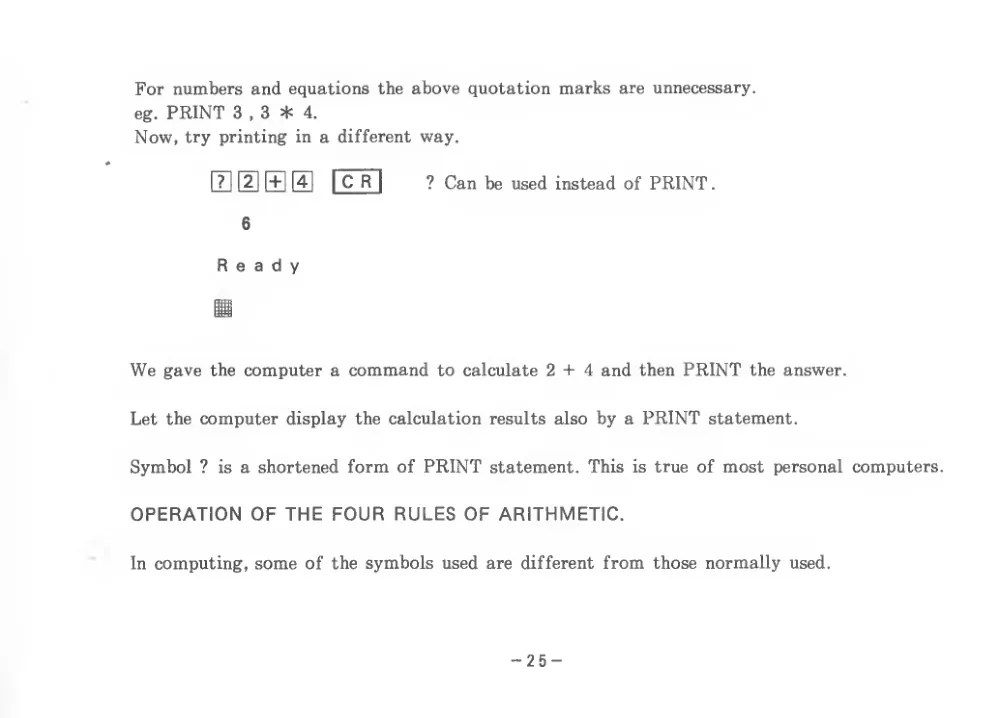
For numbers and equations the above quotation marks are unnecessary,
eg. PRINT 3,3*4.
Now, try printing in a different way.
E [U S S
I C R
I
? Can be used instead of PRINT
.
6
Ready
We gave the computer a command to calculate 2+4 and then PRINT the answer.
Let the computer display the calculation results also by a PRINT statement.
Symbol ?
is a shortened form of PRINT statement. This
is true of most personal computers.
OPERATION OF THE FOUR RULES OF ARITHMETIC.
In computing, some of the symbols used are different from those normally used.
- 25 -
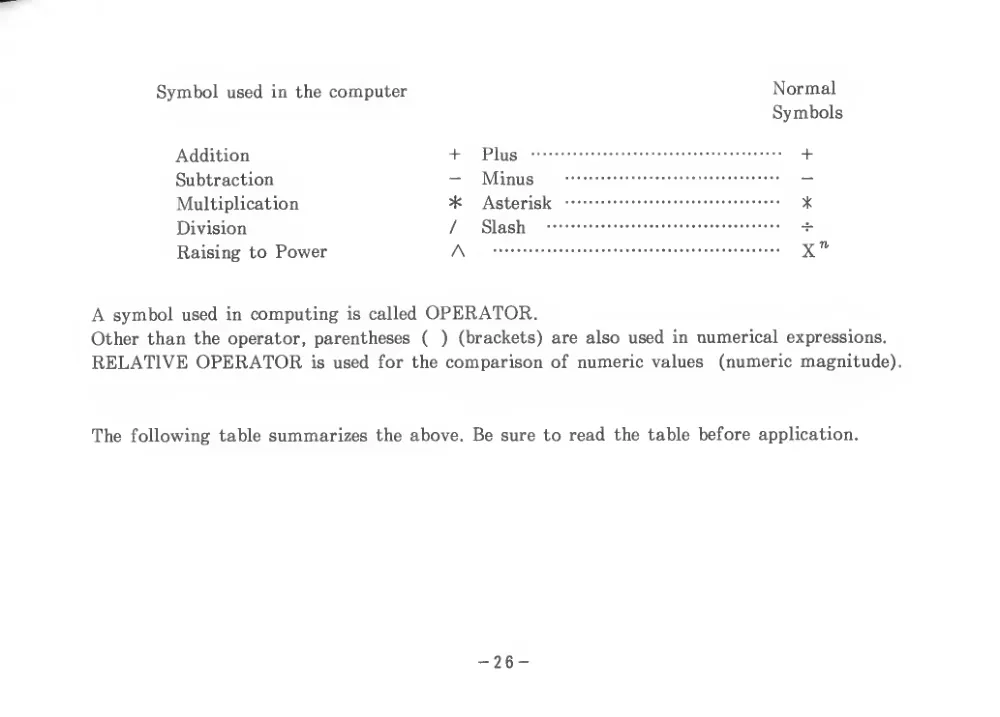
Symbol used in the computer
Normal
Symbols
Addition
+
Plus
+
Subtraction
—
Minus
—
Multiplication
=1=
Asterisk
>1
Division
/
Slash
Raising to Power
A
X"
A symbol used in computing
is called OPERATOR.
Other than the operator, parentheses
(
)
(brackets) are also used in numerical expressions.
RELATIVE OPERATOR
is used for the comparison of numeric values
(numeric magnitude).
The following table summarizes the above. Be sure to read the table before application.
- 26 -
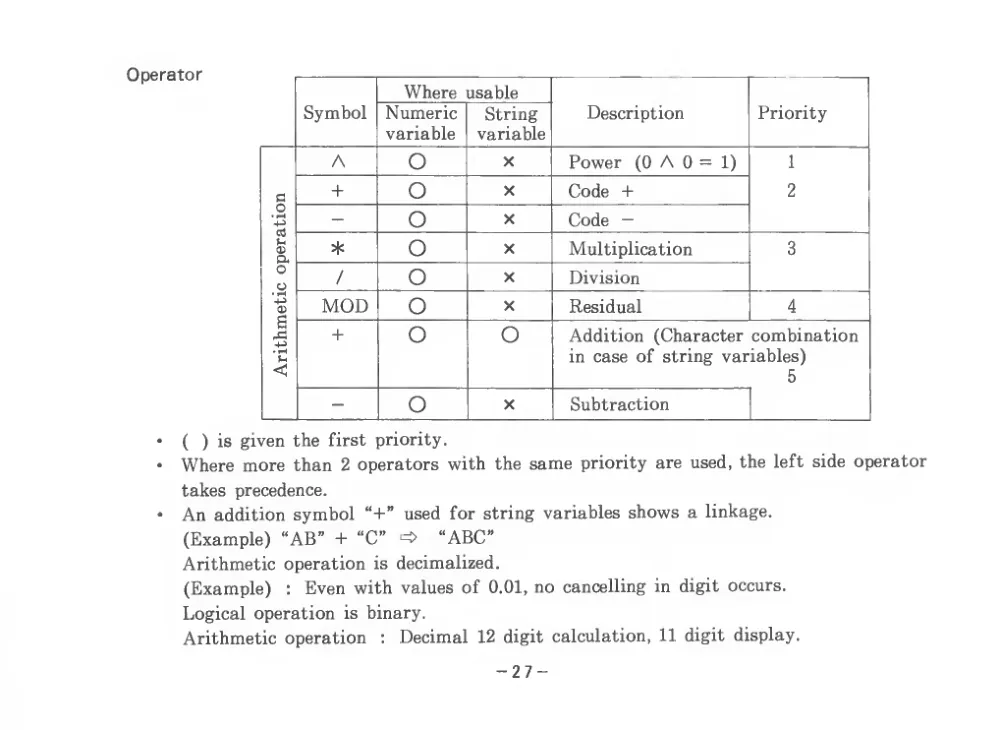
Operator
Where usable
Symbol
Numeric
variable
String
variable
Description
Priority
A
O
X
Power
(0 A 0 =
1)
1
C3
+
O
X
Code +
2
O
cOu
0)
-
O
X
Code —
*
o
X
Multiplication
3
o
o
/
o
X
Division
CD
a
iM<
MOD
o
X
Residual
4
+
o
o
Addition (Character combination
in case of string variables)
5
-
o
X
Subtraction
•
(
)
is given the first priority.
•
Where more than
2 operators with the same priority are used, the left side operator
takes precedence.
•
An addition symbol “+” used for string variables shows a linkage.
(Example) “AB” + “C” ^
“ABC”
Arithmetic operation
is decimalized.
(Example)
:
Even with values of 0.01, no cancelling in digit occurs.
Logical operation
is binary.
Arithmetic operation
:
Decimal 12 digit calculation, 11 digit display.
- 27 -
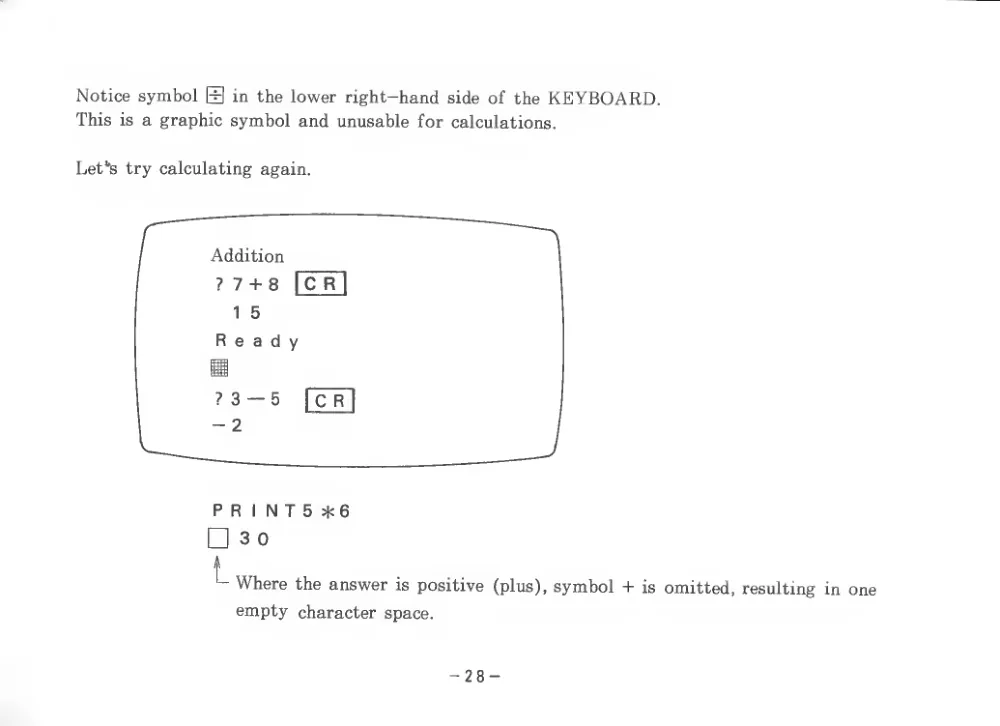
Notice symbol O in the lower right-hand side of the KEYBOARD.
This
is a graphic symbol and unusable for calculations.
Kef's try calculating again.
PR
I N T 5 *6
30
t
Where the answer
is positive
(plus), symbol +
is omitted, resulting in one
empty character space.
- 28 -
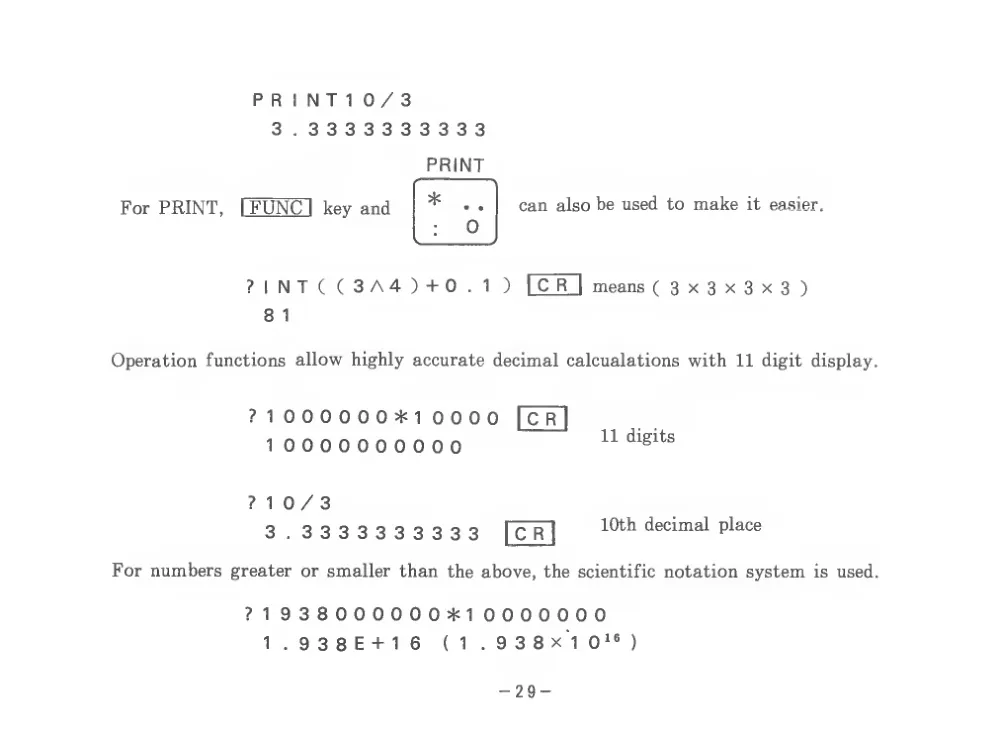
For PRINT,
P R
I N T
1 0 / 3
3.3333333333
PRINT
I FUNC
I key and
can also be used to make
it easier.
?INT((3A4)+0.1
)
I C R
I means (3x3x3x3)
8
1
Operation functions allow highly accurate decimal calcualations with 11 digit display.
7
1 0 0 0 0 0 0*1 0000
I C R
I
1 0000000000
11 digits
7 10/3
3.3333333333
10th decimal place
For numbers greater or smaller than the above, the scientific notation system
is used.
7
1 938000000*1 0000000
1.938E + 16
(1. 938X
1 0‘M
- 29 -
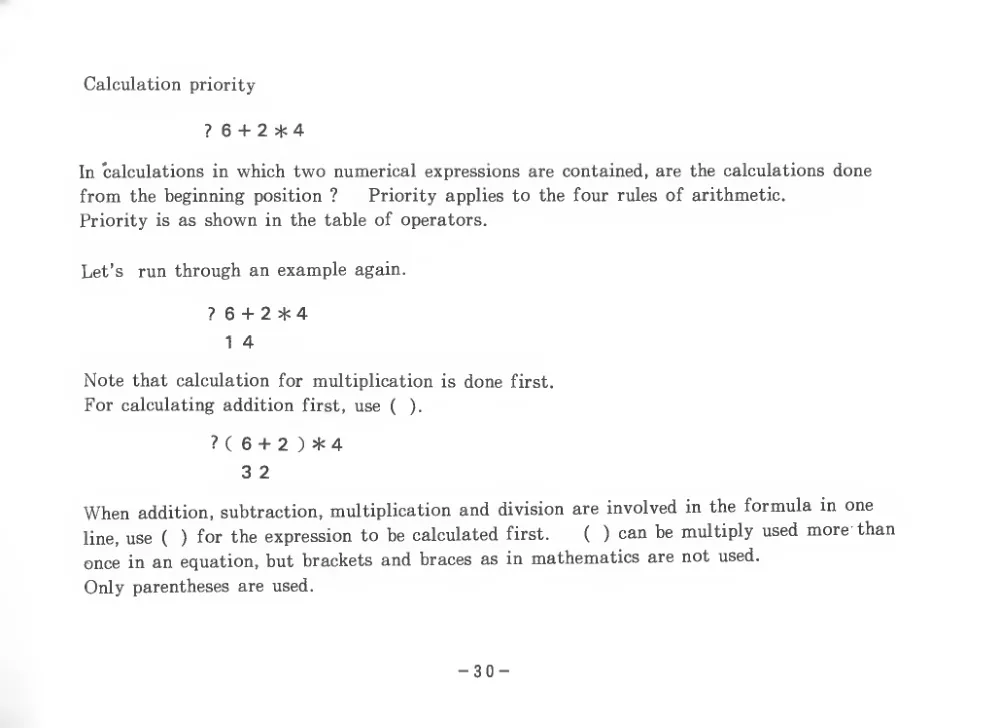
Calculation priority
? 6 + 2*4
In calculations in which two numerical expressions are contained, are the calculations done
from the beginning position
?
Priority applies to the four rules of arithmetic.
Priority
is as shown in the table of operators.
Let’s
run through an example again.
? 6 + 2*4
1 4
Note that calculation for multiplication
is done
first.
For calculating addition
first, use
(
).
?
( 6 + 2
) *4
3 2
When addition, subtraction, multiplication and division are involved in the formula in one
line, use
(
)
for the expression to be calculated
first.
(
) can be multiply used more than
once
in an equation, but brackets and braces as in mathematics are not used.
Only parentheses are used.
- 30 -
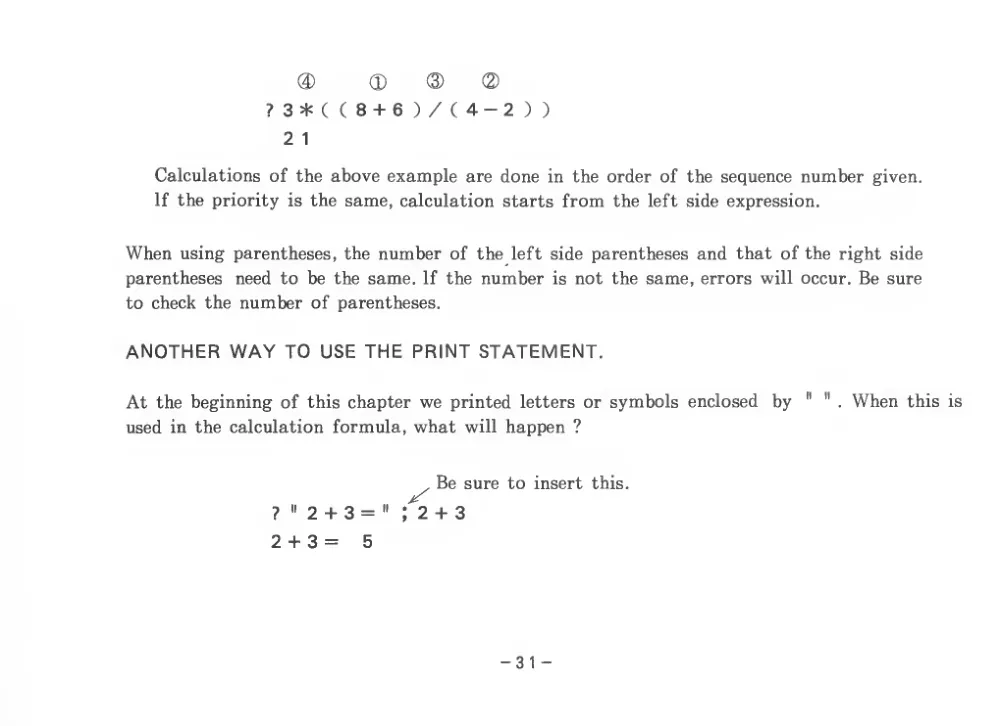
®
®
(3)
(2)
? 3 *(( 8 + 6 )/( 4 - 2 ))
2
1
Calculations of the above example are done in the order of the sequence number given.
If the priority
is the same, calculation starts from the left side expression.
When using parentheses, the number of the
left side parentheses and that of the right side
parentheses
need to be the same. If the number
is not the same, errors will occur. Be sure
to check the number of parentheses.
ANOTHER WAY TO USE THE PRINT STATEMENT.
At the beginning of this chapter we printed
letters or symbols enclosed
by
"
"
. When this
is
used in the calculation formula, what will happen ?
?
" 2 + 3 =
2 + 3 =
5
Be sure to insert
this.
; 2 + 3
-31 -
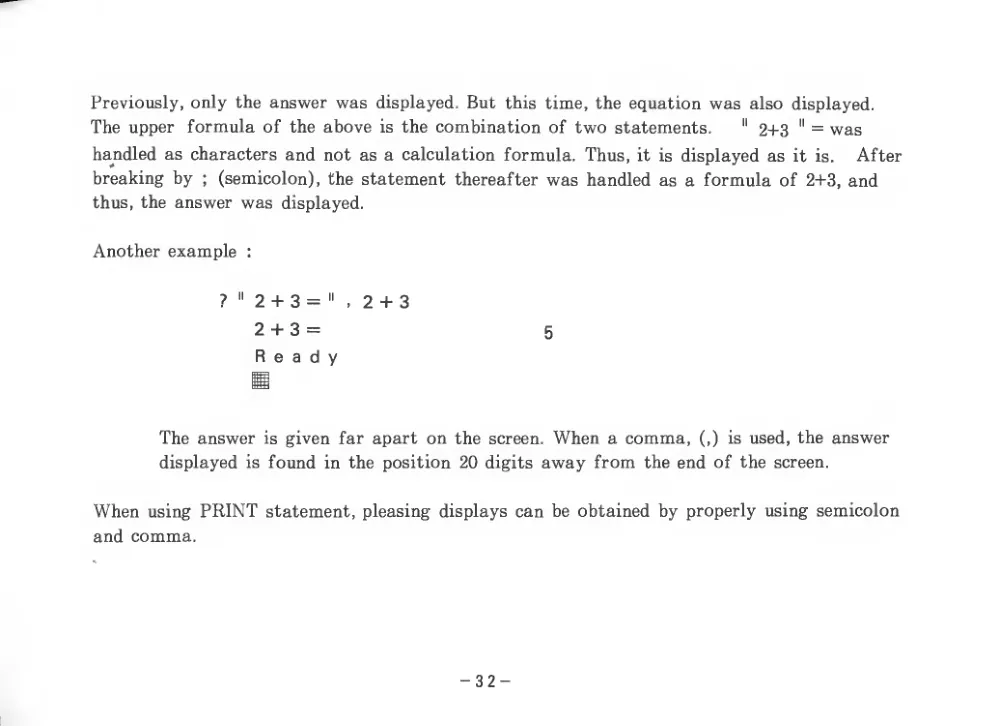
Previously, only the answer was displayed. But this time, the equation was also displayed.
The upper
formula of the above
is the combination of two statements.
" 2+3
" = was
handled as characters and not as a calculation formula. Thus, it
is displayed as
it
is.
After
breaking by
;
(semicolon), the statement thereafter was handled as a formula of 2+3, and
thus, the answer was displayed.
Another example
:
?
"
2 + 3 =
"
,
2 + 3
2 + 3=
5
Ready
The answer
is given far apart on the screen. When a comma,
(,)
is used, the answer
displayed
is found in the position 20 digits away from the end of the screen.
When using PRINT statement, pleasing displays can be obtained by properly using semicolon
and comma.
- 32 -
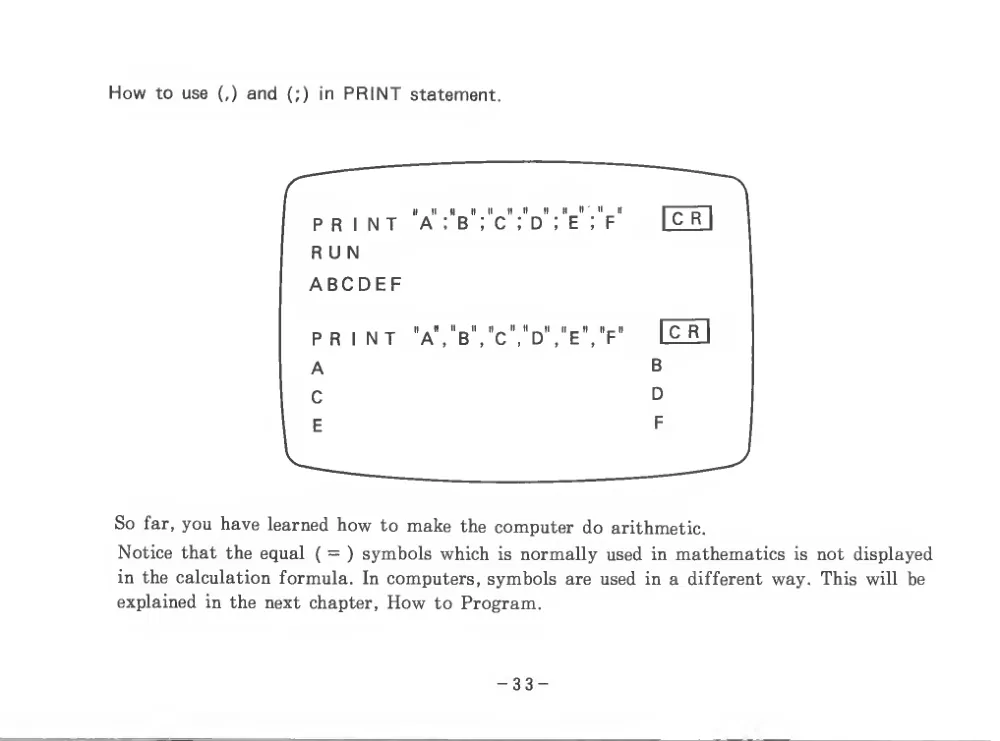
How to use
(,) and
(;)
in PRINT statement.
So far, you have learned how to make the computer do arithmetic.
Notice that the equal
( =
) symbols which
is normally used
in mathematics
is not displayed
in the calculation formula.
In computers, symbols are used
in a different way. This will be
explained in the next chapter. How to Program.
-33
Chapter
3.
How
to
Program
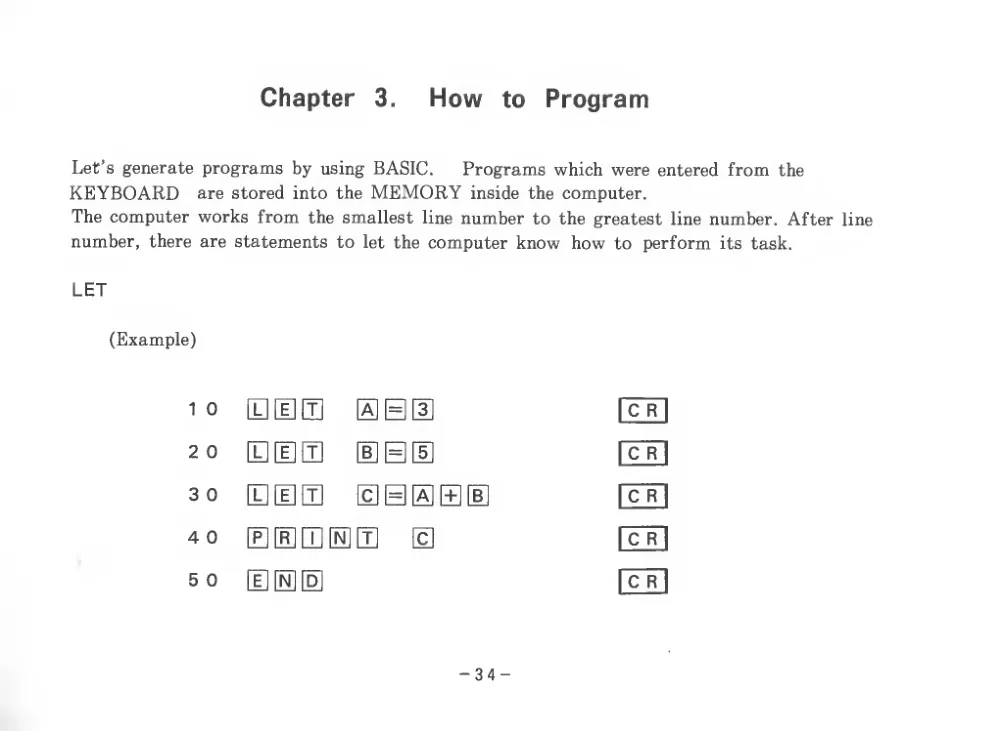
Let’s generate programs by using BASIC.
Programs which were entered from the
KEYBOARD
are stored into the MEMORY inside the computer.
The computer works from the smallest
line number to the greatest line number. After line
number, there are statements to let the computer know how to
perform
its task.
LET
(Example)
1 0
[cTI
2 0 BBS
[UB®
|CR|
3 0
B[e]E EHHS®
|CR|
4 0 BBBBB
B
[m
5 0 BBB
|cr|
-34
EE]®
[c^
8
Ready
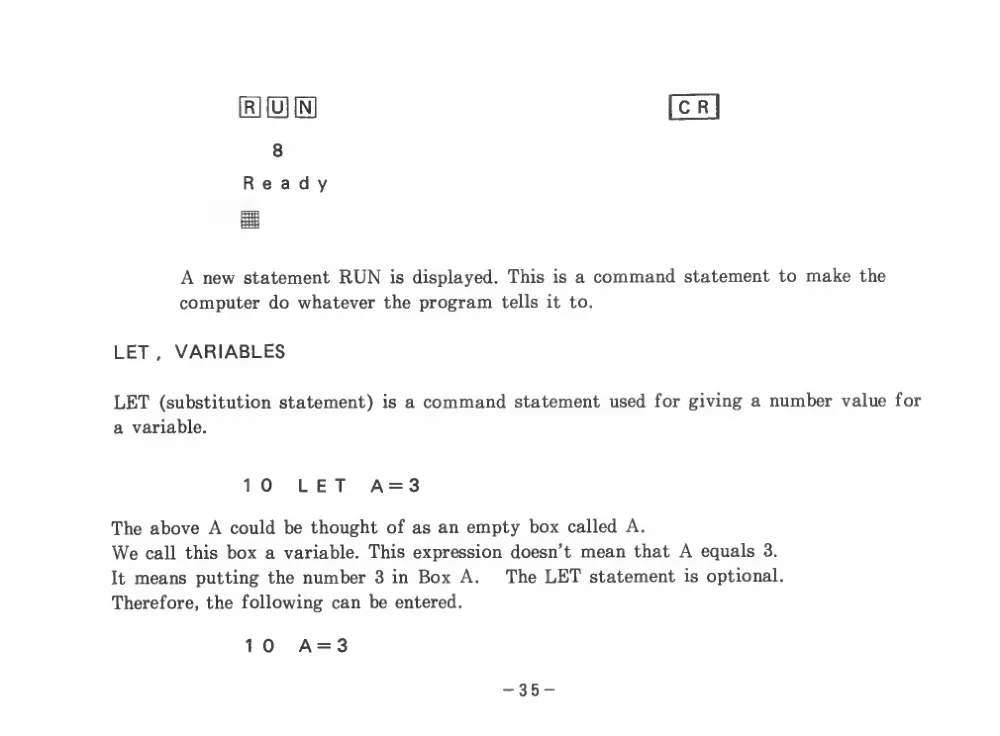
A new statement RUN
is displayed. This
is a command statement to make the
computer do whatever the program
tells
it
to.
LET
, VARIABLES
LET (substitution statement)
is a command statement used for giving a number value for
a variable.
10
LET
A=3
The above A could be thought of as an empty box called A.
We call this box a variable. This expression doesn’t mean that A equals
3.
It means putting the number 3 in Box A.
The LET statement
is optional.
Therefore, the following can be entered.
1 0
A = 3
- 35 -
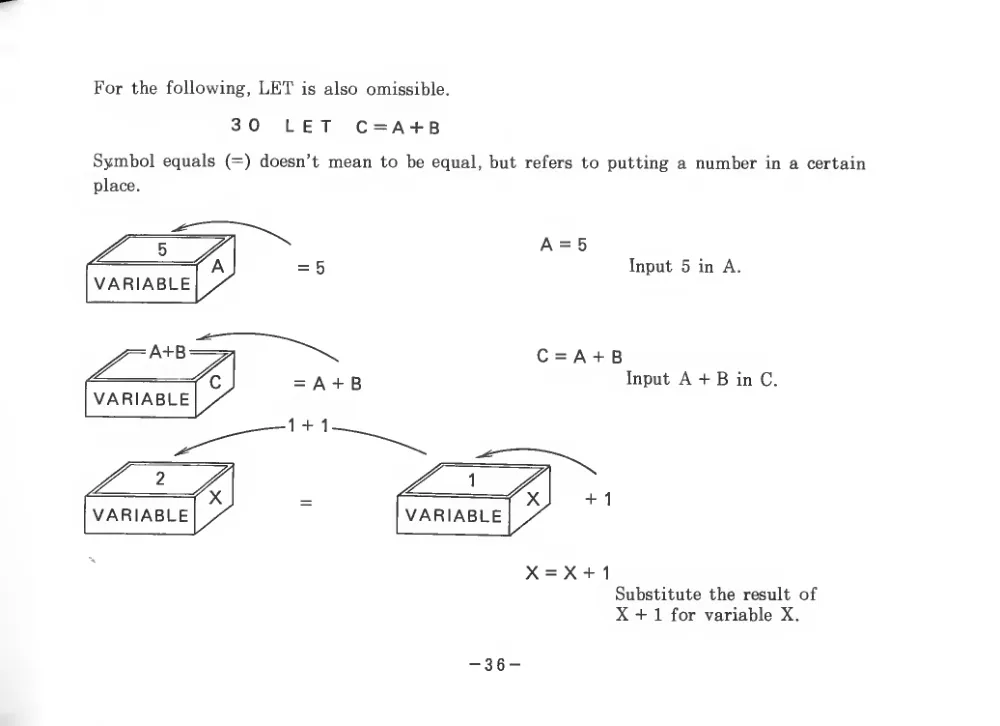
For the following, LET
is also omissible.
30
LET
C=A+B
Symbol equals
(=) doesn’t mean to be equal, but refers to putting a number in a certain
place.
=5
VARIABLE /
A = 5
Input 5 in A.
= A+B
VARIABLE
C = A + B
^ A + B
-1 +
1
-
Input A + B in C.
rx
VARIABLE
VARIABLE
+
1
X = X +
1
- 36 -
Substitute the result of
X + 1 for variable X.
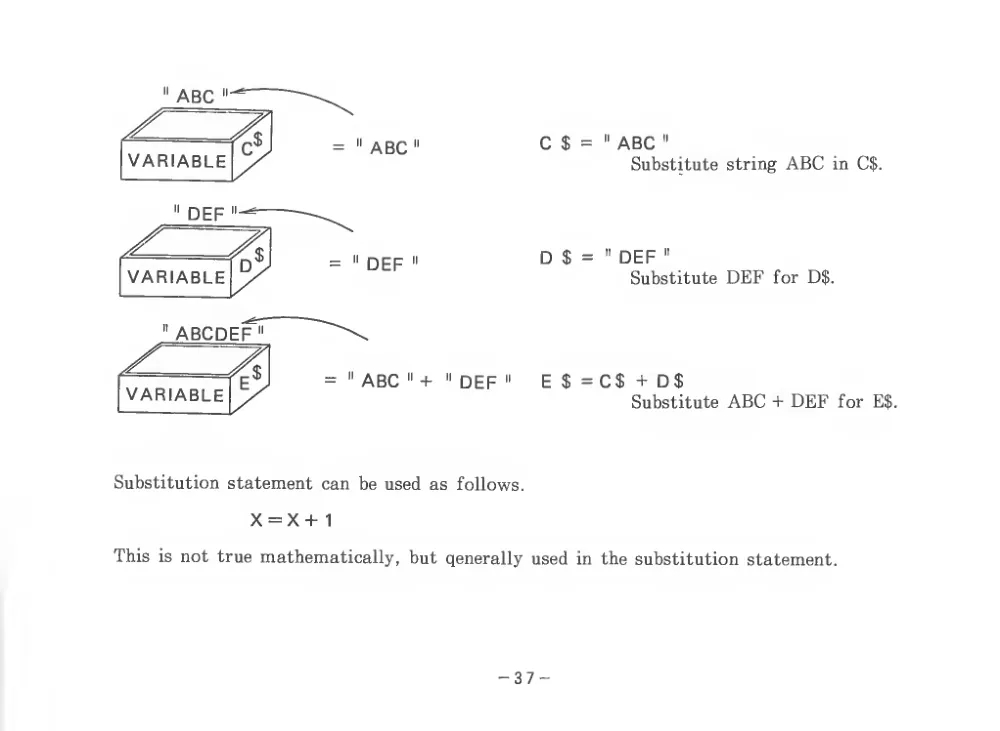
c $ =
VARIABLE
=
" ABC
"
ABC
"
Substitute string ABC in C$.
D $ =
" DEF
"
Substitute DEF for D$.
E$=C$+D$
Substitute ABC + DEF for E$.
Substitution statement can be used as follows.
X = X+
1
This
is not true mathematically, but qenerally used in the substitution statement.
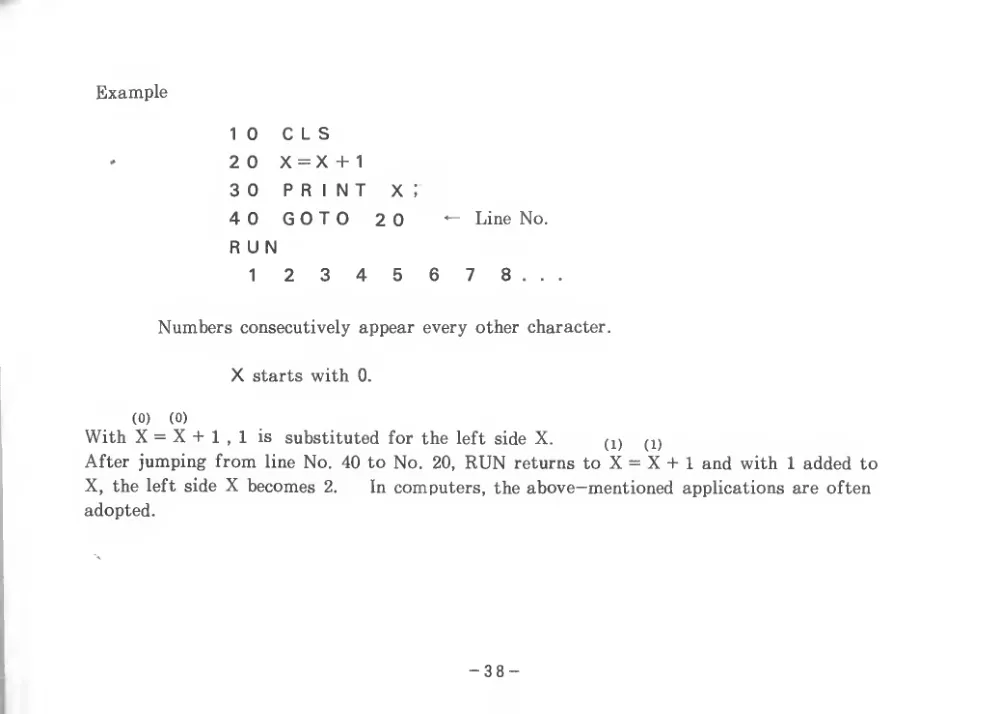
Example
1 0
2 0
3 0
4 0
RUN
1
C L S
X = X +
1
PRINT
GOTO
2
3
4
X
2 0
5
Line No.
6
7
8
.
.
.
Numbers consecutively appear every other character.
X starts with
0.
(0)
(0)
With X = X + 1
,
1
is
substituted for the
left side X.
(i)
After jumping from line No. 40 to No.
20, RUN returns to X = X +
1 and with
1 added to
X, the left side X becomes
2.
In computers, the above-mentioned applications are often
adopted.
- 38 -
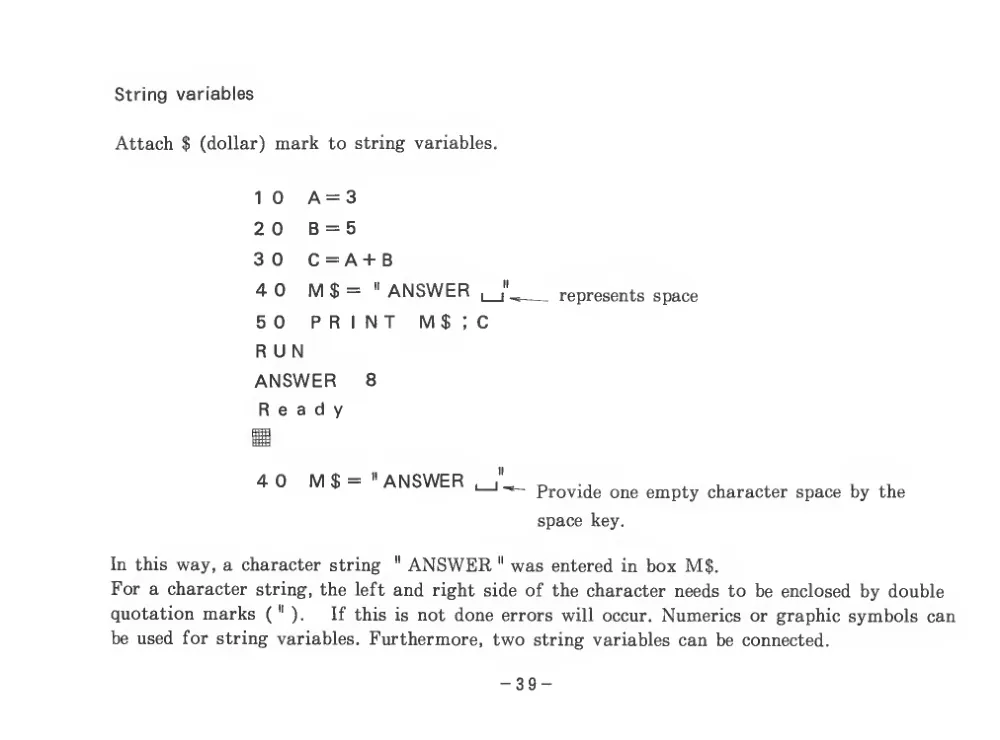
String variables
Attach $
(dollar) mark to string variables.
1 0
A = 3
2 0
B = 5
3 0
C = A+ B
4 0
M $ =
" ANSWER
50
PRINT
M$:C
RUN
ANSWER
8
Ready
4 0
M$ = "ANSWER
represents space
Provide one empty character space by the
space key.
In this way, a character string
" ANSWER
" was entered in box M$.
For a character string, the left and right side of the character needs to be enclosed by double
quotation marks
(
"
).
If this
is not done errors will occur. Numerics or graphic symbols can
be used for string variables. Furthermore, two string variables can be connected.
- 39 -
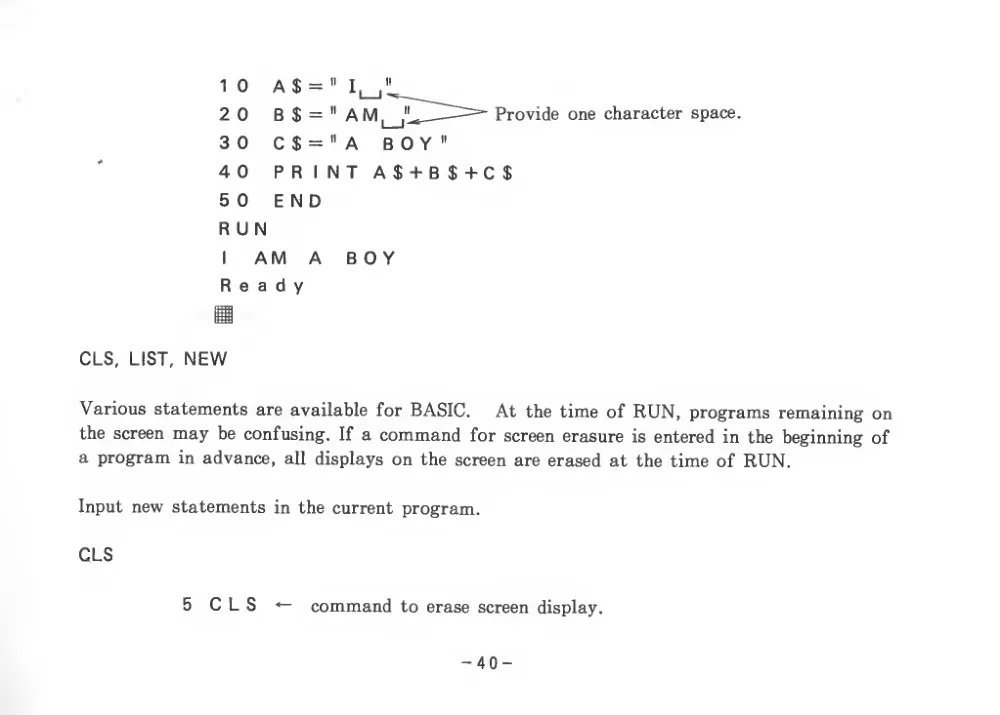
Provide one character space.
1
2
3
4
5
R
I
0
A $
0
B $
0
C $
0
PR
0
E N
U N
AM
A
BOY
Ready
jHHj
CIS,
LIST, NEW
Various statements are available for BASIC.
At the time of RUN, programs remaining on
the screen may be confusing.
If a command for screen erasure
is entered in the beginning of
a program in advance,
all displays on the screen are erased at the time of RUN.
Input new statements in the current program.
CLS
5 CLS
•—
command to erase screen display.
- 40 -
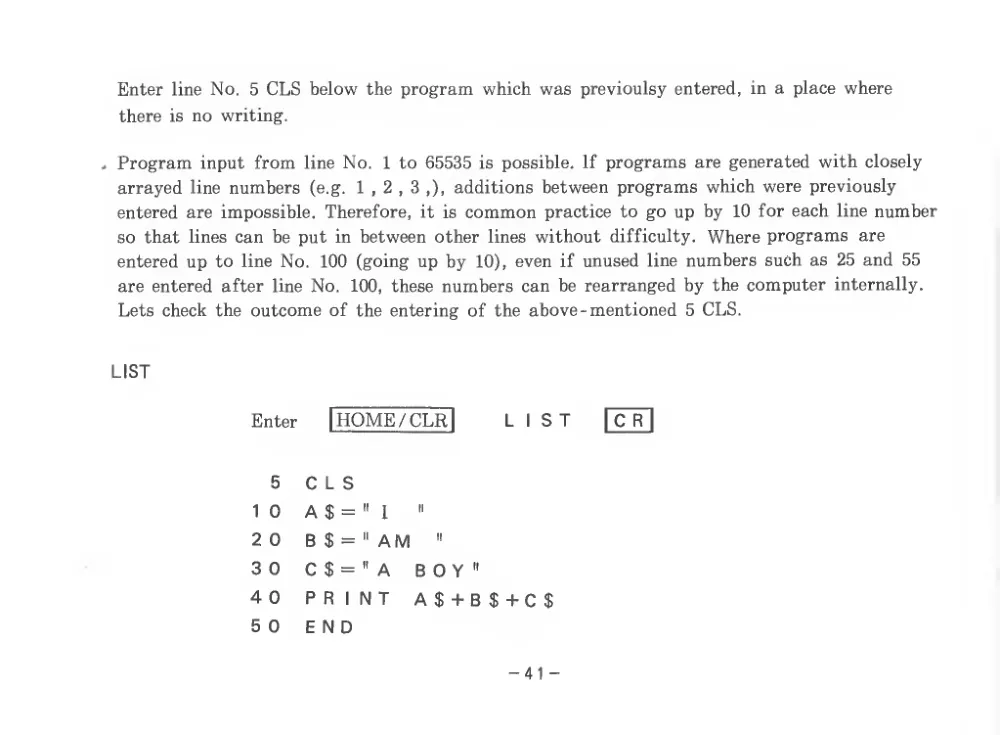
Enter line No.
5 CLS below the program which was previoulsy entered,
in a place where
there
is no writing.
. Program input from line No.
1 to 65535
is possible.
If programs are generated with closely
arrayed line numbers
(e.g. 1,2,3,), additions between programs which were previously
entered are impossible. Therefore,
it
is common practice to go up by 10 for each line number
so that lines can be put in between other
lines without difficulty. Where programs
are
entered up to line No.
100 (going up by
10), even
if unused line numbers such as 25 and 55
are entered after
line No.
100, these numbers can be rearranged by the computer internally.
Lets check the outcome of the entering of the above-mentioned
5 CLS.
LIST
Enter
|H0ME/CL^
LIST
| C R
|
5
CLS
1 0
A $ =
II
j
II
2 0
B $ = "AM
"
3 0
C $ = "A
BOY"
4 0
P R
1 NT
A$-t-B$ + C$
5 0
END
-41 -
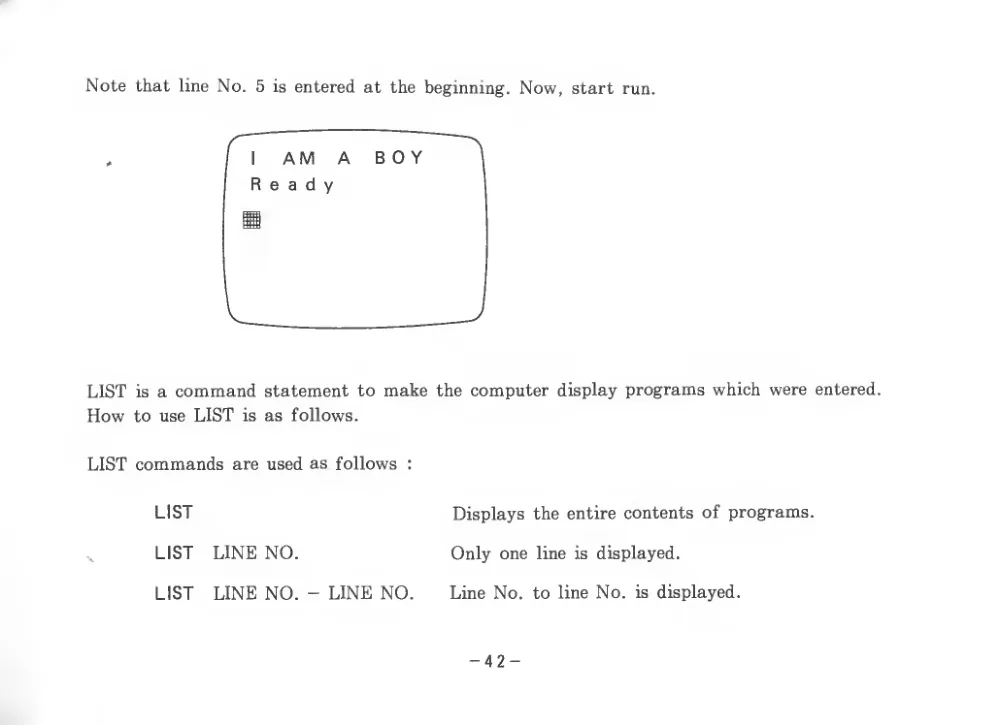
Note that line No.
5
is entered at the beginning. Now, start run.
LIST
is a command statement to make the computer display programs which were entered.
How to use LIST
is as follows.
LIST commands are used as follows
:
LIST
LIST
LINE NO.
LIST
LINE NO. - LINE NO.
Displays the entire contents of programs.
Only one line
is displayed.
Line No. to line No.
is displayed.
- 42 -
LIST
LINE NO. -
The content of programs after line No.
is
displayed.
LIST
- LINE NO.
This displays from the beginning of the program
to
line No.
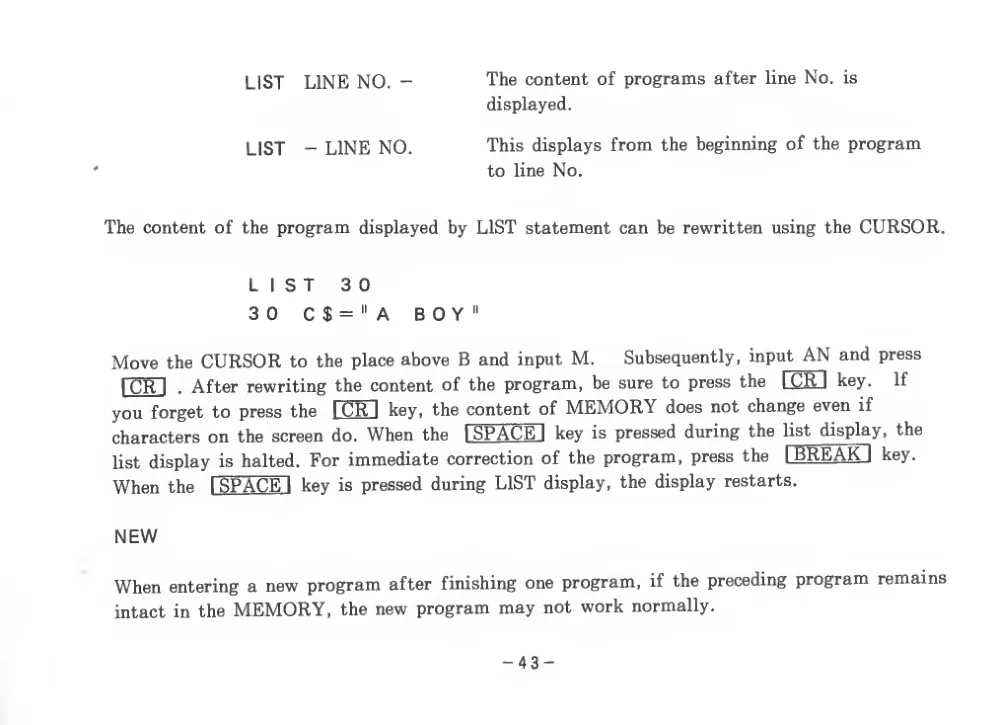
The content of the program displayed by LIST statement can be rewritten using the CURSOR.
LIST
30
30
C$="A
BOY"
Move the CURSOR to the place above B and input M.
Subsequently, input AN and press
I CR
I
. After rewriting the content of the program, be sure to press the
I CR
I
key.
If
you forget to press the
I CR
I
key, the content of MEMORY does not change even
if
characters on the screen do. When the
1 SPACE"! key
is pressed during the
list display, the
list display
is halted. For immediate correction of the program, press the
I BREAKj
key.
When the
I SPACE
I key
is pressed during LIST display, the display restarts.
NEW
When entering a new program after finishing one program,
if the preceding program remains
intact in the MEMORY, the new program may not work normally.
- 43 -
The program which was previously entered cannot be erased by CLS statement from the
inside of the MEMORY.
To erase programs, input NEW and press
I CR
I
.
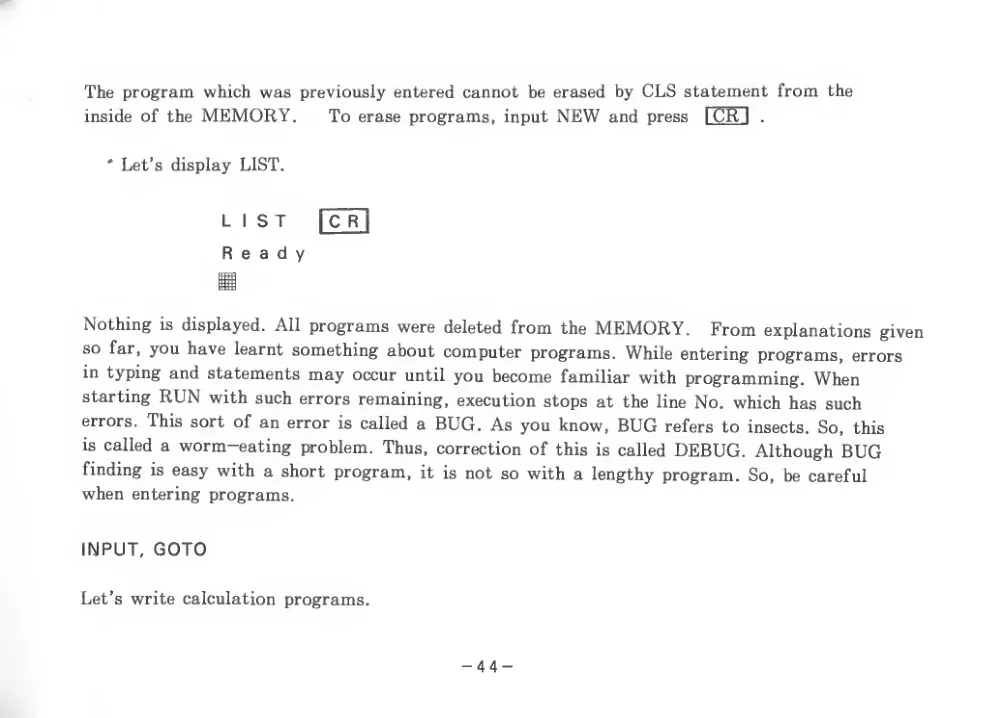
' Let’s display LIST.
LIST
I C R
Ready
Nothing
is displayed. All programs were deleted from the MEMORY.
From explanations given
so
far, you have learnt something about computer programs. While entering programs, errors
in typing and statements may occur until you become familiar with programming. When
starting RUN with such errors remaining, execution stops at the line No. which has such
errors. This sort of an error
is called a BUG. As you know, BUG refers to insects. So,
this
is called a worm-eating problem. Thus, correction of this
is called DEBUG. Although BUG
finding
is easy with a short program,
it
is not so with a lengthy program.
So, be careful
when entering programs.
INPUT, GOTO
Let’s write calculation programs.
- 44 -
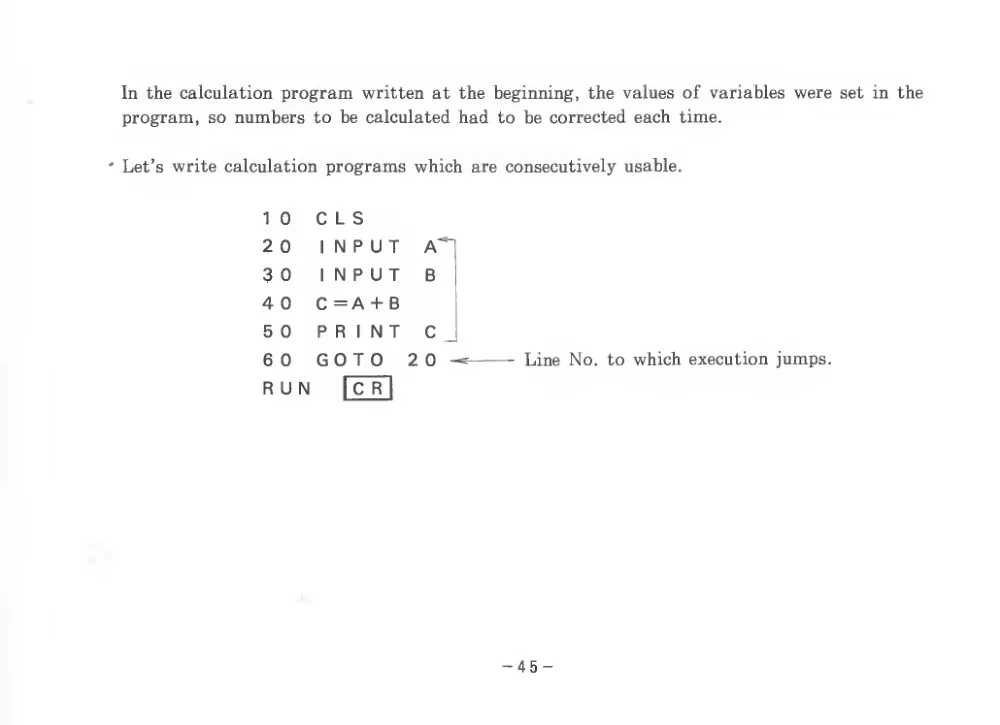
In the calculation program written at the beginning, the values of variables were set in the
program, so numbers to be calculated had to be corrected each time.
' Let’s write calculation programs which are consecutively usable.
1 0
2 0
3 0
4 0
5 0
6 0
R U
C L S
INPUT
INPUT
B
C =A + B
PRINT
C _
GOTO
20 ^
Line No. to which execution jumps.
N
|C R
I
-45
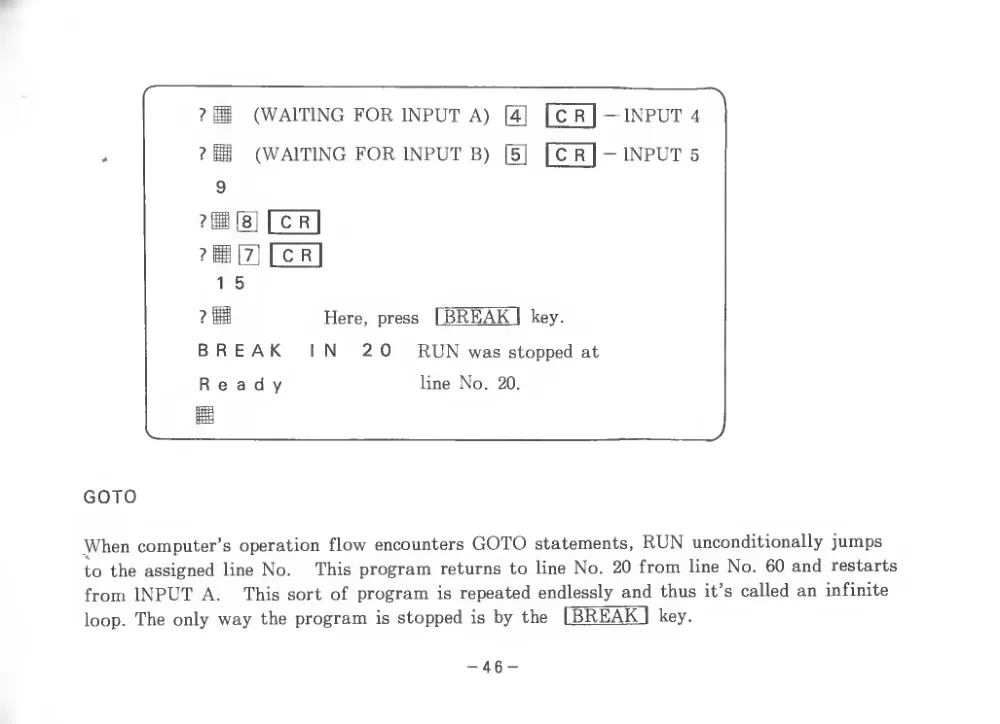
(WAITING FOR INPUT A)
(WAITING FOR INPUT B)
[4]
I C R
I
INPUT 4
d]
I C R
I - INPUT 5
?Bd]
I C R
I
?B0
I c R
1
5
? H
Here,
press
I BREAKi
key.
BREAK
IN
20
RUN was stopped at
Ready
line No.
20.
GOTO
When computer’s operation flow encounters GOTO statements, RUN unconditionally jumps
to the assigned line No.
This program returns to line No. 20 from line No. 60 and restarts
from INPUT A.
This sort of program
is repeated endlessly and thus
it’s called an infinite
loop. The only way the program
is stopped
is by the
I BREAK 1
key.
- 46 -
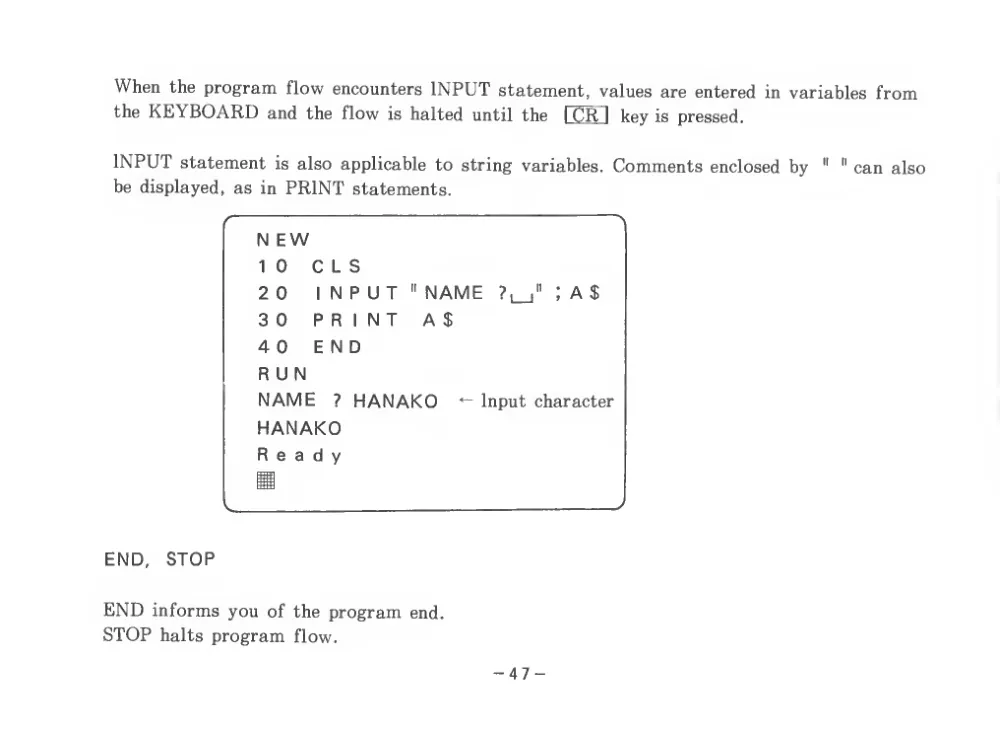
When the program flow encounters INPUT statement, values are entered in variables from
the KEYBOARD and the flow
is halted until the
I CR
I
key is pressed.
INPUT statement
is also applicable to string variables. Comments enclosed by
"
" can also
be displayed, as in PRINT statements.
C
N
N EW
10
CIS
2 0
INPUT" NAME
?l_i"
1 A $
30
PRINT
A$
4 0
END
RUN
NAME
? HANAKO
^ Input character
HANAKO
Ready
/
END,
STOP
END informs you of the program end.
STOP halts program flow.
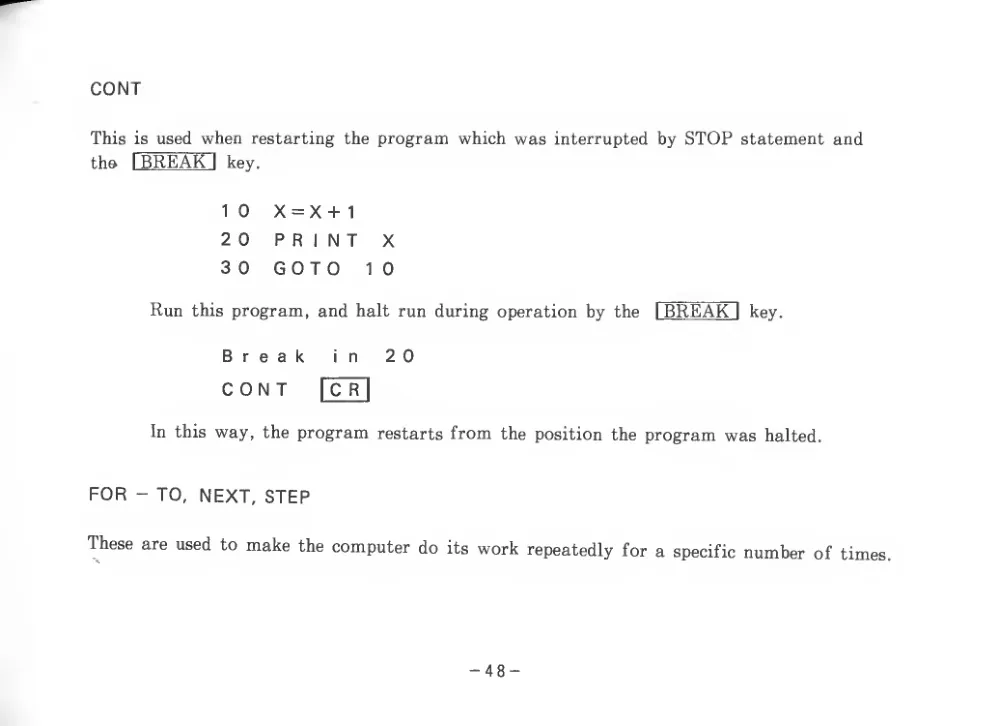
CONT
This
is used when restarting the program which was interrupted by STOP statement and
the
I BREAK
I
key.
10
X=X+
1
20
PRINT
X
30
GOTO
10
Run this program, and halt run during operation by the
I BREAK"!
key.
Break
in
20
CONT
I C R
I
In this way, the program restarts from the position the program was halted.
FOR - TO, NEXT, STEP
These are used to make the computer do
its work repeatedly for a specific number of times.
- 48 -
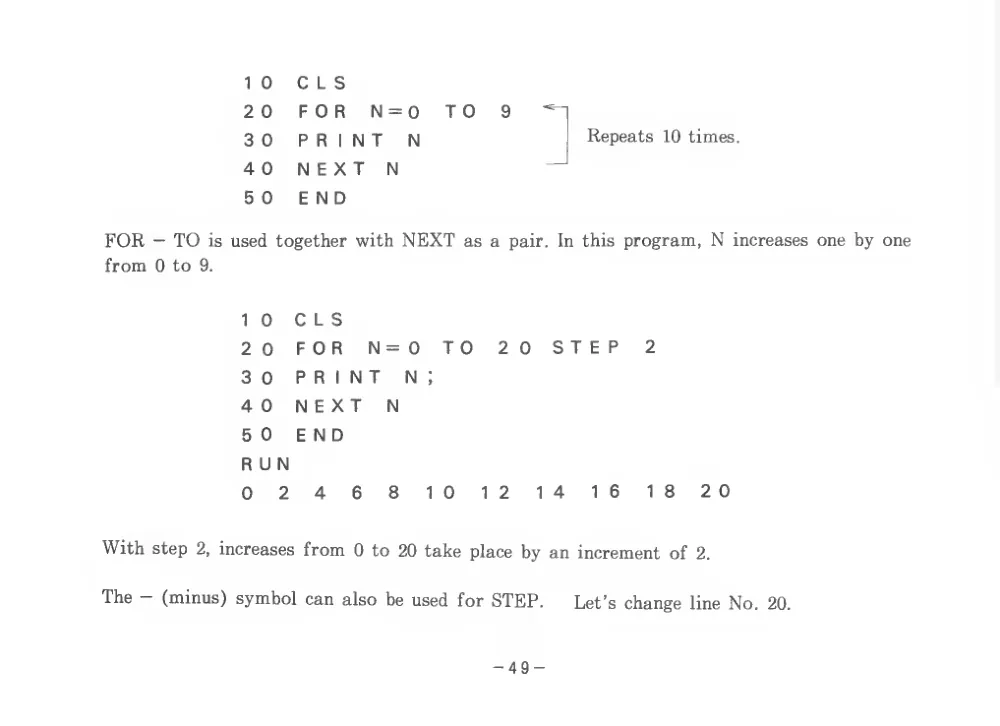
Repeats 10 times.
10
C L S
20
FOR
N=0
TO
9
30
PRINT
N
40
NEXT
N
5 0
END
FOR — TO
is used together with NEXT as a pair.
In this program, N increases one by one
from 0 to
9.
10
CIS
20
FOR
N=0
TO
20
STEP
2
3 0
PRINT
N
;
40
NEXT
N
5 0
END
RUN
0
2
4
6
8
10
12
14
16
18
20
With step
2, increases from 0 to 20 take place by an increment of
2.
The ~ (minus) symbol can also be used for STEP.
Let’s change
line No.
20.
- 49 -
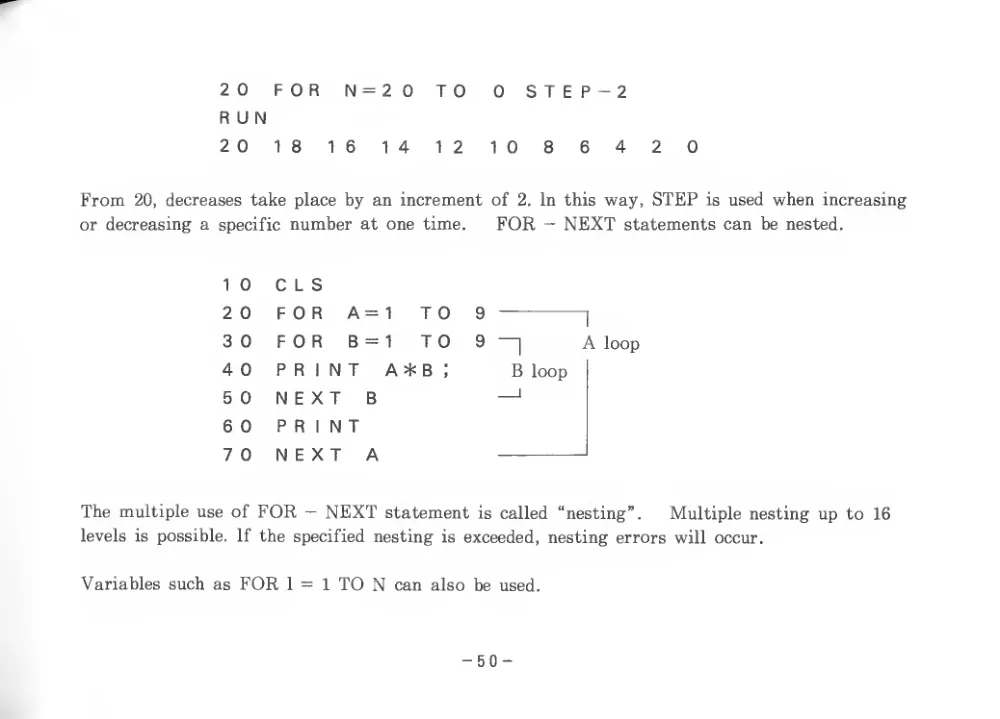
0
S T E P - 2
2 0
FOR
RUN
N = 20
T 0
2 0
18
1
6
1 4
1
2
1 0
8
6
4
2
0
From
20, decreases take place by an increment of
2.
In this way, STEP
is used when increasing
or decreasing a
specific number at one time.
FOR — NEXT statements can be nested.
1 0
C L S
2 0
FOR
A=
1
TO
9
3 0
FOR
B =
1
TO
9 n
^
4 0
PRINT
A * B
:
B loop
5 0
NEXT
B
6 0
PRINT
7 0
NEXT
A
A loop
The multiple use of FOR — NEXT statement
is called
“nesting”.
Multiple nesting up to 16
levels
is possible.
If the specified nesting
is exceeded, nesting errors will occur.
Variables such as FOR
I =
1 TO N can also be used.
- 50 -
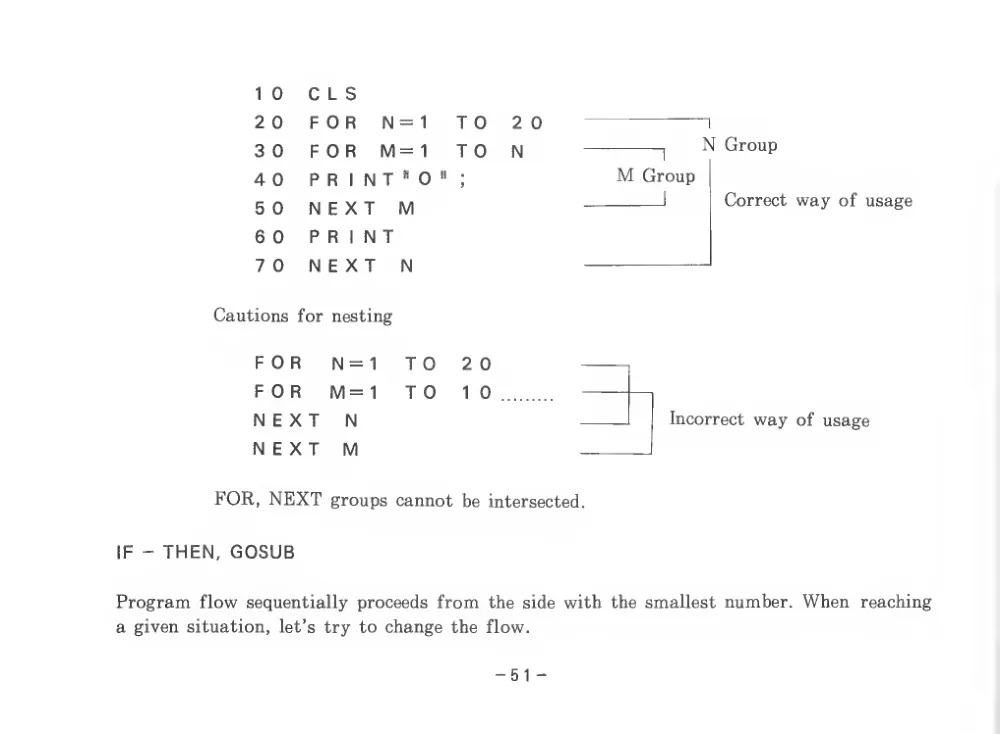
1 0
C L S
2 0
FOR
N =
1
TO
2 0 —
3 0
FOR
M=
1
TO
N
1
'1 Group
4 0
P R
1 N T
" 0
"
;
M Group
5 0
NEXT
M
1
Correct way of usage
6 0
PRINT
7 0
NEXT
N
Cautions for nesting
FOR
N=1
TO
20
FOR
M=1
TO
10
NEXT
N
NEXT
M
Incorrect way of usage
FOR, NEXT groups cannot be intersected.
IF - THEN, GOSUB
Program flow sequentially proceeds from the side with the smallest number. When
reaching
a given situation,
let’s try to change the flow.
-51 -
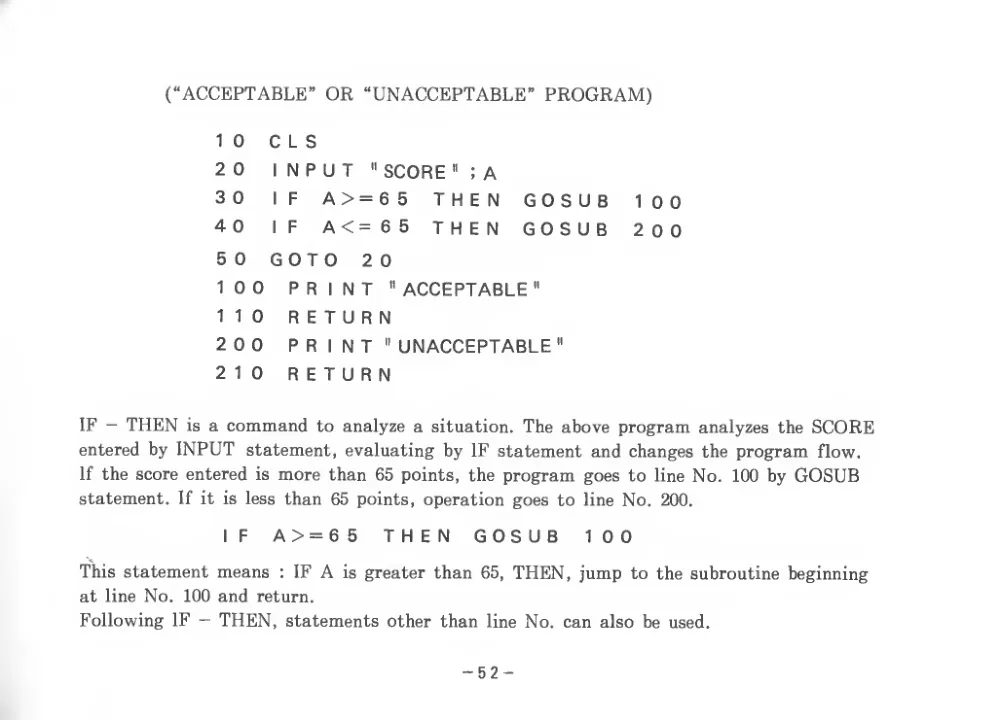
(“ACCEPTABLE” OR “UNACCEPTABLE” PROGRAM)
1 0
c L S
2 0
1 N P U T
II SCORE
"
: A
3 0
1
F
A > = 6 5
THEN
G 0 S U B
1 0 0
4 0
1
F
A < = 6 5
THEN
G 0 S U B
o
CM
0
5 0
G 0 T 0
2 0
1 0 0
P R
1 N T
" ACCEPTABLE
1
1 0
R E T U R N
2 0 0
P R
1 N T
" UNACCEPTABLE
2
1 0
R E T U R N
IF — THEN
is a command to analyze a situation. The above program analyzes the SCORE
entered by INPUT
statement, evaluating by IF statement and changes the program flow.
If the score entered
is more than 65 points, the program goes to line No.
100 by GOSUB
statement.
If
it
is
less than 65 points, operation goes to line No.
200.
IF
A>=65
THEN
GOSUB
100
This statement means
:
IF A
is greater than
65, THEN, jump to the subroutine beginning
at
line No.
100 and return.
Following IF — THEN, statements other than line No. can also be used.
- 52 -
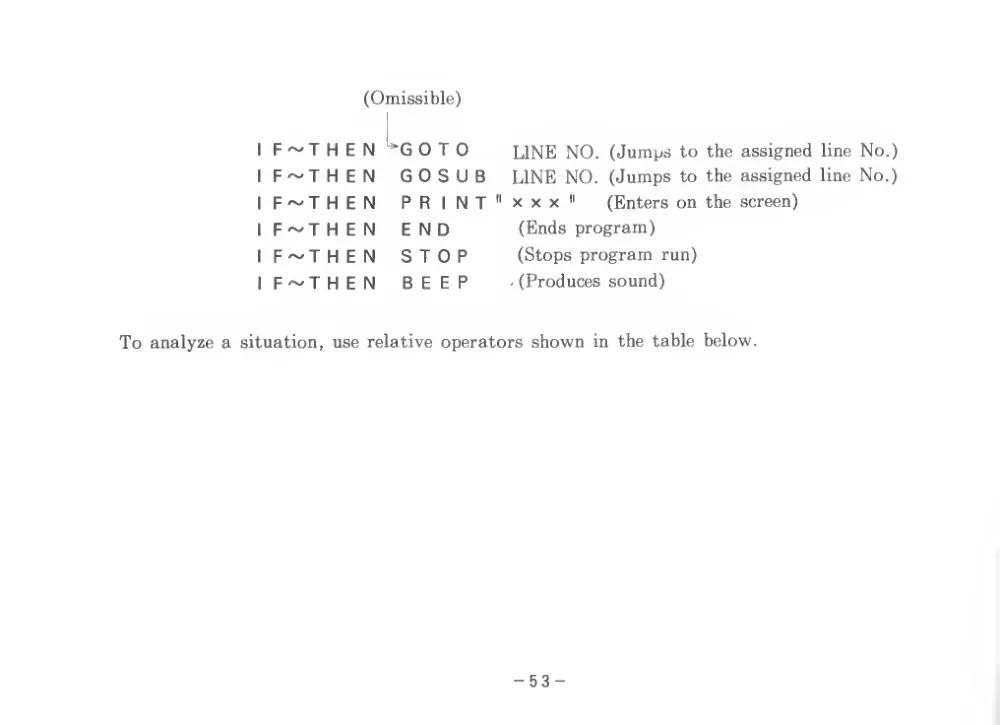
(Omissible)
F ~T H E N
0 T 0
LINE NO. (Jumps to the assigned
line No.)
F~T H E N
G 0 S U B
LINE NO. (Jumps to the assigned line No.)
F ~T H E N
PRINT" X X X
"
(Enters on the screen)
F~T H E N
END
(Ends program)
F~T H E N
STOP
(Stops program run)
F~T H E N
BEEP
- (Produces sound)
To analyze a situation, use relative operators shown
in the table below.
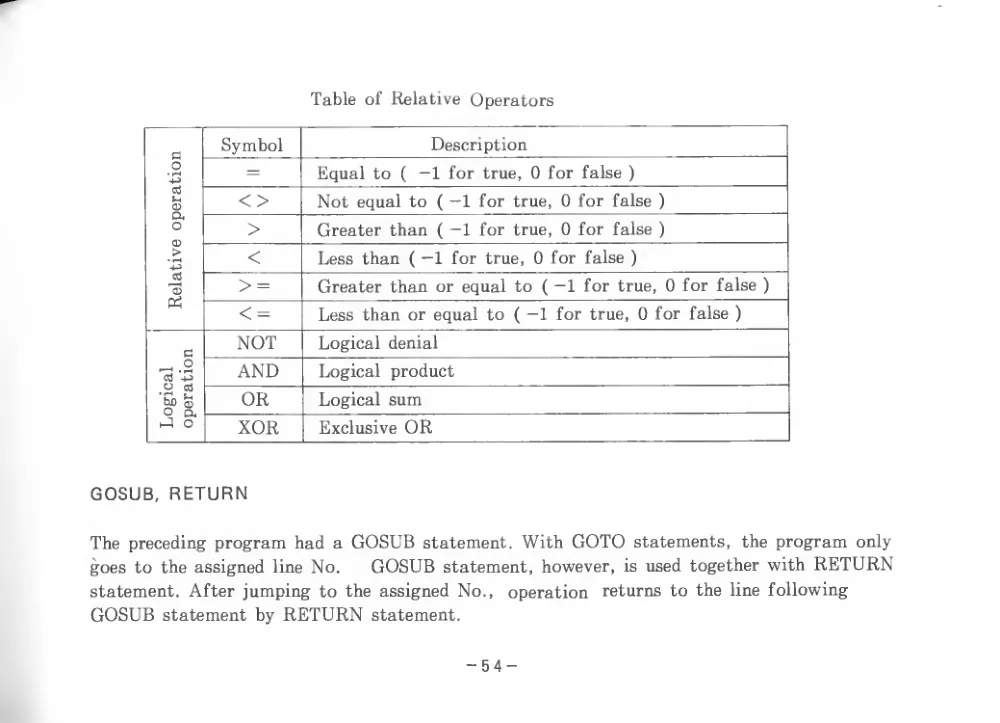
Table of Relative Operators
Symbol
Description
.2
’-tj
=
Equal to
(
—1 for
true, 0 for false
)
cd
!D
< >
Not equal to
( —1 for true, 0 for false
)
o
>
Greater than
( —1 for true, 0 for false
)
>
<
Less than
( —1 for true, 0 for false
)
cd
> =
Greater than or equal to
( —1 for true, 0 for false
)
Ph
< =
Less than or equal to
( —1 for true, 0 for false
)
C
NOT
Logical denial
^ o
cd
'Xs
AND
Logical product
fcuO
0)
n
OR
Logical sum
hP O
XOR
Exclusive OR
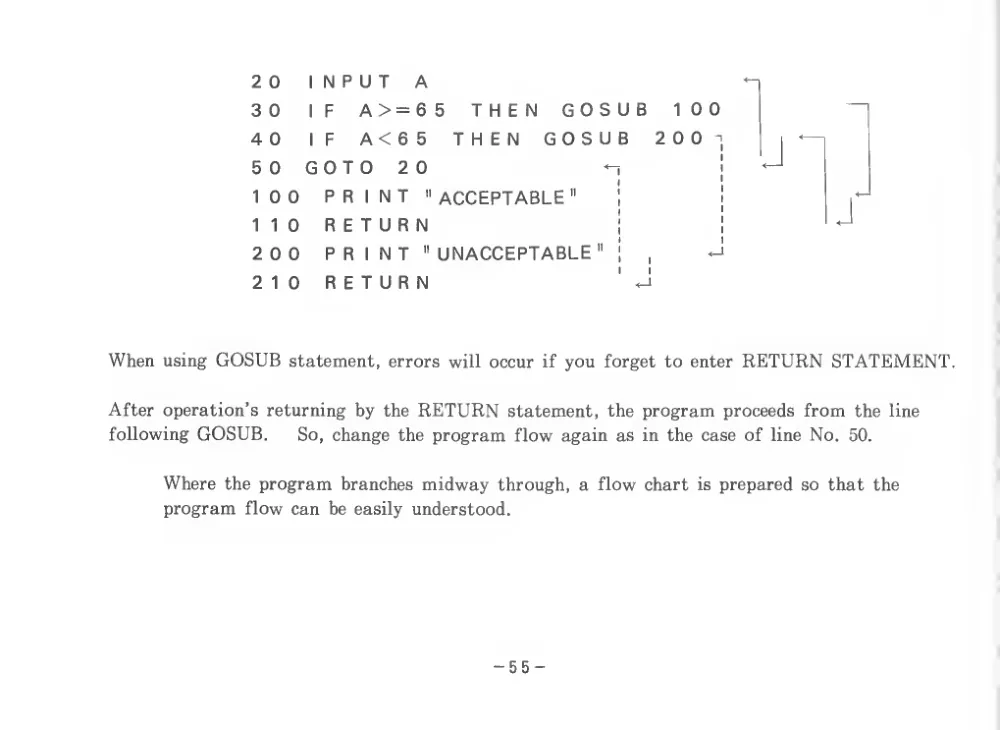
GOSUB, RETURN
The preceding program had a GOSUB statement. With GOTO statements,
the program only
goes to the assigned line No.
GOSUB statement, however,
is used together with RETURN
statement. After jumping to the assigned No.,
operation
returns to the
line following
GOSUB statement by RETURN statement.
- 54 -
2 0
1 N P U T
A
3 0
1
F
A > = 6 5
THEN
GO
4 0
1
F
A < 6 5
THEN
G 0 S
5 0
GO T 0
2 0
1 0 0
P R
1 N T
II ACCEPTABLE
1
1 0
R E T U R N
2 0 0
P R
1 N T
II UNACCEPTABLE
2
1 0
R E T U R N
When using GOSUB statement, errors will occur
if you forget to enter RETURN STATEMENT.
After operation’s returning by the RETURN statement, the program proceeds from the line
following GOSUB.
So, change the program flow again as in the case of line No.
50.
Where the program branches midway through, a flow chart
is prepared so that the
program flow can be easily understood.
- 55 -
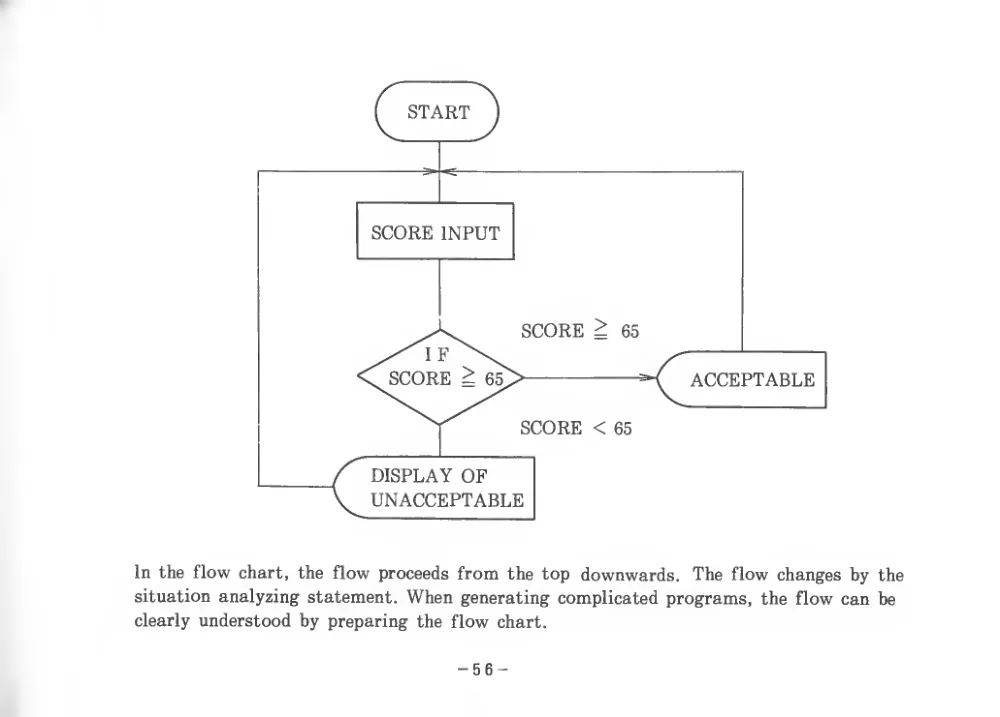
In the flow chart, the flow proceeds from the top downwards.
The flow changes by the
situation analyzing statement. When generating complicated programs, the flow can be
clearly understood by preparing the flow chart.
- 56 -
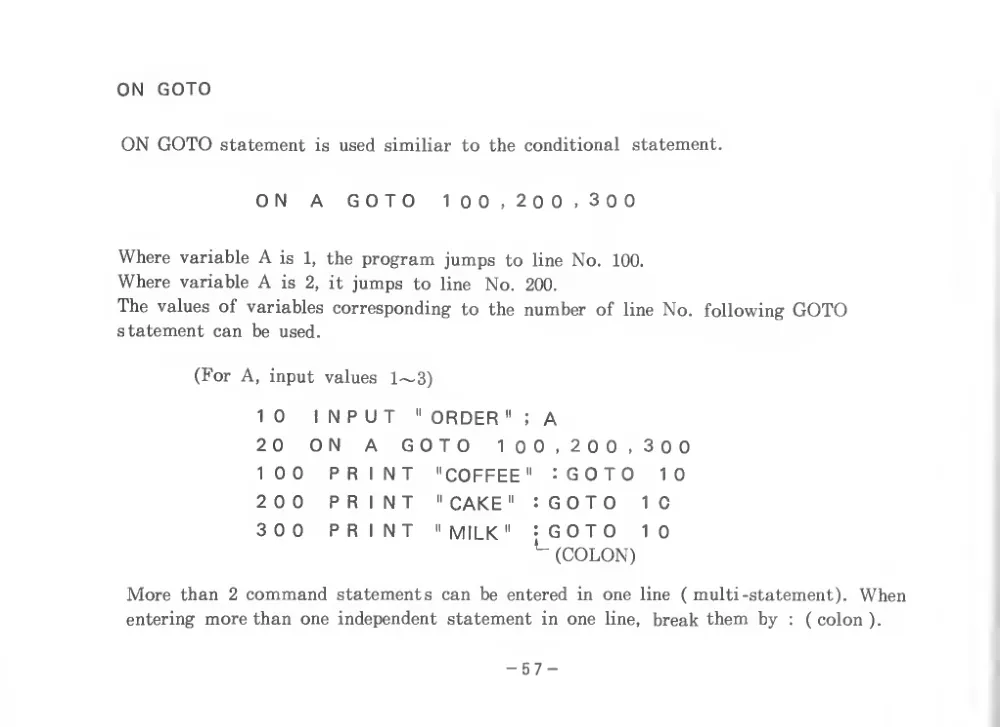
ON GOTO
ON GOTO statement
is used similiar to the conditional
statement.
ON
A
GOTO
100,200,300
Where variable A
is
1,
the program jumps to
line No.
100.
Where variable A
is
2,
it jumps
to
line
No.
200.
The values of variables corresponding to the number of
line No.
following GOTO
statement can be used.
(For A, input values
1~3)
10
INPUT
" ORDER
; A
20
ON
A
GOTO
100,200,
3 0 0
100
PRINT
"COFFEE
"
: G 0 T 0
1 0
200
PRINT
" CAKE
: G 0 T 0
1 0
300
PRINT
" MILK
"
: G 0 T 0
(COLON)
1 0
More than
2 command statements can be entered
in one
line
( multi -statement). When
entering more than one independent statement
in one
line,
break them by
:
(colon).
- 57 -
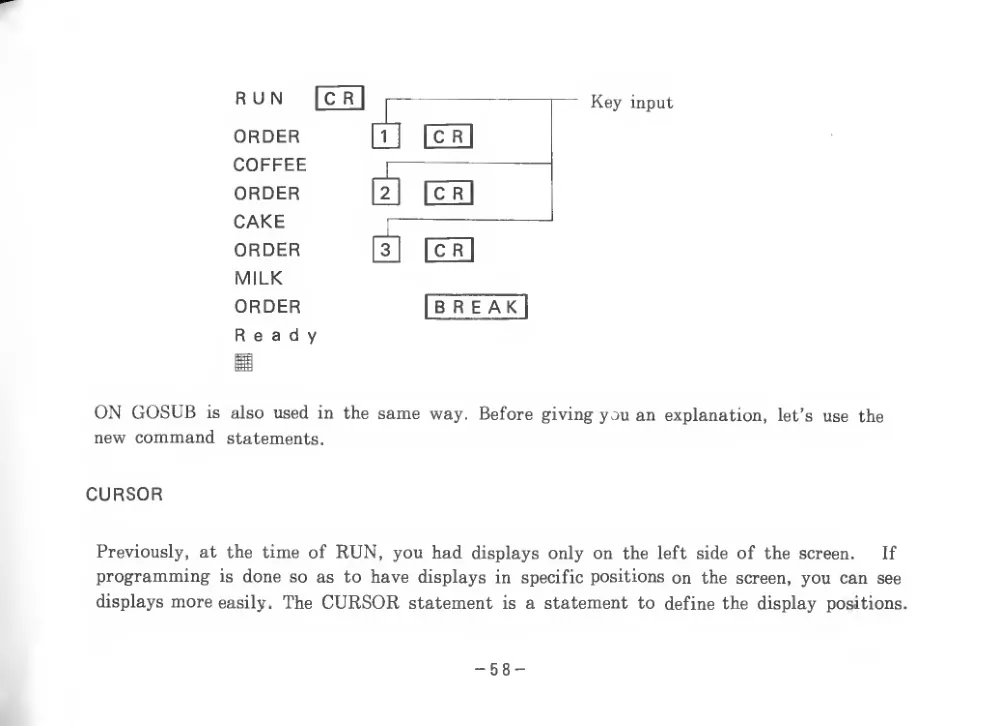
Key input
RUN
ORDER
COFFEE
ORDER
CAKE
ORDER
MILK
ORDER
HU
I B R E A K
I
Ready
ON GOSUB
is
also used
in the same way. Before giving you an explanation,
let’s use the
new command
statements.
CURSOR
Previously,
at the time of RUN, you had displays only on the
left side of the screen.
If
programming
is done so as to have displays in
specific positions on the screen, you can see
displays more easily. The CURSOR statement
is a statement to define the display positions.
- 58 -
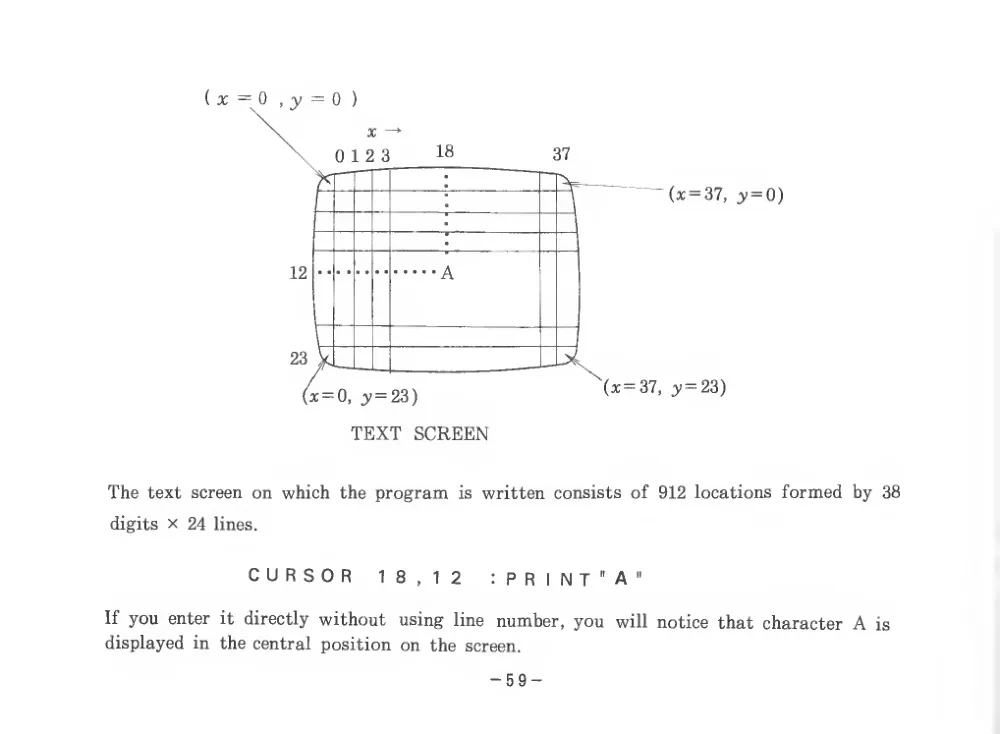
The text screen on which the program
is written consists of 912 locations formed by 38
digits X 24 lines.
CURSOR
18,12
:PRINT"A"
If you enter
it
directly without
using
line
number, you
will notice that character A
is
displayed
in the central position on
the screen.
- 59 -
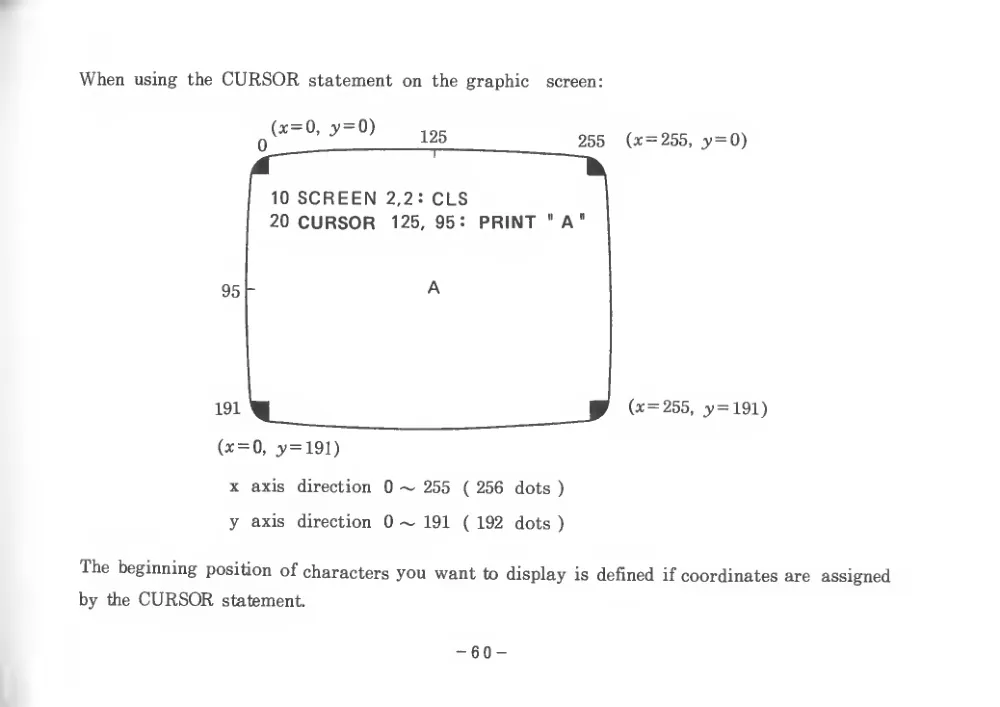
When using the CURSOR statement on the graphic
screen:
X
axis
direction
0 ~ 255
( 256
dots
)
y
axis
direction
0 — 191
( 192
dots
)
The beginning position of characters you want to display is defined
if coordinates are
assigned
by the CURSOR statement.
- 60 -
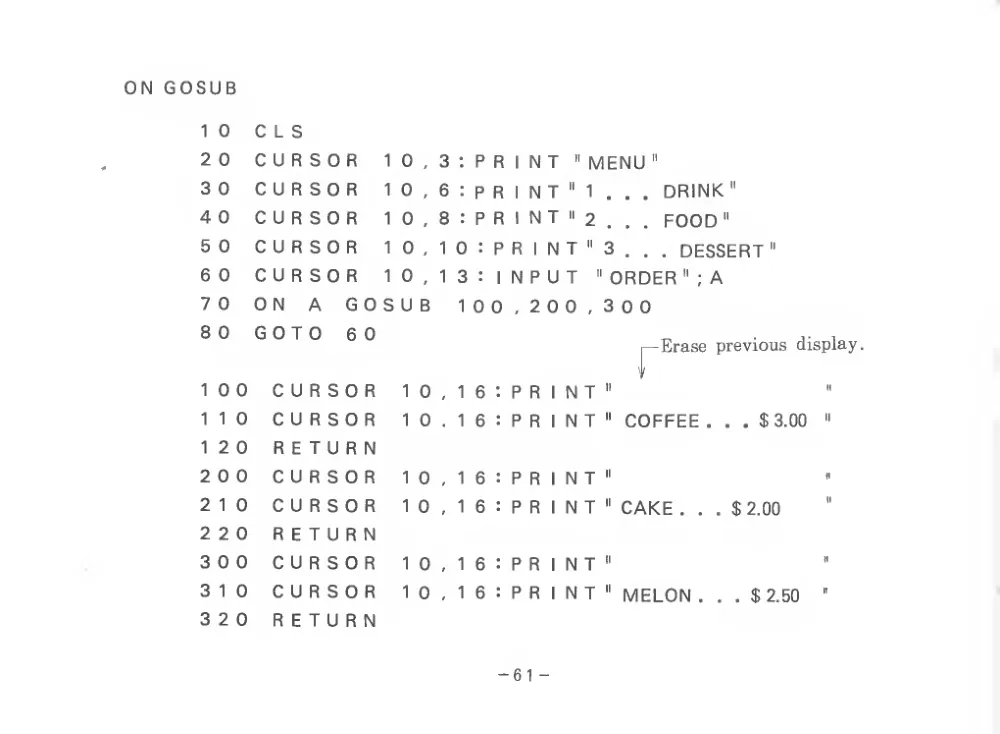
ON GOSUB
1 0
C L S
2 0
CURSOR
1 0
3
P R
1 N T
" MENU
3 0
CURSOR
1 0
6
P R
1 N T
II
1
.
.
DRINK"
4 0
CURSOR
1 0
8
: P R
1 N T
II 2
.
.
.
FOOD"
5 0
CURSOR
1 0
1 0
:
P R
1 N T
"
3
.
.
. DESSERT"
6 0
CURSOR
1 0
1
3
:
1 N P U T
' ORDER
"
;
A
7 0
ON
A
GOSUB
1 0 0 ,2 0 0,
3 0 0
8 0
GOTO
60
1— Erase previous display
1 0 0
CURSOR
1 0
,
1
6
:
P R
1 N T
It
1
1 0
CURSOR
1 0
1
6
:
P R
1 N T
COFFEE
.
.
. $3.00
"
1
2 0
RETURN
2 0 0
CURSOR
1 0
1
6
:
P R
1 N T
II
2
1 0
CURSOR
1 0
1
6
:
P R
1 N T
CAKE ...
$ 2.00
2 2 0
RETURN
3 0 0
CURSOR
1 0
1
6
:
P R
1 N T
"
3
1 0
CURSOR
1 0
1
6
:
P R
1 N T
MELON
.
.
. $2.50
"
3 2 0
RETURN
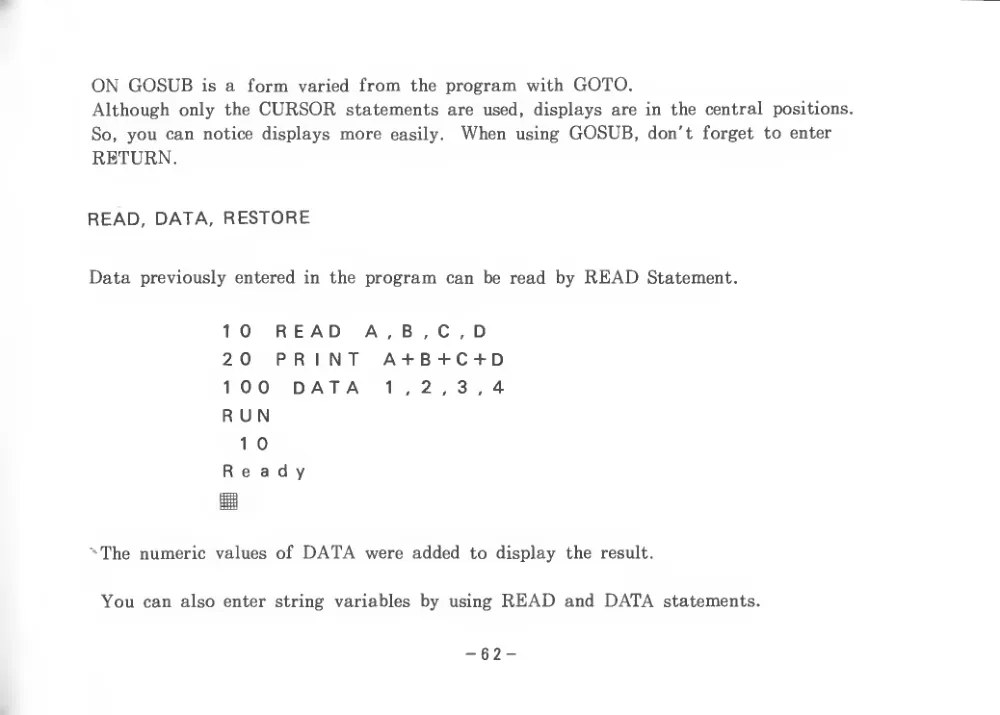
ON GOSUB
is
a
form varied from
the program with GOTO.
Although only the CURSOR statements are used, displays are in the central positions.
So, you can notice displays more
easily.
When using GOSUB, don't forget to enter
RETURN.
READ, DATA, RESTORE
Data previously entered
in the program can be read by READ Statement.
10
READ
A,B,C,D
20
PRINT
A+B+C+D
100
DATA
1,2, 3, 4
RUN
1 0
Ready
The numeric values of DATA were added to display
the
result.
You can also enter string variables by using READ and DATA statements.
- 62 -
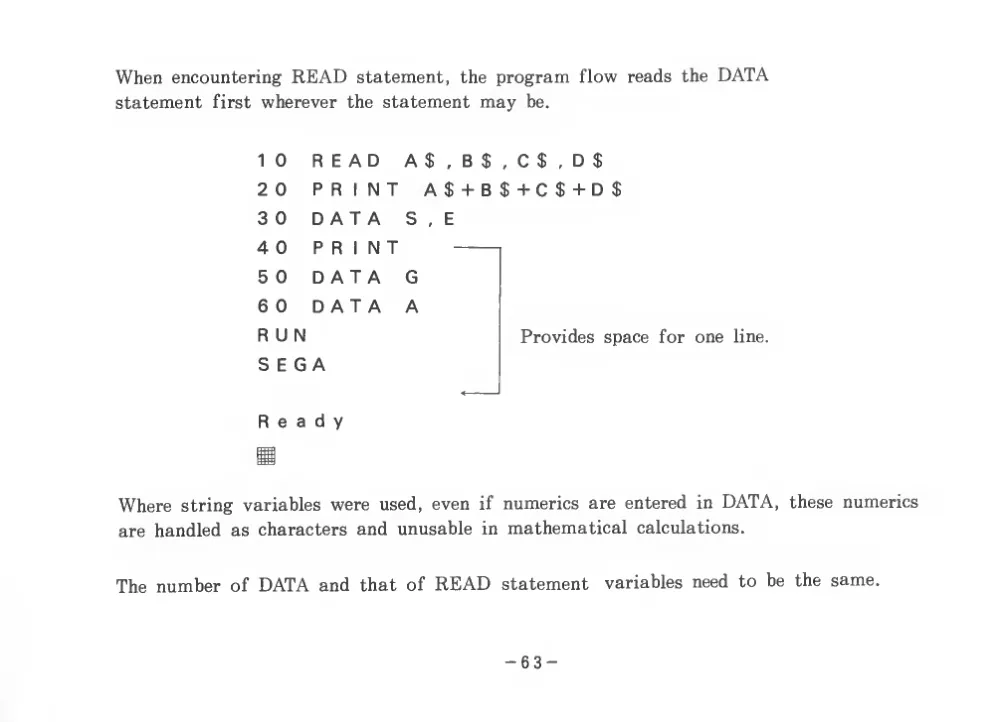
When encountering READ statement, the program flow reads the DATA
statement
first wherever the statement may
be.
, C $
, D $
$ + C $ + D $
10
READ
A$,B$
20
PRINT
A$+B
30
DATA
S,E
40
PRINT
50
DATA
G
60
DATA
A
RUN
SEGA
Provides space
for one
line.
Ready
Where string variables were used, even
if numerics are entered
in DATA,
these numerics
are handled as characters and unusable
in mathematical calculations.
The number of DATA and that of READ statement
variables need to be the same.
- 63 -
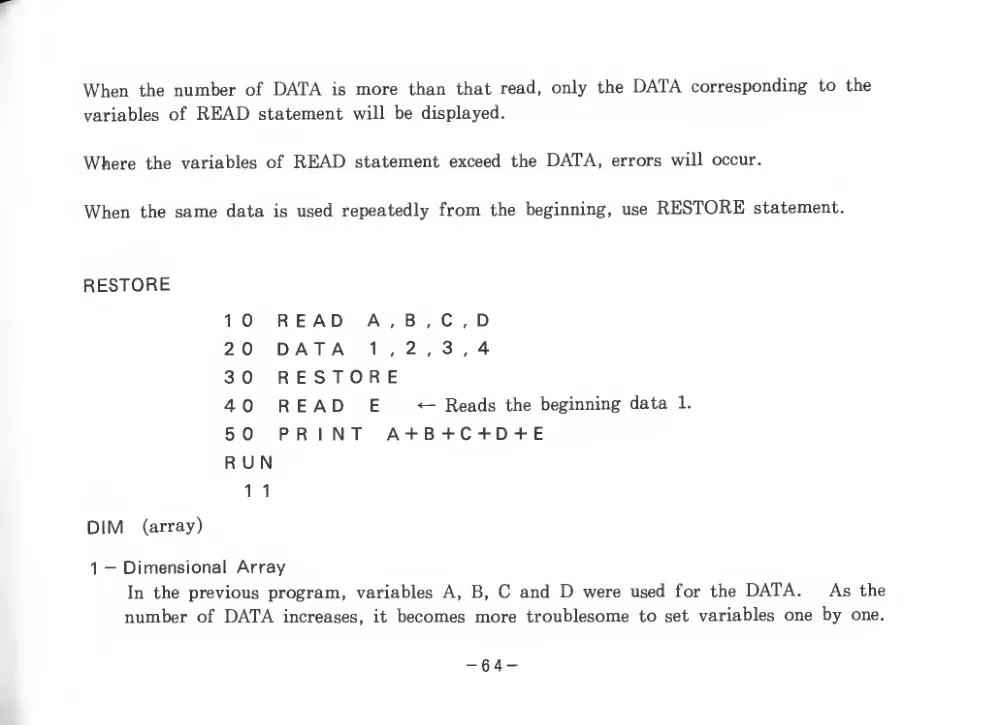
When
the number of DATA
is more than that read, only the DATA corresponding
to the
variables of READ statement
will be displayed.
Where the variables of READ statement exceed the DATA, errors will occur.
When the same data
is used repeatedly from the beginning,
use RESTORE statement.
RESTORE
1 0
R E A D
A
, B
,, C
, D
2 0
D A T A
1
,
2
, 3,4
3 0
R E S T 0 R E
4 0
R E A D
E
- Reads the beginning data
1.
5 0
P R
1 N T
A+B+C+D+E
R U N
1
1
DIM
(array)
1 — Dimensional Array
In the previous program,
variables A,
B, C and D were used for the DATA.
As the
number of DATA increases,
it becomes more troublesome to
set variables one by one.
- 64 -
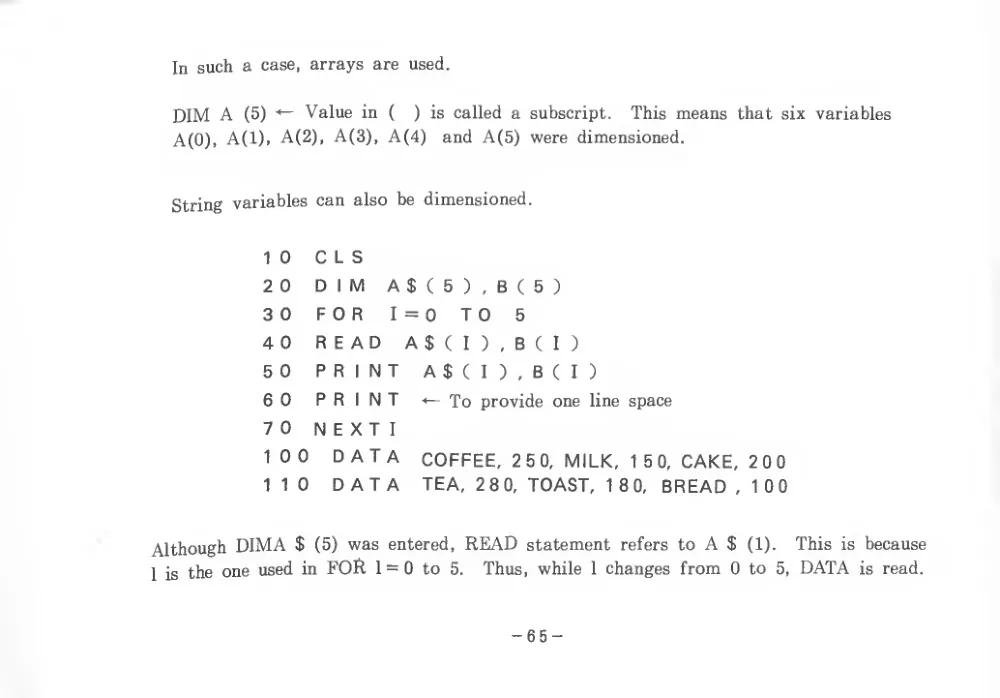
In such a
case, arrays are used.
DIM A
(5) <— Value
in
(
)
is called a
subscript.
This means that
six
variables
A(0), A(l), A(2),
A(3), A(4)
and A(5) were dimensioned.
String variables can also be dimensioned.
1
2
3
4
5
6
7
1
1
0
C L S
0
DIM
A$(5),B(5)
0
FOR
1=0
TO
5
0
READ
A $
(
I
)
, B
(
I
)
0
PRINT
A $
(
I
)
, B
(
I
)
0
PRINT
To provide one
line Space
0
N E X T
I
0 0
DATA
COFFEE,
2 5 0, MILK,
1 5 0, CAKE, 20 0
1 0
DATA
TEA,
2 8 0, TOAST, 18 0, BREAD, 100
Although DIMA $
(5) was entered, READ statement
refers to A $
(1).
This
is because
I
is
the one used in FOR
I = 0 to
5.
Thus,
while
I changes from 0 to
5, DATA
is read.
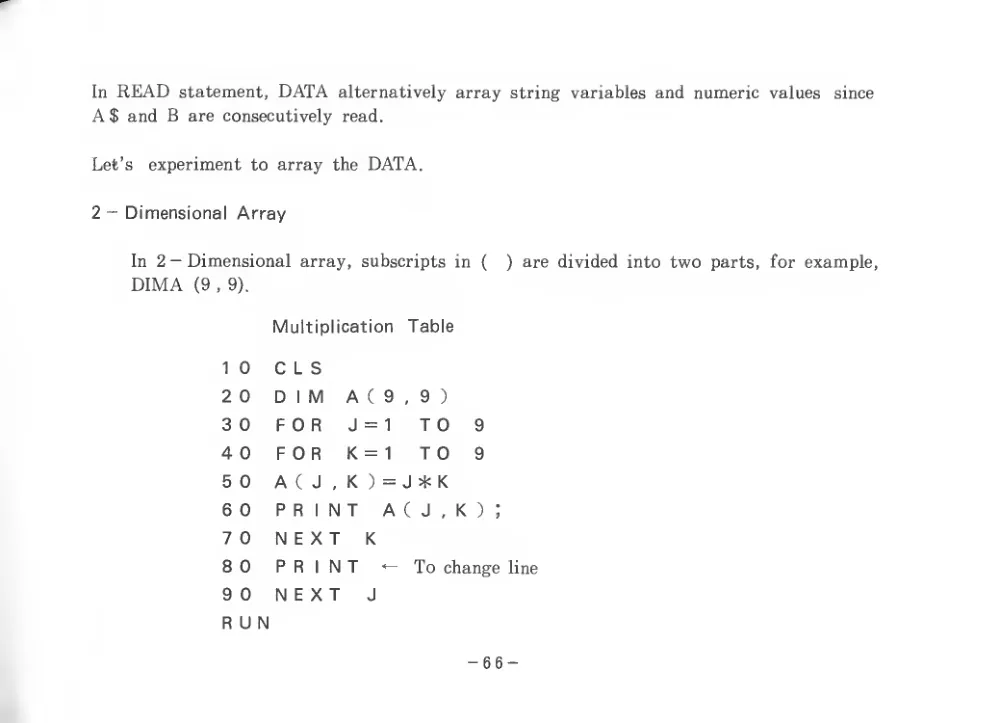
In READ statement, DATA alternatively array string variables and numeric values
since
A $ and B are consecutively read.
Let’s
experiment to array the DATA.
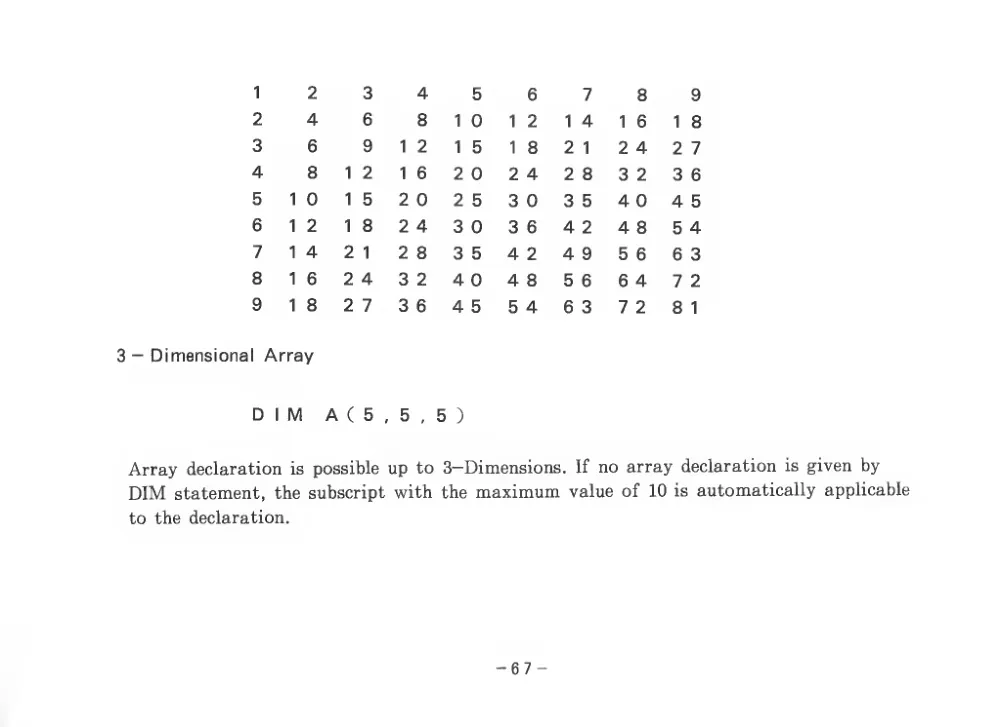
2- Dimensional Array
In
2 - Dimensional array, subscripts
in
(
) are divided into two parts,
for example,
DIMA
(9
,
9).
Multiplication
Table
10
C L S
2 0
DIM
A
( 9
,
9
)
30
FOR
J=1
TO
9
40
FOR
K=1
TO
9
50
A(J,K)=J*K
60
PRINT
A(J,K);
70
NEXT
K
80
PRINT
-^To change line
90
NEXT
J
RUN
- 66 -
1
2
3
4
5
6
7
8
9
2
4
6
8
1 0
1
2
1 4
1
6
1
8
3
6
9
1
2
1
5
1
8
2
1
2 4
2 7
4
8
1
2
1
6
2 0
2 4
2 8
3 2
3 6
5
1 0
1
5
2 0
2 5
3 0
3 5
4 0
4 5
6
1 2
1 8
2 4
3 0
3 6
4 2
4 8
5 4
7
1 4
2
1
2 8
3 5
4 2
4 9
5 6
6 3
8
1
6
2 4
3 2
4 0
4 8
5 6
6 4
7 2
9
1 8
Dimensional Array
2 7
3 6
4 5
5 4
6 3
7 2
8
1
DIM
A
( 5
,
5
,
5
)
Array declaration
is possible up to 3—Dimensions.
If no array declaration
is given by
DIM statement, the subscript with the maximum value of 10
is automatically applicable
to the declaration.
- 67 -
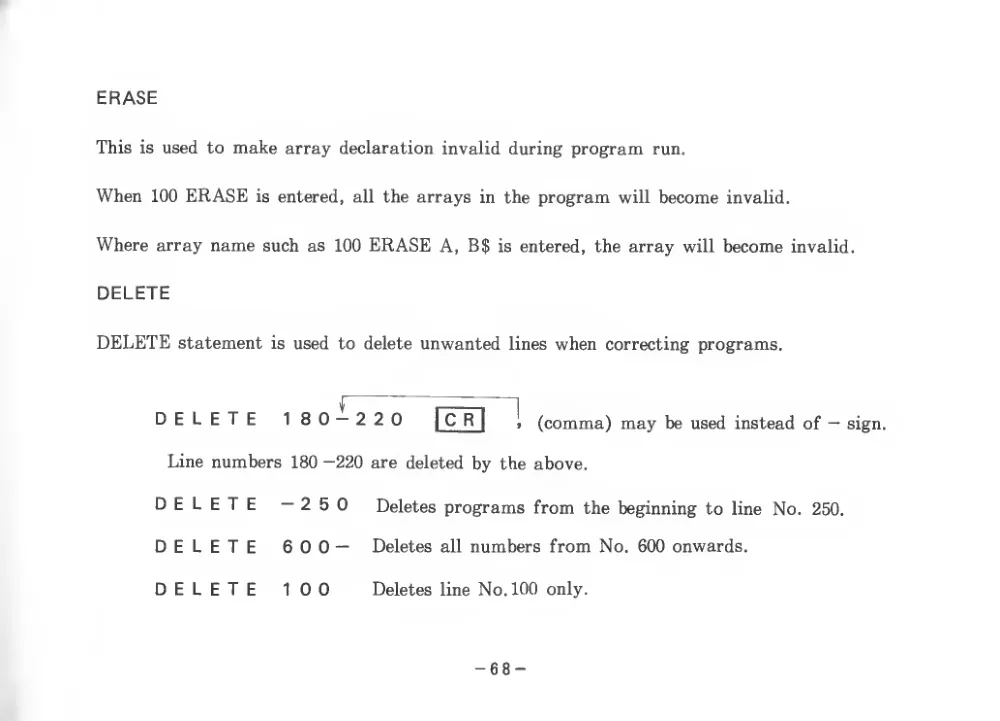
ERASE
This
is used to make array declaration invalid during program
run.
When 100 ERASE
is entered,
all the arrays in the program will become invalid.
Where array name such as 100 ERASE A, B$
is entered, the array will become invalid.
DELETE
DELETE statement
is used to delete unwanted lines when correcting programs.
r
DELETE
180
220
| C R
|
,
(comma) may be used instead of — sign.
Line numbers 180 -220 are deleted by the above.
DELETE
DELETE
DELETE
— 2 5 0
Deletes programs from the beginning to
line No.
250.
6 0 0 —
Deletes
all numbers from No. 600 onwards.
10 0
Deletes line No. 100 only.
- 68 -
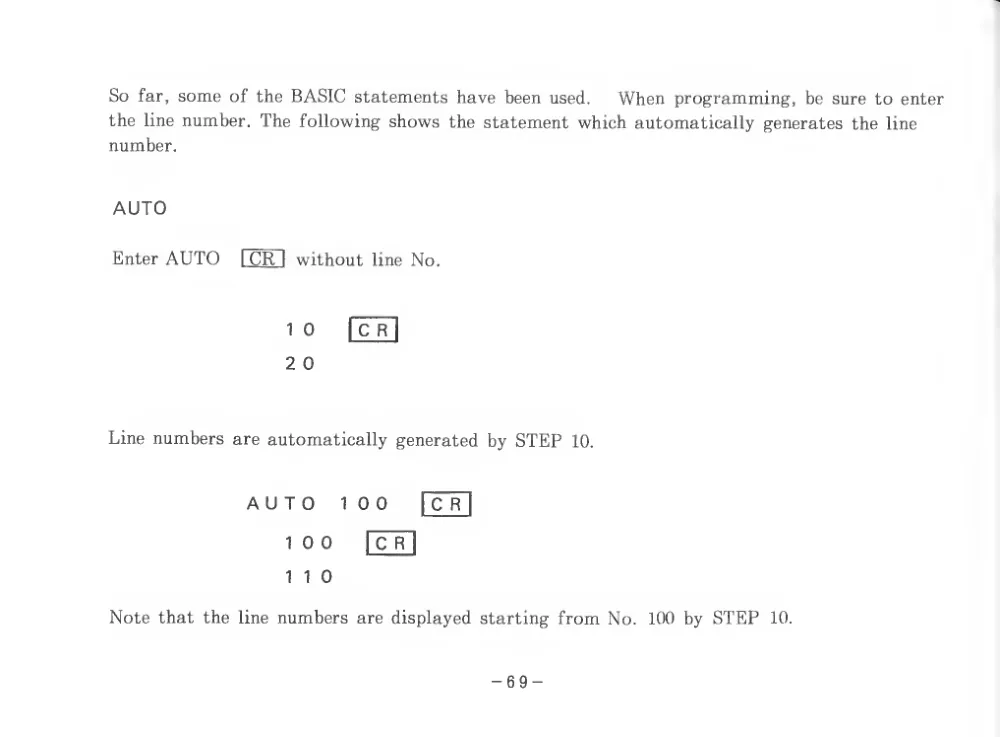
So
far, some of the BASIC statements have been used.
When programming, be sure to enter
the line number. The following shows the statement which automatically generates the line
number.
AUTO
Enter AUTO
I CR
I without
line No.
1 0
I C R
I
2 0
Line numbers are automatically generated by STEP
10.
AUTO
100
C R
1 0 0
1
1 0
C R
Note that the line numbers are displayed starting from No.
100 by STEP
10.
- 69 -
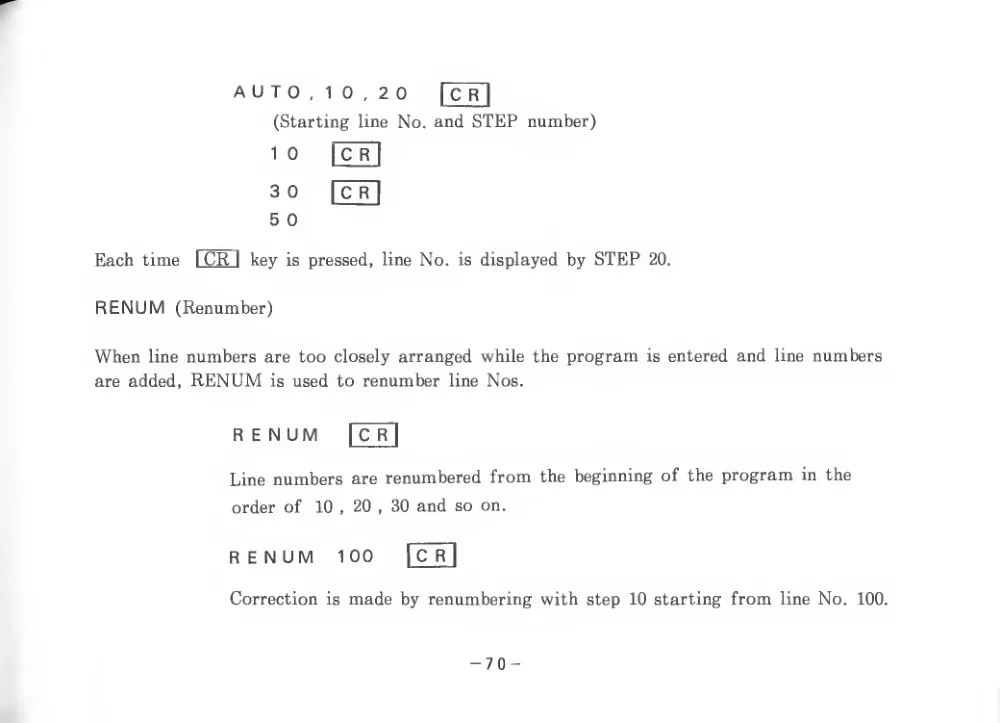
A U T 0
,
1 0
, 2 0
[TT|
(Starting line No. and STEP number)
1 0
I C R
3 0
I C R
I
5 0
Each time
I CR
I
key
is pressed,
line No.
is displayed by STEP
20.
RENUM (Renumber)
When line numbers are too closely arranged while the program
is entered and line numbers
are added, RENUM
is used to renumber line Nos.
RENUM
I C R
I
Line numbers are renumbered from the beginning of the program in the
order of
10
, 20
, 30 and so on.
RENUM
100
I C R
I
Correction
is made by renumbering with step 10 starting from
line No.
100.
- 70 -
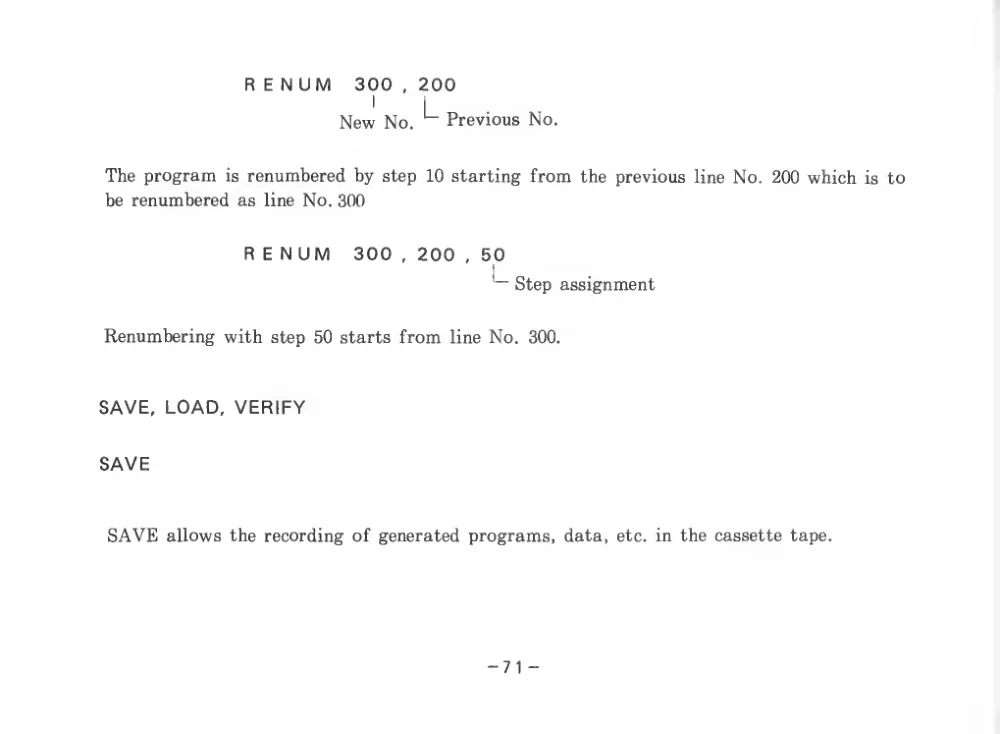
R E N UM
300
, 200
I
I
New No.
Previous No.
The program
is renumbered by step 10 starting from the previous
line No. 200 which
is to
be renumbered as line No. 300
R E N UM
300
, 200
, 50
Step assignment
Renumbering with step 50 starts from line No.
300.
SAVE, LOAD, VERIFY
SAVE
SAVE allows the recording of generated programs, data,
etc.
in the cassette tape.
-7 1-
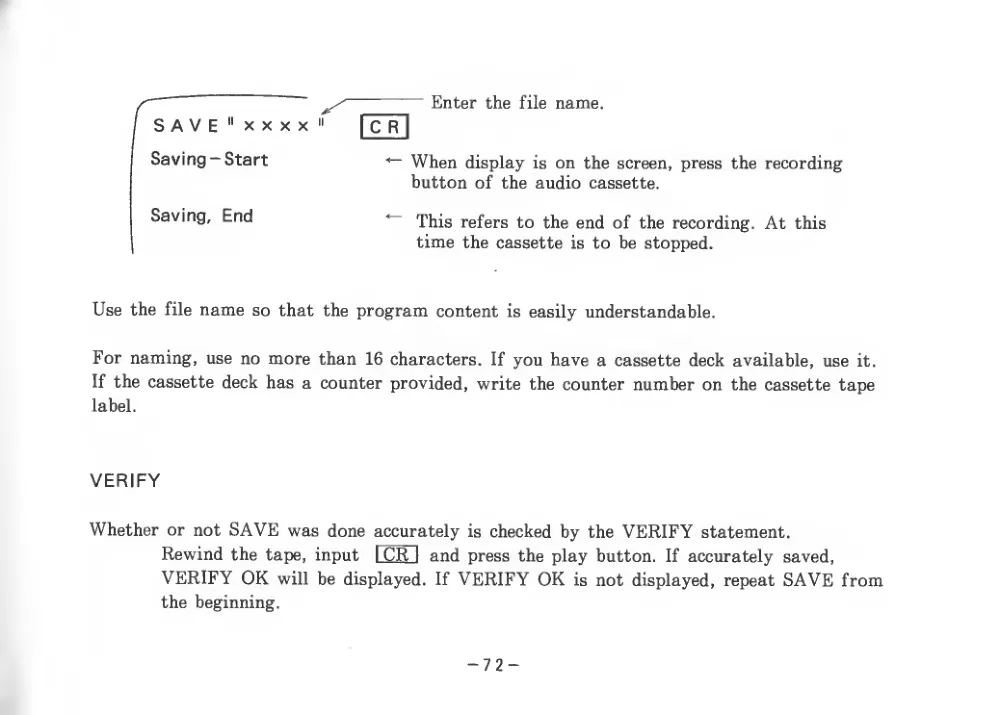
Enter the
file name.
S A V E
" X X X X
"
I C R
I
Saving — Start
^ When display
is on the screen, press the recording
button of the audio cassette.
Saving, End
<—
This refers to the end of the recording. At this
time the cassette
is to be stopped.
Use the
file name so that the program content
is easily understandable.
For naming, use no more than
16 characters.
If you have a cassette deck available, use
it.
If the cassette deck has a counter provided, write the counter number on the cassette tape
label.
VERIFY
Whether or not SAVE was done accurately
is checked by the VERIFY statement.
Rewind the tape, input
I CR
I and press the play button.
If accurately
saved,
VERIFY OK will be displayed.
If VERIFY OK
is not displayed, repeat SAVE from
the beginning.
- 72 -
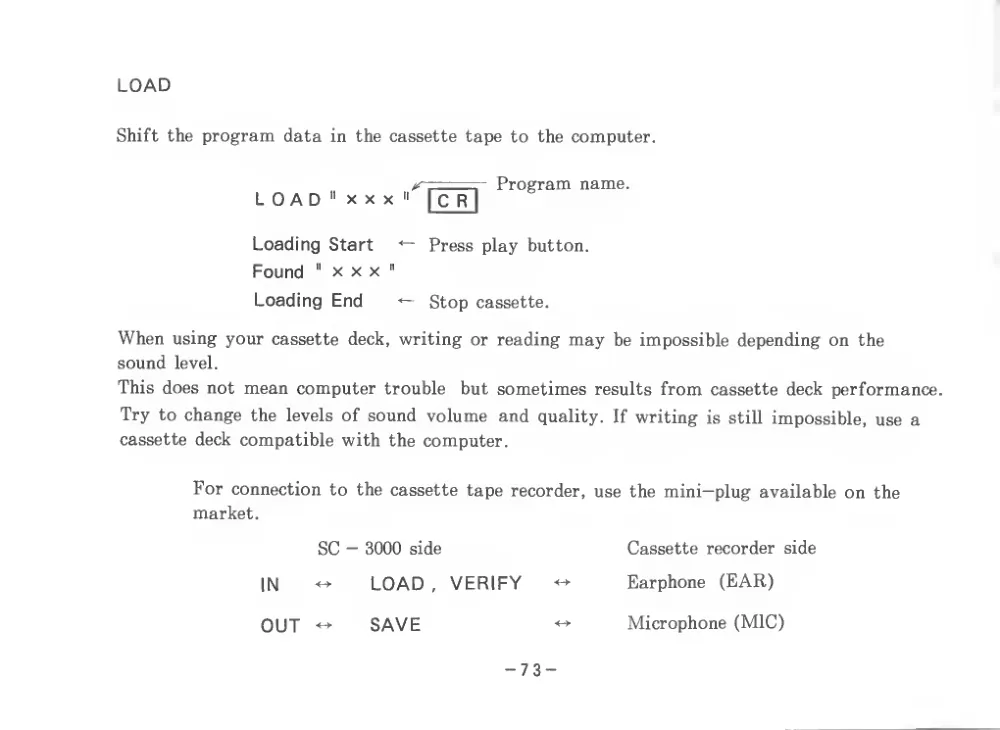
LOAD
Shift the program data in the cassette tape to the computer.
LOAD
Program name.
XXX"
[FrI
Loading Start
^
Press play button.
Found
"
X X X
"
Loading End
Stop cassette.
When using your cassette
deck, writing or reading may be impossible depending on the
sound level.
This does not mean computer trouble
but sometimes results from cassette deck performance.
Try to change the
levels of sound volume and quality.
If writing
is
still impossible, use a
cassette deck compatible with the computer.
For connection to the cassette tape recorder, use the mini—plug available on the
market.
SC - 3000 side
Cassette recorder side
IN
«
LOAD
, VERIFY
^
Earphone
(EAR)
OUT
SAVE
^
Microphone (MIC)
- 73 -
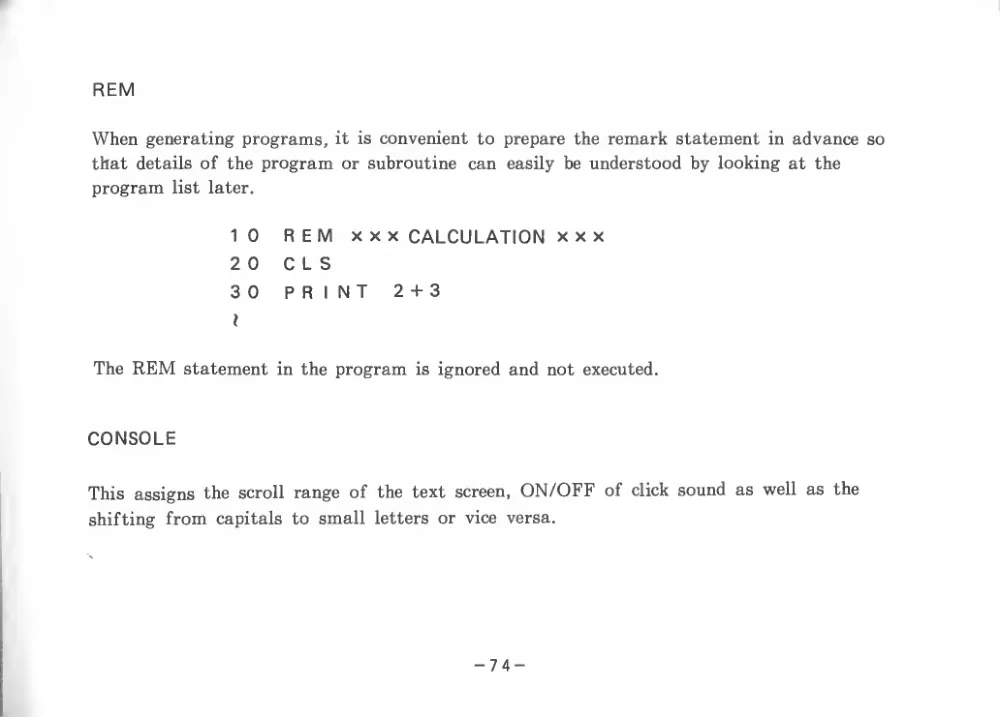
REM
When generating programs,
it
is convenient to prepare the remark statement in advance so
that details of the program or subroutine
can
easily be understood by looking at the
program
list later.
10
REM XXX CALCULATION
x x x
2 0
C L S
30
PRINT
2+3
I
The REM statement in the program
is ignored and not executed.
CONSOLE
This assigns the scroll range of the text screen, ON/OFF of click sound as well as the
shifting from capitals to small
letters or vice
versa.
- 74 -
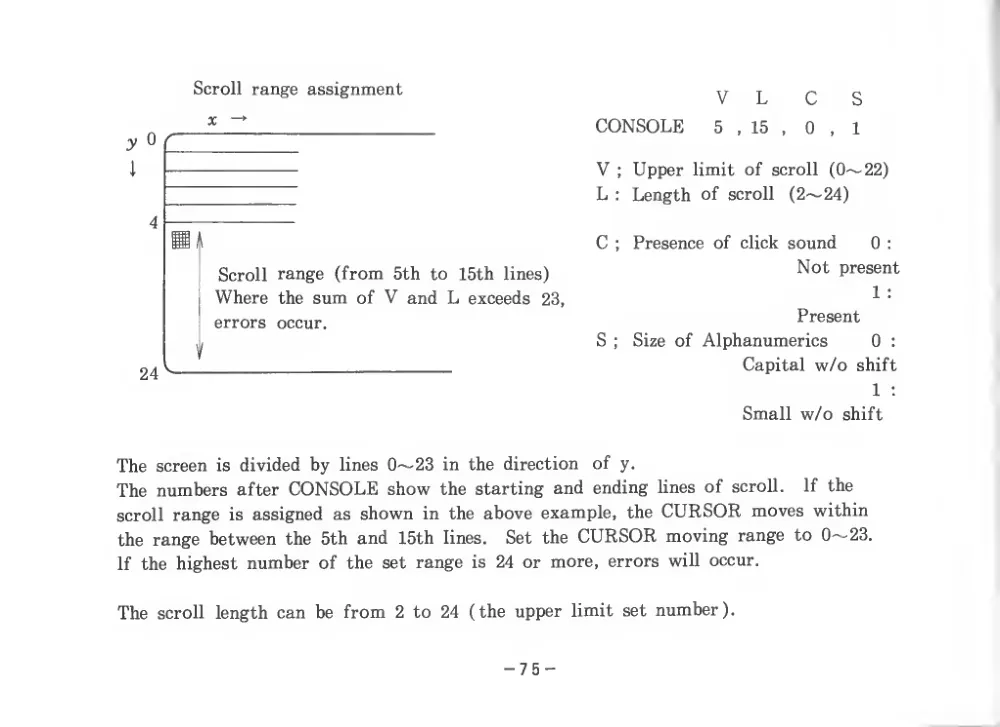
Scroll range assignment
V
L
C
S
0
,
1
y 0
i
4
24
Scroll range (from 5th to
15th
lines)
Where the sum of V and L exceeds
23,
errors
occur.
CONSOLE
5
,
15
,
V
; Upper limit of scroll (0~22)
L
;
Length
of scroll
(2~24)
C
;
Presence of click sound
0
:
Not present
1
:
Present
S
;
Size of Alphanumerics
0
:
Capital w/o shift
1
:
Small w/o shift
The screen
is divided by
lines 0~23 in the direction
of
y.
The numbers after CONSOLE show
the starting and ending
lines of
scroll.
If the
scroll range
is assigned as shown
in the above example,
the CURSOR moves within
the range between the 5th and
15th
lines.
Set the CURSOR moving range to 0~23.
If the highest number of the set range
is
24 or more, errors
will occur.
The
scroll
length can be from
2 to 24 (the upper limit
set number).
- 75 -
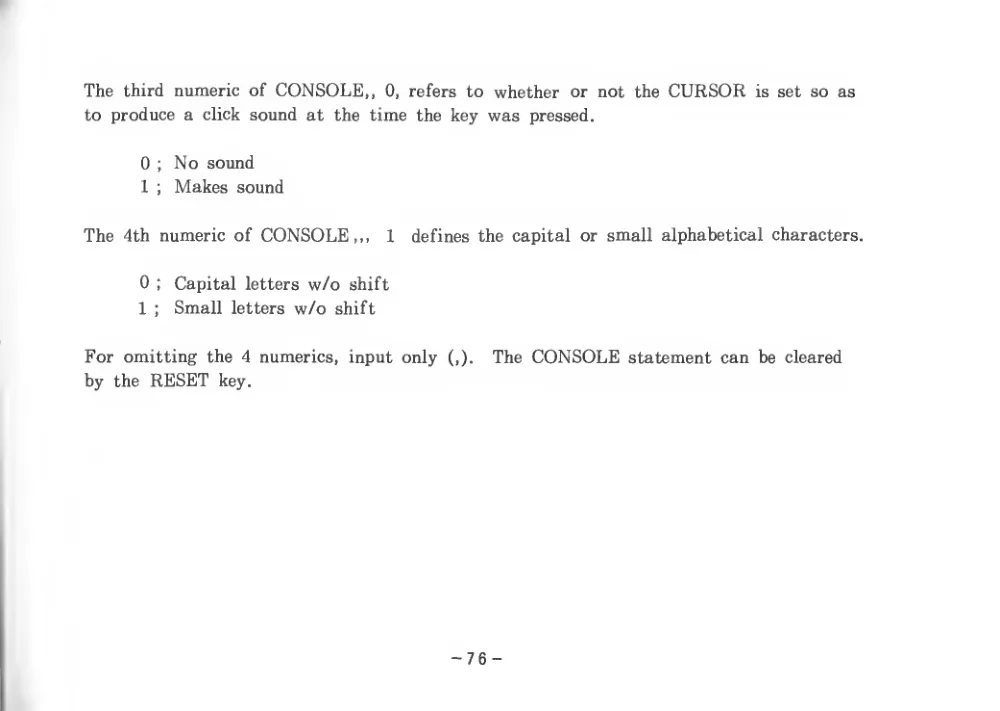
The third numeric of CONSOLE,,
0,
refers to whether
or not the CURSOR
is set so as
to produce a
click sound at
the time the key was pressed.
0
; No sound
1
;
Makes sound
The 4th numeric of CONSOLE,,,
1
defines the capital or small alphabetical characters.
0
;
Capital
letters w/o shift
1
;
Small
letters w/o shift
For omitting the 4 numerics,
input only
(,).
The CONSOLE statement can be cleared
by
the RESET key.
- 76 -
Chapter
4.
Functions
In the function group,
there are mathematical functions and string functions.
Be sure
to
remember functions which are frequently
used.
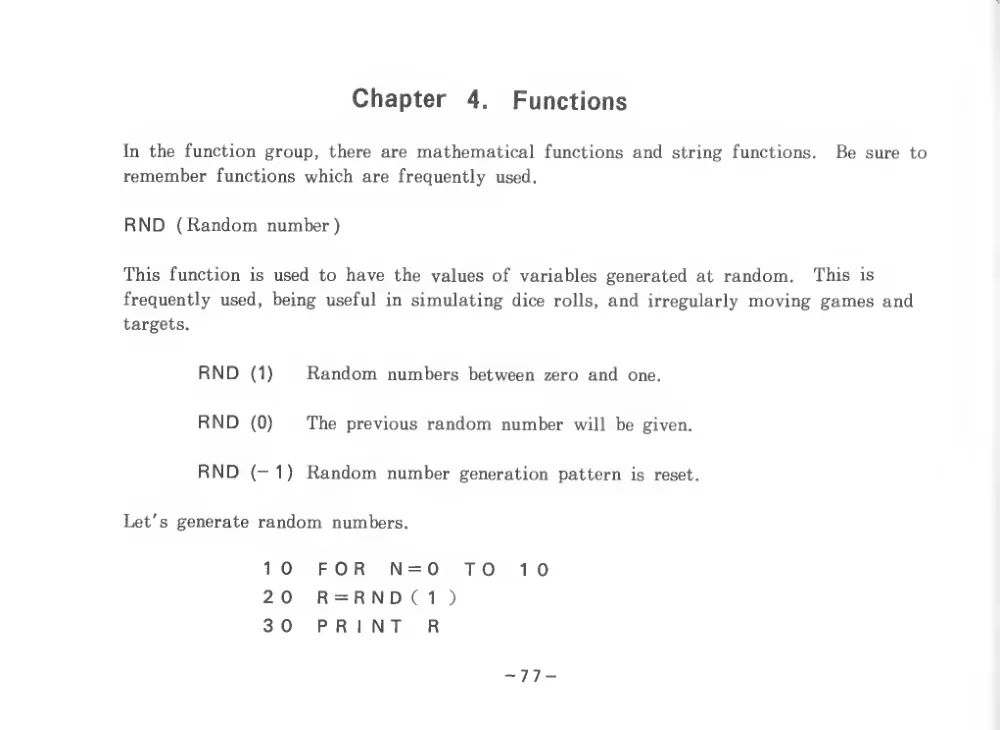
R N D
( Random number )
This function
is used
to have the values of variables generated at random.
This
is
frequently used,
being useful
in simulating dice
rolls, and irregularly moving games and
targets.
RND
(1)
Random numbers between zero and
one.
RND
(0)
The previous random number
will
be given.
RND (-1) Random number generation pattern
is
reset.
Let's generate random numbers.
1 0
FOR
N = 0
2 0
R = R N D
(
1
)
3 0
P R
1 N T
R
- 77 -
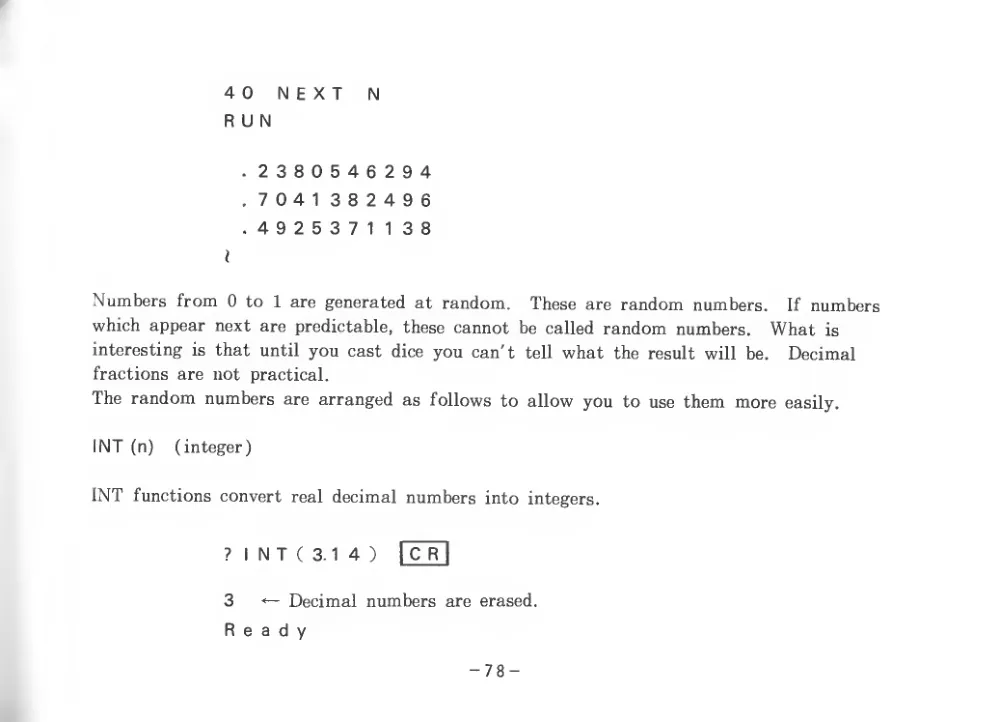
40
NEXT
N
RUN
. 2380546294
. 7041 382496
.4925371138
i
Numbers from
0 to
1 are generated
at random.
These are random numbers.
If numbers
which appear next are predictable,
these cannot
be called random numbers.
What
is
interesting
is that
until you cast
dice you can't
tell what the result will
be.
Decimal
fractions are not
practical.
The random numbers are arranged as follows to allow you to use them more easily.
I NT (n)
(integer)
INT
functions convert real decimal numbers into
integers.
?
I N T
(
3. 1 4
)
C R
I
3
^ Decimal numbers are erased.
Ready
- 78 -
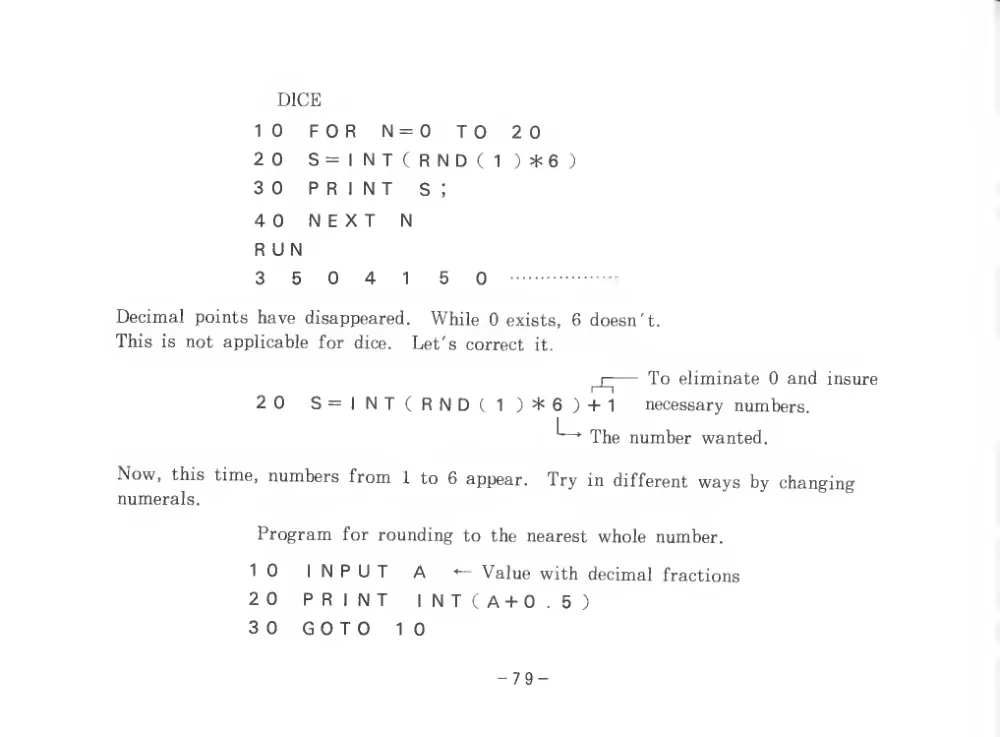
DICE
10
FOR
N=0
TO
20
20
S=INT(RND(1)>1<6)
3 0
PRINT
S
;
40
NEXT
N
RUN
3
5
0
4
1
5
0
Decimal points have disappeared.
While
0 exists,
6 doesn't.
This
is not applicable for
dice.
Let's correct
it.
n— To eliminate 0 and
insure
20
S=INT(RNDC1 )^6) +
1
necessary numbers.
^
' The number wanted.
Now,
this
time, numbers from
1
to 6 appear.
Try
in
different ways by changing
numerals.
Program
for rounding to the nearest whole number.
10
INPUT
A
^ Value with decimal
fractions
20
PRINT
INT(A+0.5)
30
GOTO
10
- 79 -
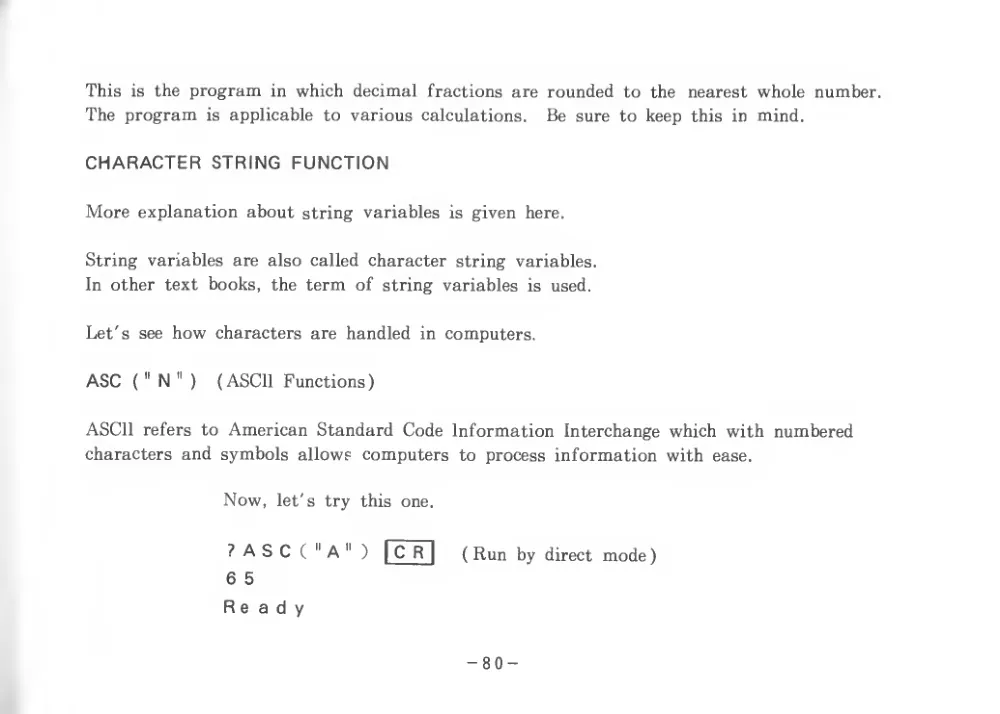
This
is the program
in which decimal
fractions are rounded
to the
nearest whole number.
The program
is applicable to various calculations.
Be sure to keep this
in mind.
CHARACTER STRING FUNCTION
More explanation about string
variables
is given
here.
String variables are also called character string
variables.
In other
text books,
the term of string variables
is
used.
Let's
see how characters are handled
in computers.
ASC
(
" N
"
)
(ASCII Functions)
ASCII
refers to American Standard Code Information Interchange which with numbered
characters and symbols allows computers
to process information with ease.
Now,
let's
try
this one.
? A S C
(
" A
"
)
6 5
Ready
C R
I
( Run by direct mode )
- 80 -
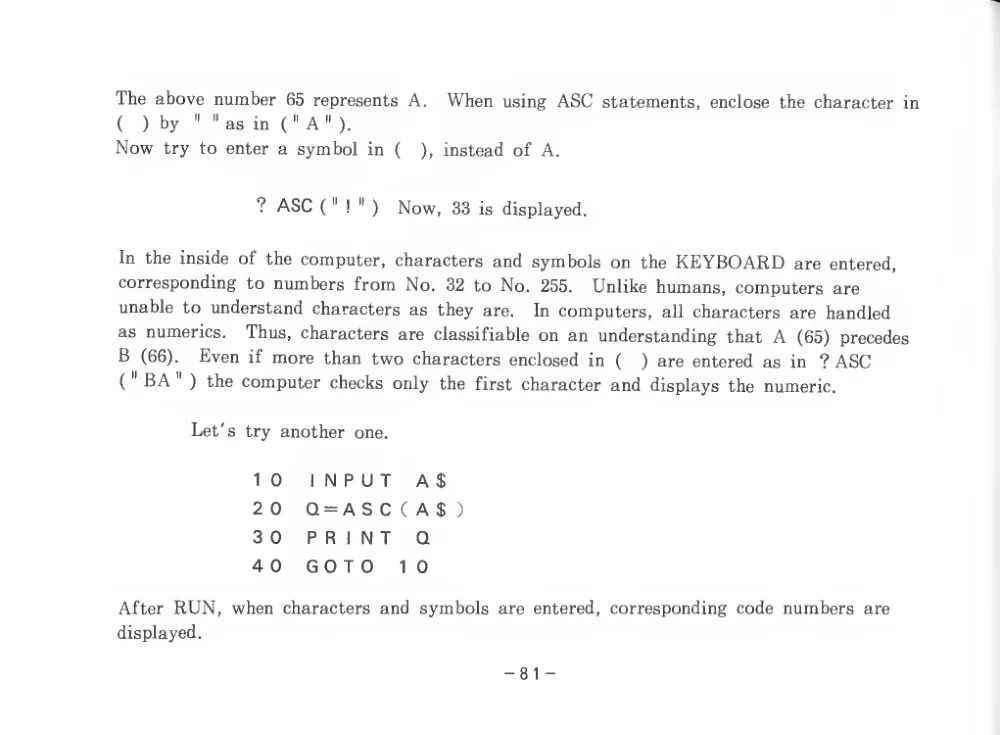
The above number 65 represents A.
When using ASC statements, enclose
the character
in
(
) by
"
" as
in
(
" A
"
).
Now
try to enter a symbol
in
(
),
instead of A.
? ASC
{
"
!
"
)
Now,
33
is displayed.
In the inside of the computer, characters and symbols on
the KEYBOARD are
entered,
corresponding to numbers from No.
32 to No.
255.
Unlike humans, computers are
unable to understand characters
as they
are.
In computers,
all characters are handled
as numerics.
Thus, characters are classifiable on an understanding that A
(65)
precedes
B
(66).
Even
if more than two characters enclosed
in
(
)
are entered as
in
? ASC
(
BA
)
the computer checks only
the
first character and displays the numeric.
Let's try another
one.
10
INPUT
A $
20
Q=ASC(A$)
30
PRINT
Q
40
GOTO
10
After RUN, when characters and symbols are entered, corresponding code numbers are
displayed.
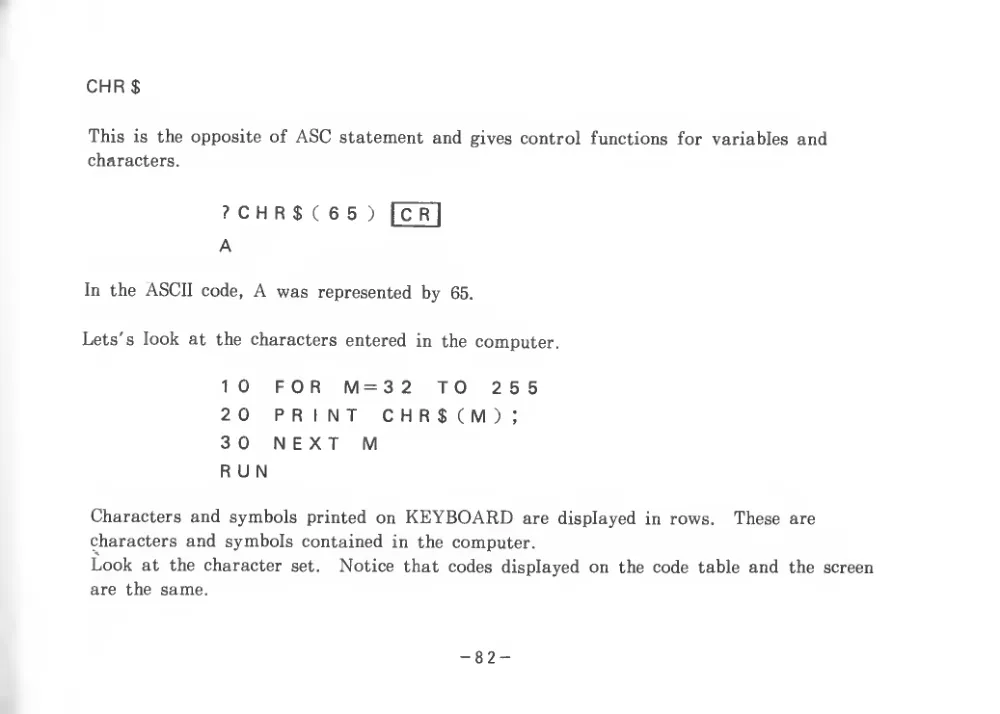
CHR $
This
is the opposite of ASC statement and gives control functions for variables and
characters.
? C H R $
( 6 5
;
A
C R
I
In the ASCII code, A was represented by
65.
Lets' s look at the characters entered
in
the computer.
10
FOR
IVI=32
TO
255
20
PRINT
CHR$(Mj>;
30
NEXT
M
RUN
Characters and symbols printed on KEYBOARD are displayed
in rows.
These are
characters and symbols contained
in the computer.
Look at
the character
set.
Notice that codes displayed on the code table and
the screen
are
the same.
- 82 -
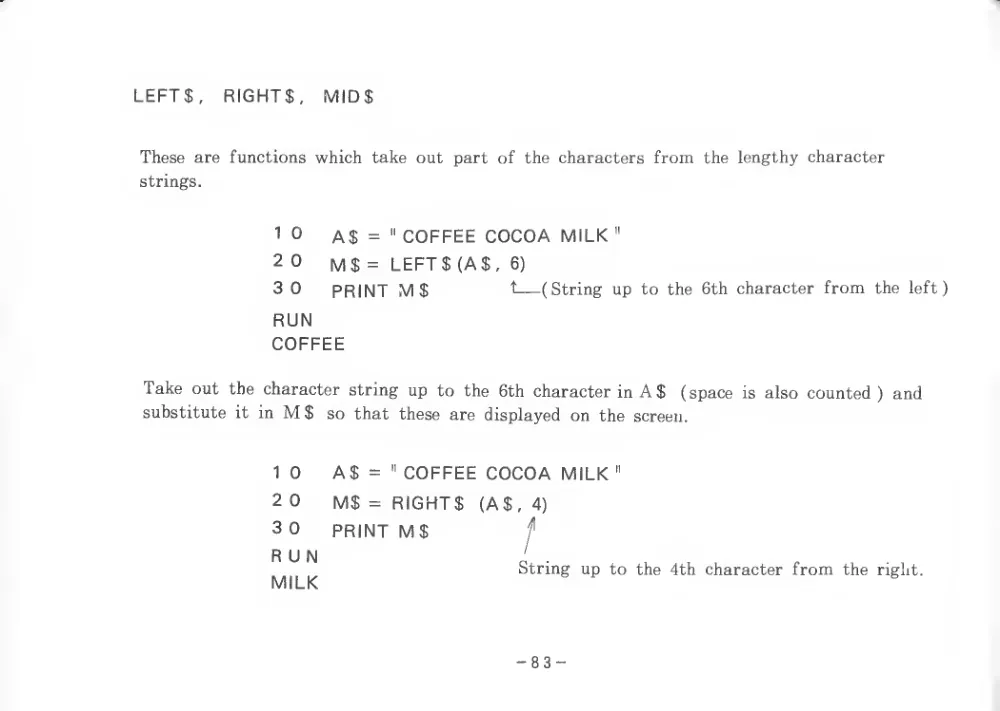
LEFTS,
RIGHTS,
MIDS
These are functions which take out part of the characters from the lengthy character
strings.
10
AS =
" COFFEE COCOA MILK
"
2 0
MS = LEFTS (AS,
6)
3 0
PRINT MS
— (String up
to the 6th character from
the left)
RUN
COFFEE
Take out
the character string up
to
the
6th character in A S
(space
is also counted
) and
substitute
it
in M S
so that these are displayed on the
screen.
10
AS =
" COFFEE COCOA MILK
"
2 0
MS = RIGHTS
(AS,
4)
3 0
PRINT MS
f
RUN
String up
to the 4th character from
the
right.
- 83 -
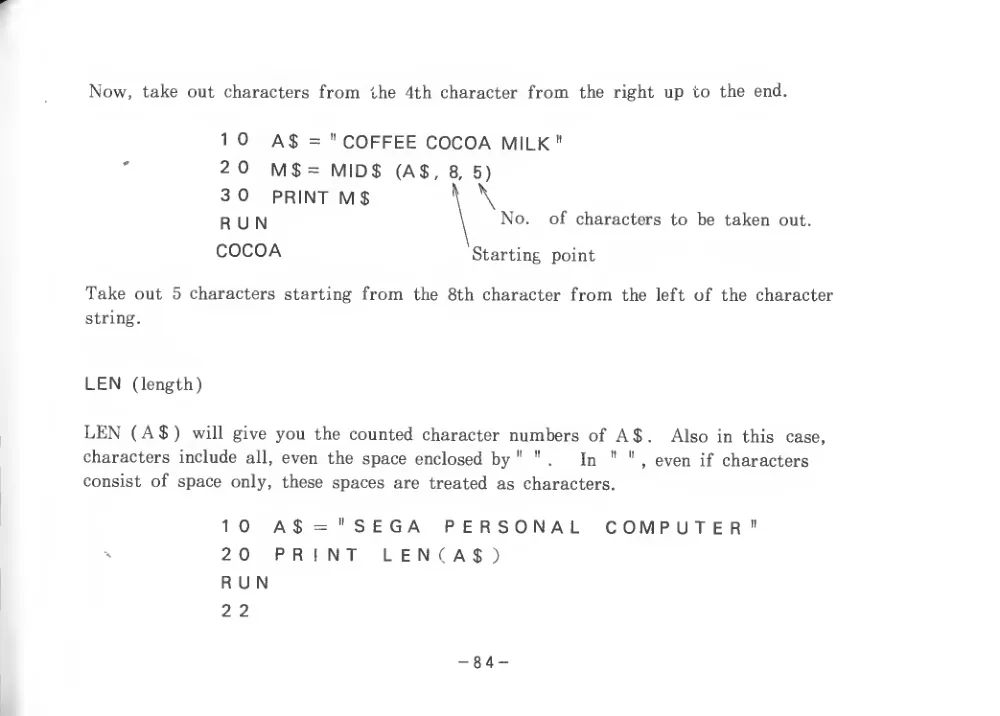
Now,
take out characters from the 4th character from
the right up to the end.
10
A$ =
" COFFEE COCOA MILK
2 0
M$ = MID$
(A$,
8,
5)
3 0
PRINT M$
\ \
\
\
RUN
COCOA
No.
of characters to be taken out.
Starting
point
Take out
5 characters starting from
the 8th character from the
left of the character
string.
LEN
(length)
LEN
( A $
)
will give you
the counted character numbers of A $
.
Also
in
this
case,
characters include
all, even
the space enclosed by
"
"
.
In
"
"
, even
if characters
consist of space
only,
these spaces are
treated as characters.
10
A$="SEGA
PERSONAL
COMPUTER"
20
PRINT
LEN(A$)
RUN
2 2
- 84 -
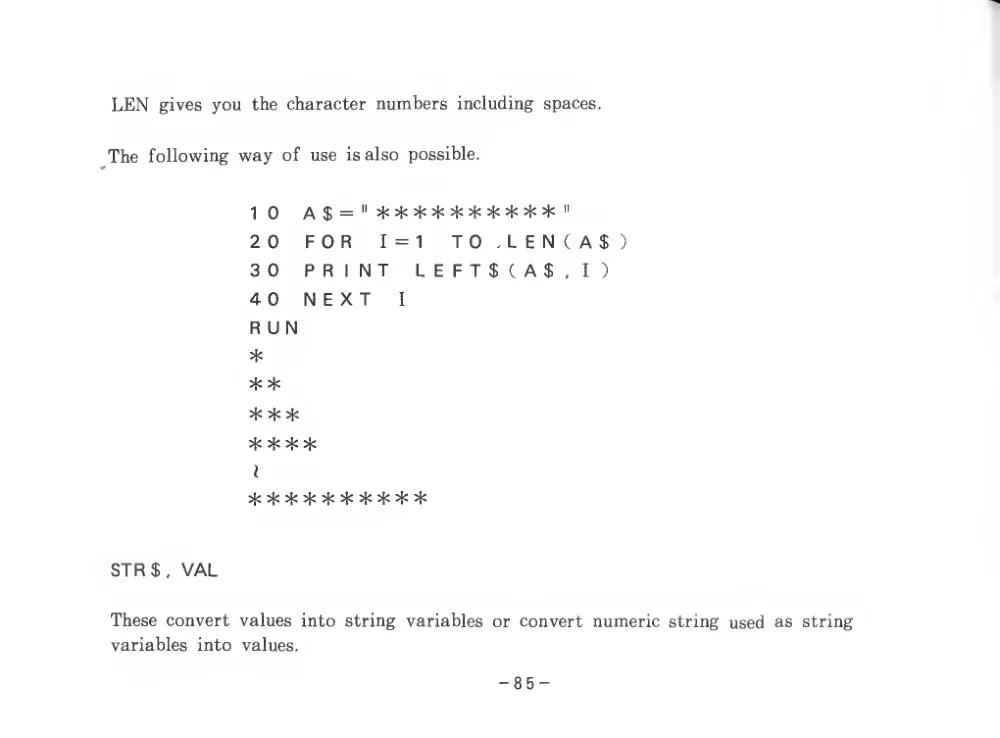
LEN
gives you
the character numbers including spaces.
The following way of use
is also
possible.
10
=
20
FOR
1=1
TO,LEN(A$)
30
PRINT
LEFT$CA$,I)
40
NEXT
I
RUN
*
* *
* * *
* * * *
I
^1.
»T'»
*T'>
STR$, VAL
These convert values into string
variables or convert numeric string used as string
variables
into
values.
- 85 -
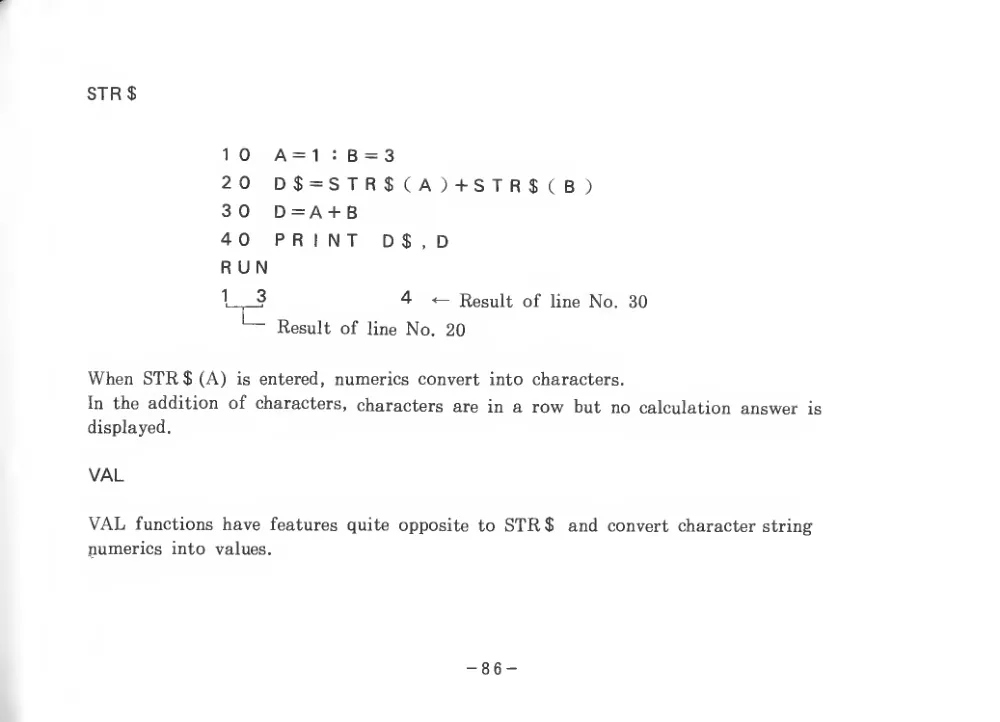
STR$
10
A =
1
: B = 3
20
D $ = S T R $
( A
) +S T R $
( B
)
3 0
D = A + B
40
PRINT
D$,D
RUN
1
,
.?
4
<— Result of
line No.
30
'
Result of
line No. 20
When STR$(A)
is entered, numerics convert into characters.
In the addition of characters, characters are
in a row but no calculation answer
is
displayed.
VAL
VAL functions have features quite opposite to STR $
and convert character string
numerics into
values.
- 86 -
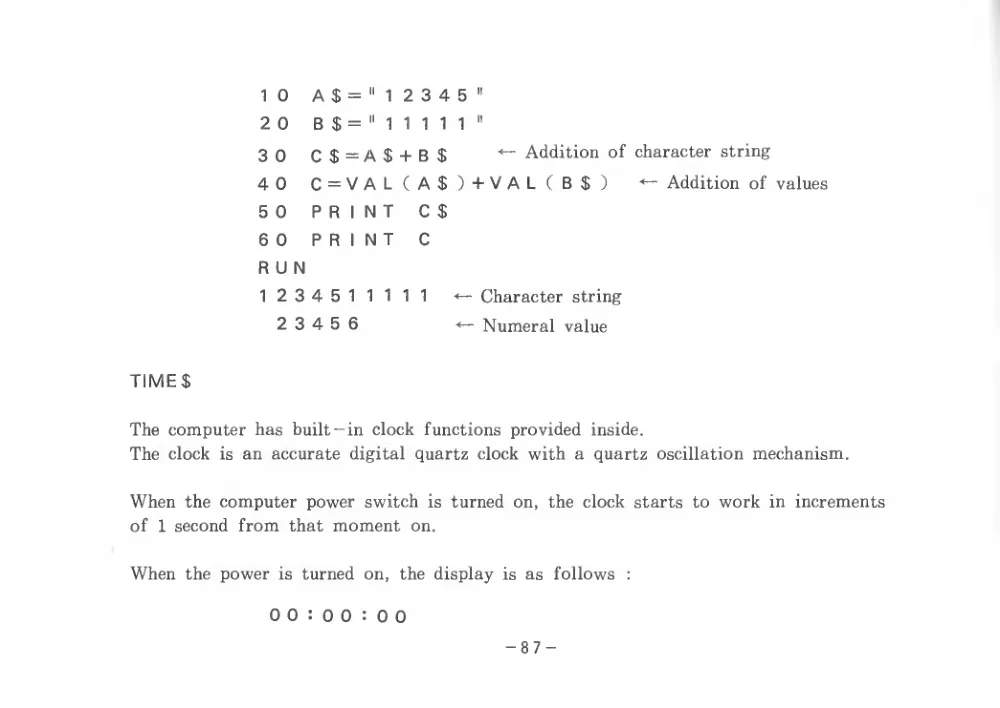
10
A $ =
"
1
2 3 4 5
"
2 0
B $ =
"
1
1
1
1
1
"
30
C$=A$ + B$
^ Addition of character string
40
C=VALCA$)+VAL(B$)
Addition of values
50
PRINT
C$
60
PRINT
C
RUN
1234511111
Character string
2 3 4 5 6
<— Numeral value
TIMES
The computer has built-in clock functions provided
inside.
The clock
is an accurate
digital quartz clock with
a quartz
oscillation mechanism.
When the computer power switch
is turned
on,
the clock starts to work
in increments
of
1 second from that moment
on.
When the power
is turned on,
the display
is as
follows
:
00:00:00
- 87 -
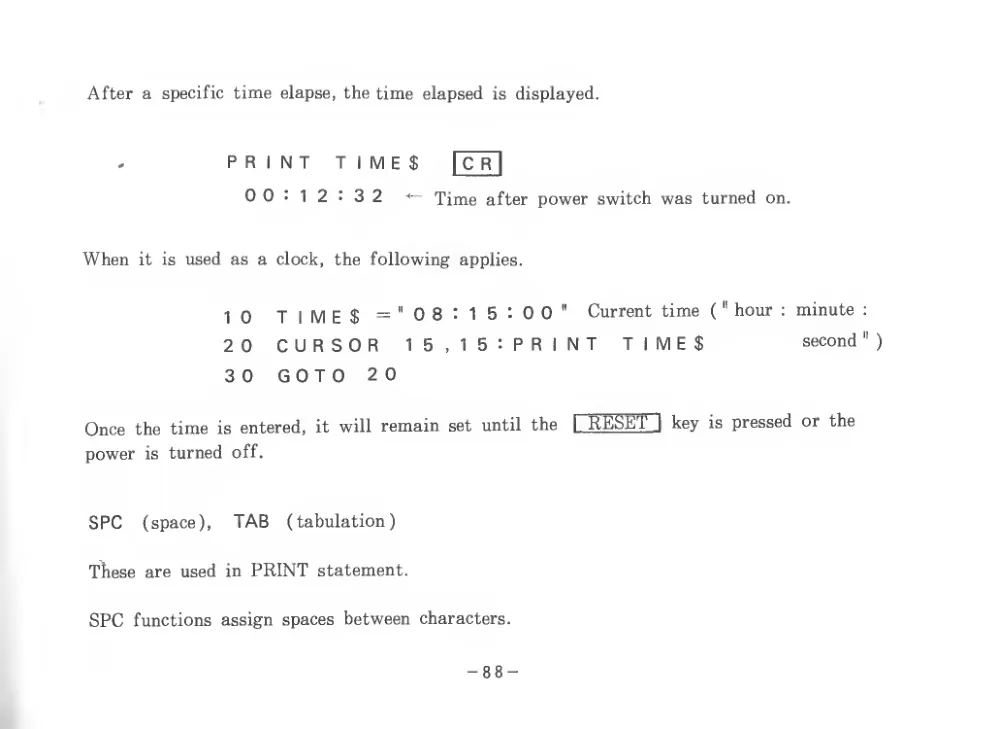
After a
specific time elapse, the time elapsed
is displayed.
,
PRINT
TIMES
I C R
I
0 0:12^32
^ Time after power switch was turned
on.
When
it
is used as a clock,
the following applies.
10
TIMES
=" 08
: 15
: 00
"
Current time
(
" hour
:
20
CURSOR
15,15:PRINT
TIMES
30
GOTO
20
Once the time
is entered,
it will remain
set until the
I RESET ] key
is pressed
power
is turned
off.
SPC
(space),
TAB
(tabulation)
These are used
in PRINT statement.
SPC functions assign spaces between characters.
minute
:
second
''
)
or the
- 88 -
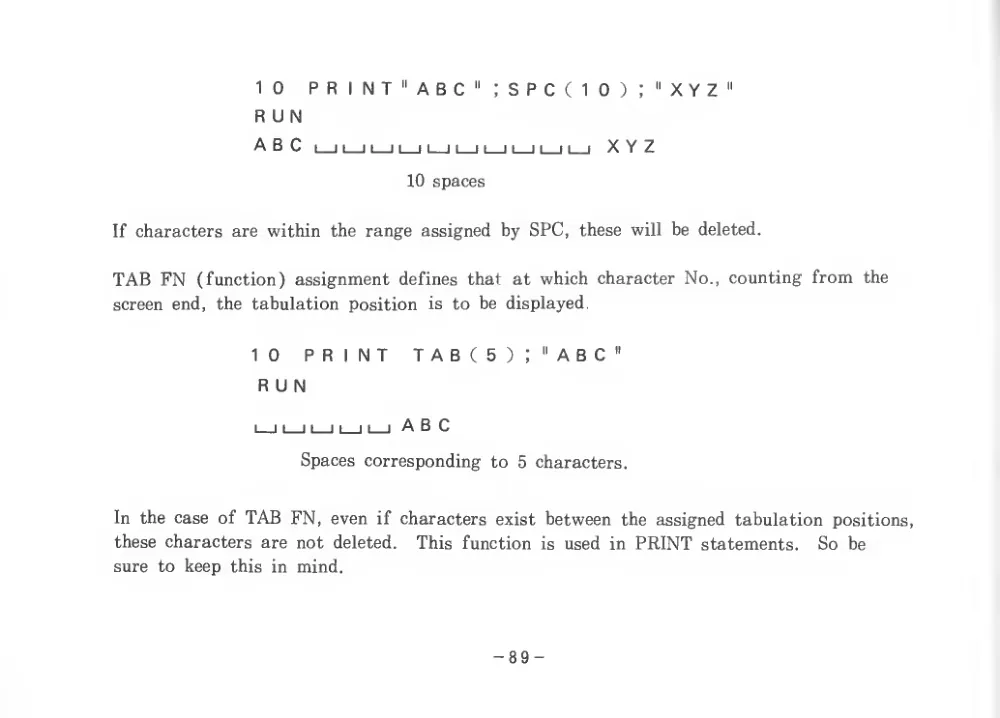
10
PRINT "ABC" ;SPC(10)
; "XYZ"
RUN
ABC
I
1
1
1
1
1
1
1
1
1
1
1
1
1
1
1
1
1
1
I XYZ
10 spaces
If characters are within the range assigned by SPC,
these
will be deleted.
TAB FN
(function) assignment defines that
at which character No., counting from
the
screen end,
the tabulation position
is to be displayed,
10
PRINT
TAB(5);"ABC"
RUN
I
1
1
1
1
1
1
1
1
I ABC
Spaces corresponding to
5 characters.
In the case of TAB FN, even
if characters exist between the assigned tabulation positions,
these characters are not deleted.
This function
is used
in PRINT statements.
So
be
sure to keep this
in mind.
- 89 -
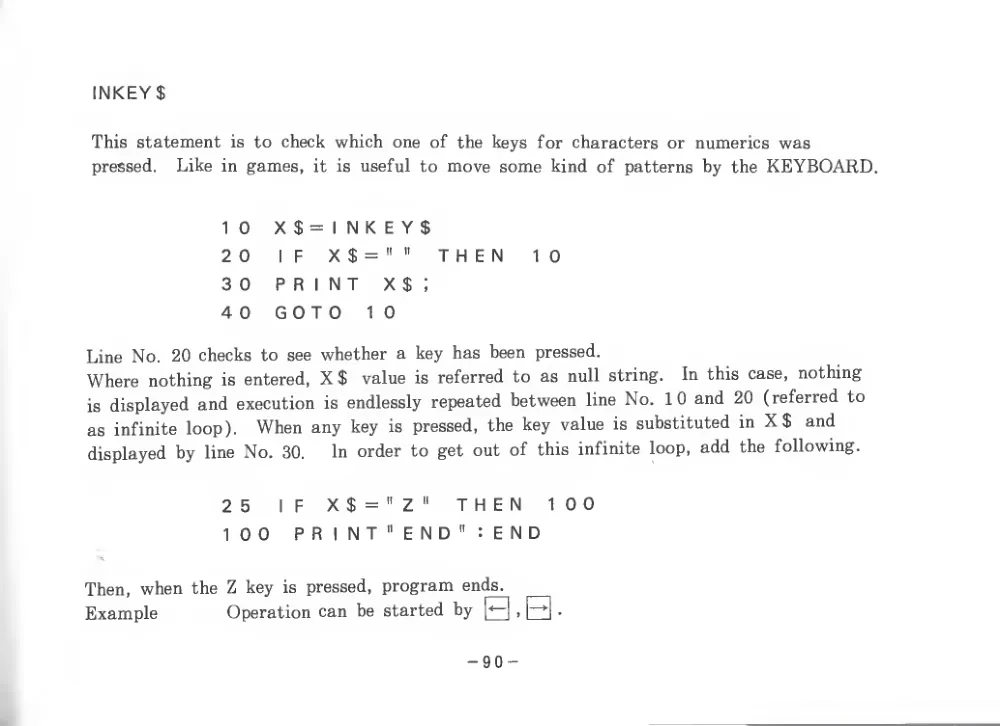
INKEY$
This statement
is to check which one of the keys for characters or numerics was
pressed.
Like
in games,
it
is useful
to move some kind of patterns by the KEYBOARD.
1 0
X $ =
1 N K E Y $
2 0
1
F
X $ =
"
"
THEN
1 0
3 0
P R
1 N T
X $
;
4 0
GOTO
10
Line No. 20 checks
to
see whether a key has been pressed.
Where nothing
is entered, X$
value
is referred to as
null
string.
In this case, nothing
is displayed and execution
is endlessly repeated between
line No. 10 and 20
(referred to
as
infinite loop).
When any key
is
pressed,
the key value
is substituted
in X$
and
displayed by
line No.
30.
In order to get out of
this
infinite loop, add the following.
25
IF
X$="Z"
THEN
100
100
PRINT
" END ":END
Then, when the Z key
is pressed, program ends.
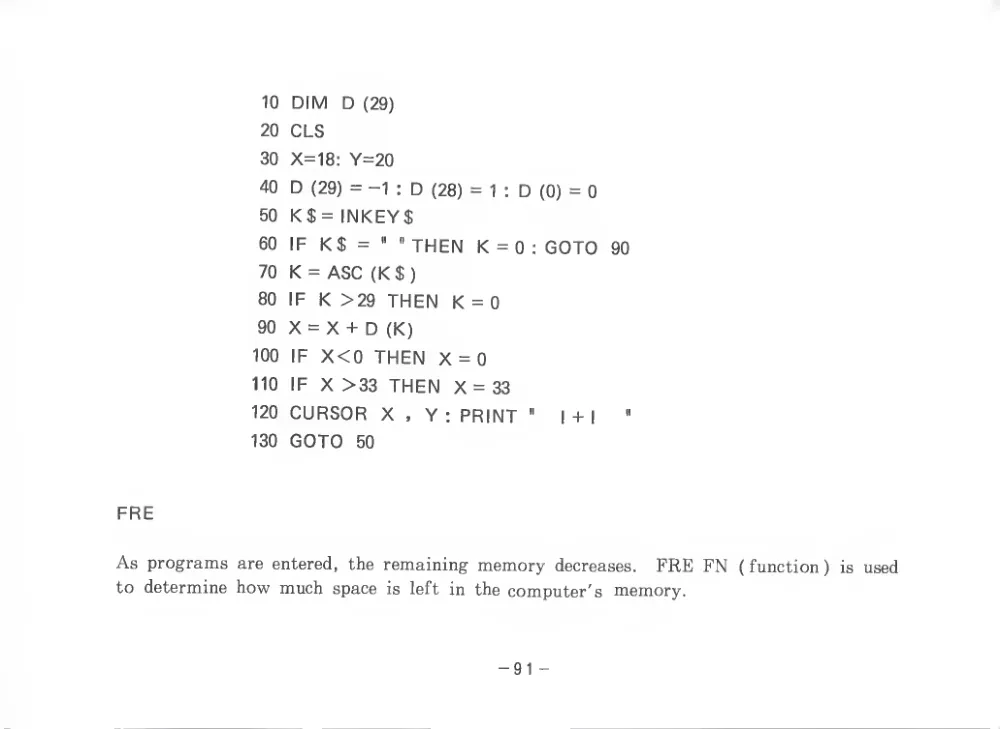
Example
Operation can be started by
.
- 90 -
10 DIM
D (29)
20 CLS
30
X=18: Y=20
40 D (29) = -1
: D (28) =
1
; D
(0) = 0
50 K$= INKEY$
60
IF K$ =
''
" THEN
K = 0
: GOTO
90
70 K = ASC (K $
)
80
IF
K >29 THEN
K = 0
90 X = X + D (K)
100
IF X<0 THEN X = 0
110
IF X >33 THEN X = 33
120 CURSOR X
, Y
; PRINT
"
I +
I
"
130 GOTO
50
FRE
As programs are entered,
the remaining memory decreases.
FRE FN
(function)
is used
to determine how much space
is
left
in the computer's memory.
-91 -
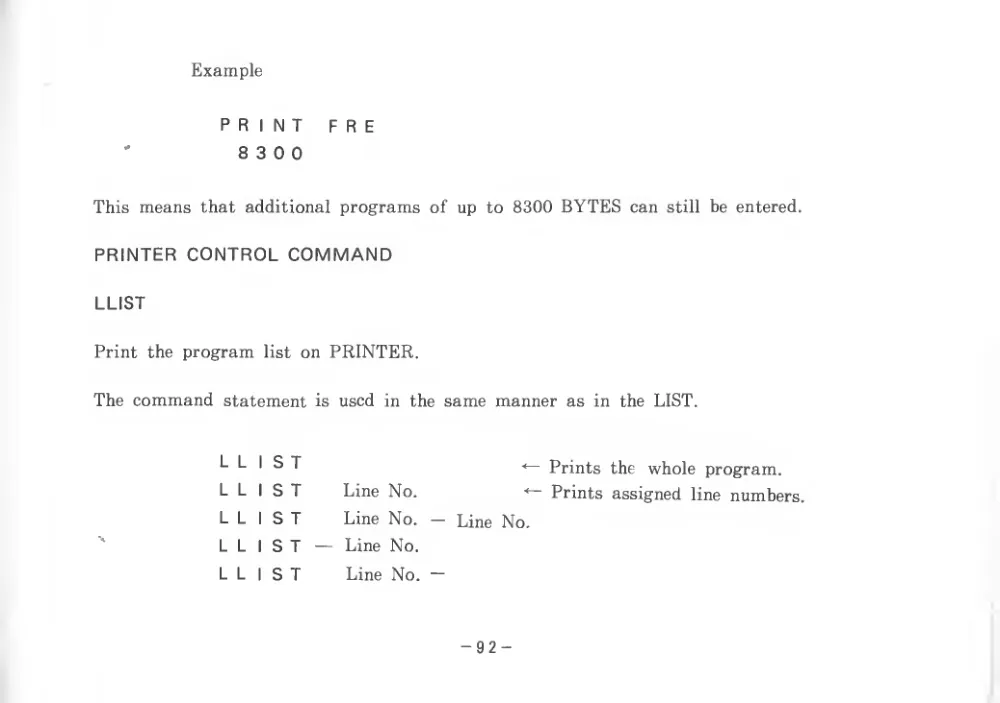
Example
PRINT
F R E
'
8 3 0 0
This means that additional programs of up to 8300 BYTES can
still
be entered.
PRINTER CONTROL COMMAND
LLIST
Print the program
list on PRINTER.
The command statement
is used
in
the same manner as
in the LIST.
LLIST
LLIST
LLIST
LLIST
LLIST
Prints
the
whole program.
Line No.
Prints assigned
line numbers.
Line No. —
Line No.
Line No.
Line No. —
- 92 -
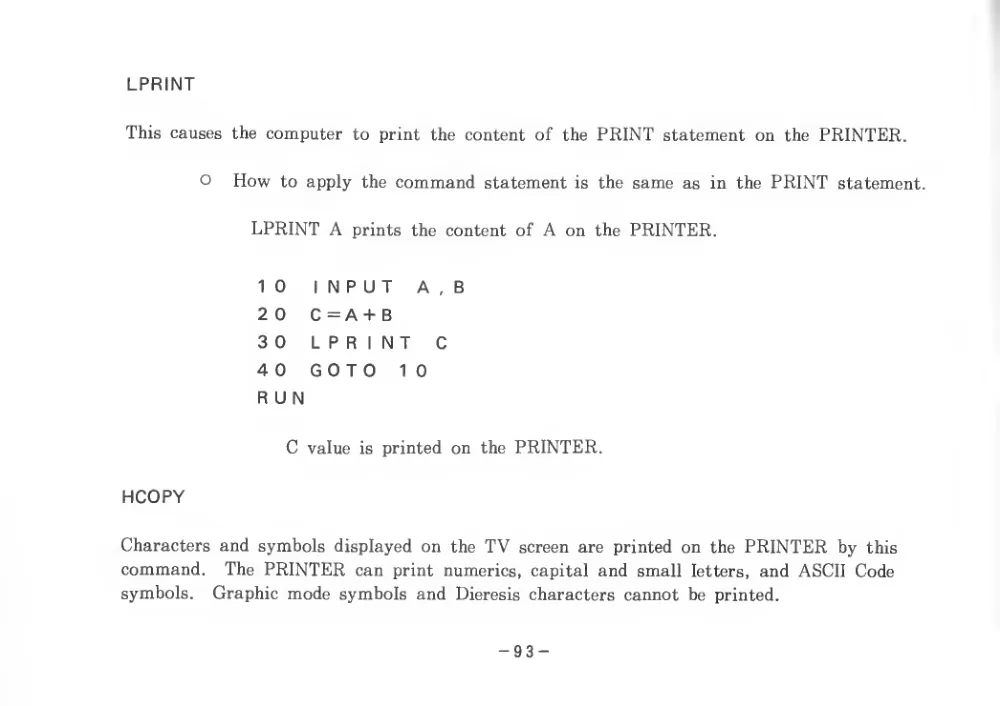
LPRINT
This causes
the computer to print
the content of the PRINT statement on
the PRINTER.
O
How to apply
the command statement
is the same as
in
the PRINT statement.
LPRINT A
prints the content of A on
the PRINTER.
10
INPUT
A
, B
2 0
C =A + B
30
LPRINT
C
40
GOTO
10
RUN
C value
is printed on the PRINTER.
HCOPY
Characters and symbols displayed on the TV screen are printed on the PRINTER by
this
command.
The PRINTER can print numerics,
capital and small
letters, and ASCII Code
symbols.
Graphic mode symbols and Dieresis characters cannot
be
printed.
- 93 -
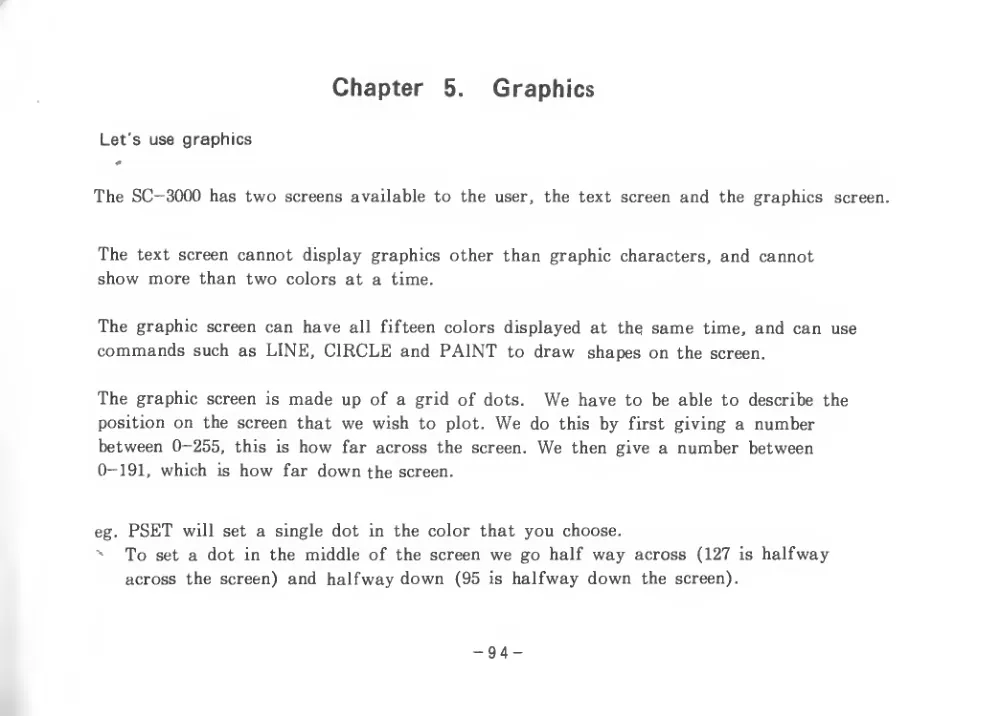
Chapter
5.
Graphics
Let's use graphics
The SC-3CX)0 has two screens available to the user,
the text screen and the graphics
screen.
The
text screen cannot display graphics other than graphic characters, and cannot
show more than two
colors at a time.
The graphic screen can have
all
fifteen colors displayed at the same time, and can use
commands such as LINE, CIRCLE and PAINT
to draw
shapes on the screen.
The graphic screen
is made up of a grid of dots.
We have to be able to describe the
position on
the screen that we wish
to
plot. We do
this by
first giving a number
between 0—255,
this
is how
far across the
screen. We then give a number between
0-191, which
is how
far down the screen.
eg. PSET
will
set a
single dot
in the color
that you choose.
'
To
set a dot
in the middle of the screen we go half way across
(127
is halfway
across
the screen) and halfway down
(95
is halfway down
the screen).
- 94 -
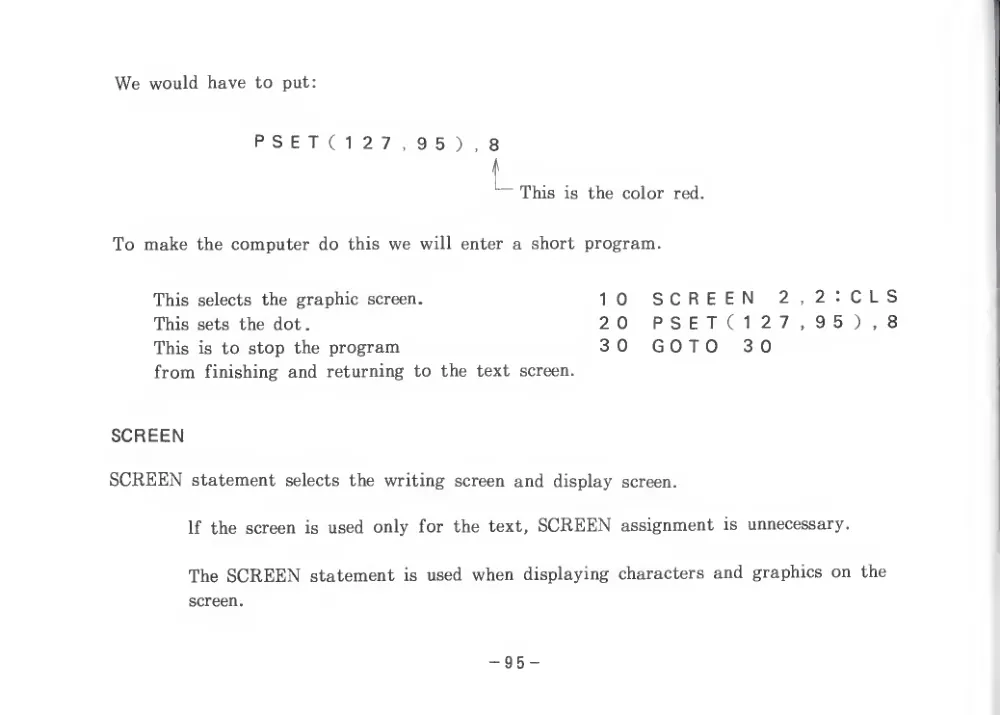
We would have to put:
PSET(127,95),8
L This
is the color
red.
To make the computer do this we will enter a short program.
This
selects
the graphic screen.
1 0
SCREEN
2
,
2
: C L S
This sets the dot
.
2 0
P S E T
(
1
2 7
^,
9 5
)
, 8
This
is to stop the program
3 0
GOTO
30
from
finishing and returning to
the text
screen.
SCREEN
SCREEN statement
selects the writing screen and display screen.
If the screen
is used only
for the text, SCREEN assignment
is unnecessary.
The SCREEN statement
is used when displaying characters and graphics on
the
screen.
- 95 -
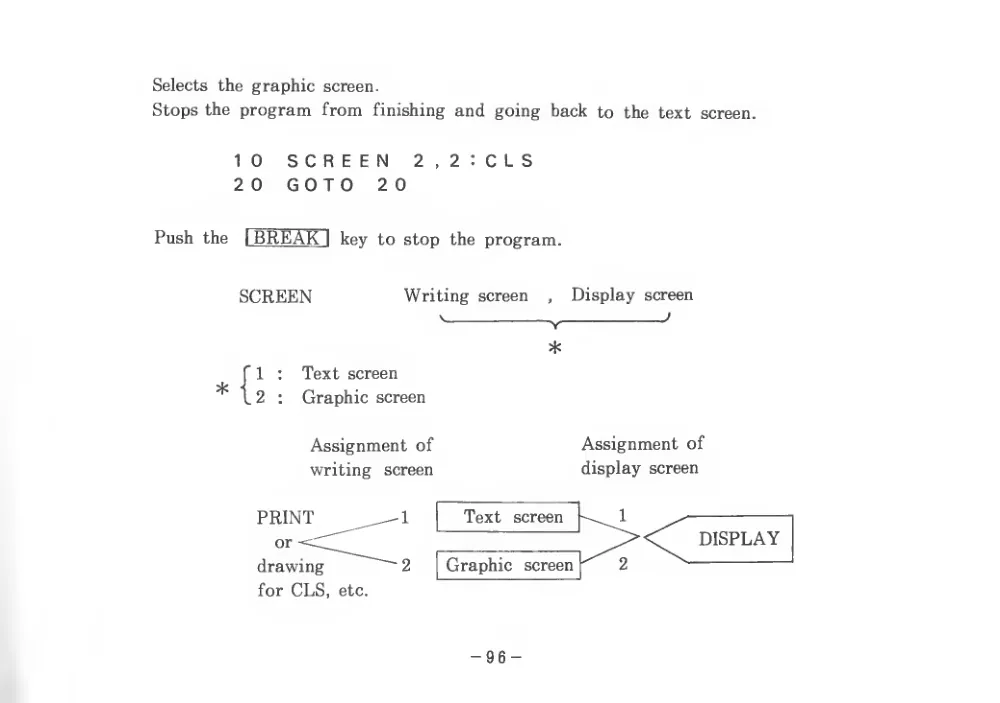
Selects
the graphic screen.
Stops the program from
finishing and going back to the text screen.
10
SCREEN
2,2;CLS
20
GOTO
20
Push
the
I BREAK"! key to stop
the program.
SCREEN
Writing screen
,
Display screen
*
Text screen
Graphic screen
*
Assignment of
writing
screen
Assignment of
display screen
PRINT
or
drawing
for CLS,
etc.
- 96 -
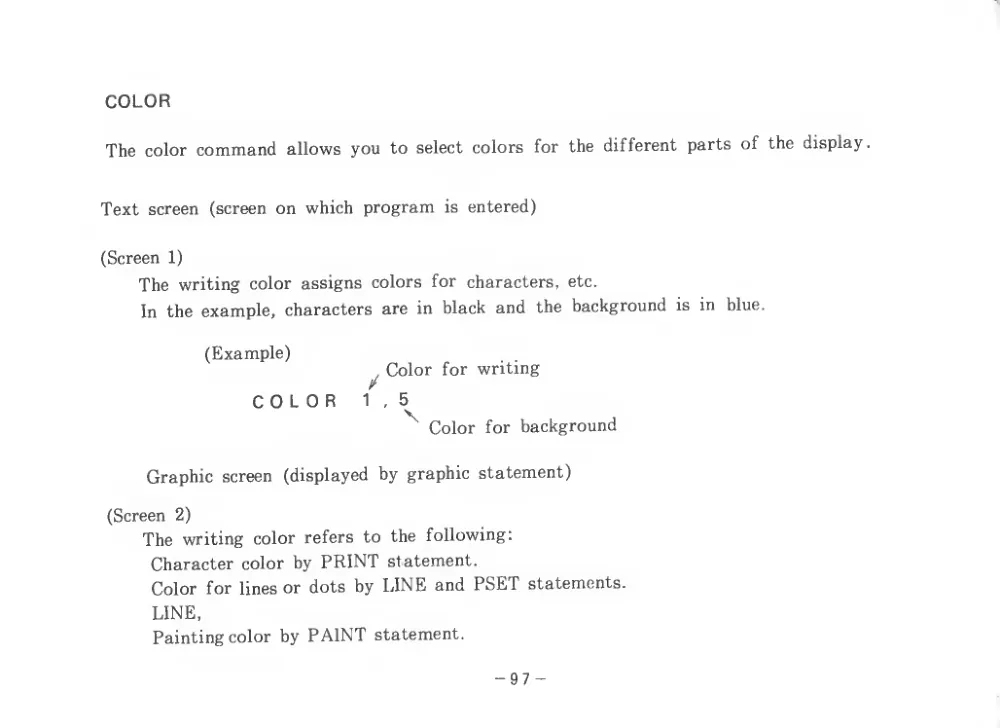
COLOR
The color command allows you to
select colors
for
the different parts of the display.
Text screen
(screen on which program
is entered)
(Screen
1)
The writing color assigns colors
for
characters,
etc.
In the example, characters are in black and
the background
is
in
blue.
(Example)
COLOR
, Color
for writing
/
Color
for background
Graphic screen
(displayed by graphic statement)
(Screen
2)
The writing color
refers to the following:
Character color by PRINT statement.
Color for lines or dots by LINE and PSET statements.
LINE,
Painting color by PAINT statement.
-97 -
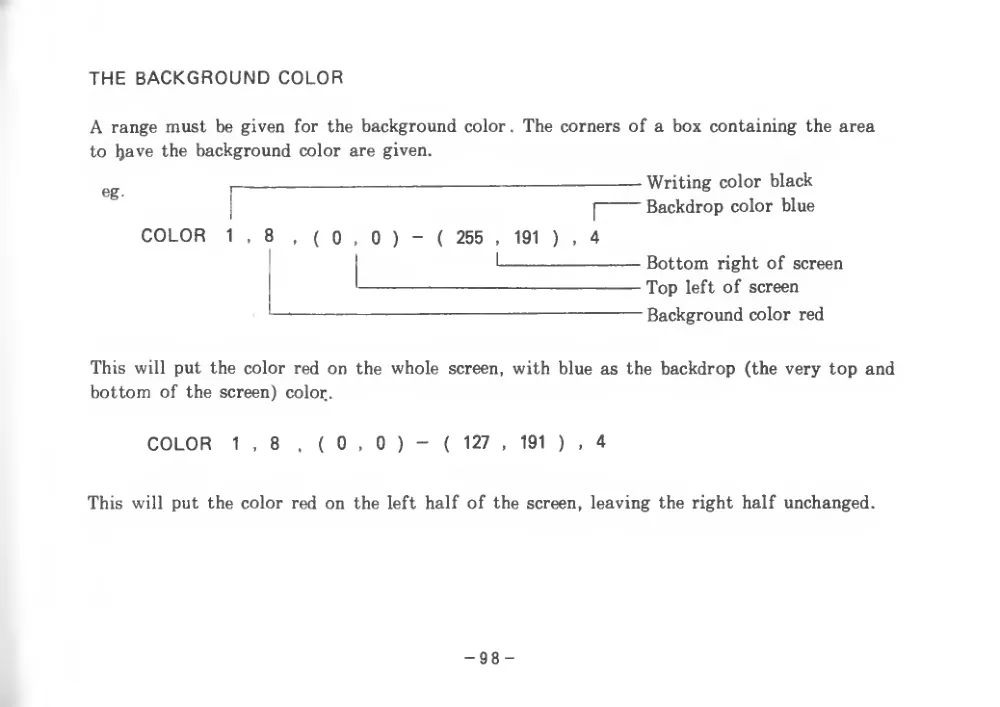
THE BACKGROUND COLOR
A range must be given for the background color
. The corners of a box containing the area
to Ijave the background color are given.
gg
,
Writing color black
I
I
Backdrop color blue
COLOR
1,8
,
(
0
,
0
)
-
(
255
,
191
)
,
4
I
I
Bottom right of screen
'
Top left of screen
Background color red
This will put the color red on the whole
screen, with blue as the backdrop (the very top and
bottom of the screen) color.
COLOR
1,8
.
(
0
,
0
) -
(
127
,
191
)
,
4
This will put the color red on the left half of the screen, leaving the right half unchanged.
- 98 -
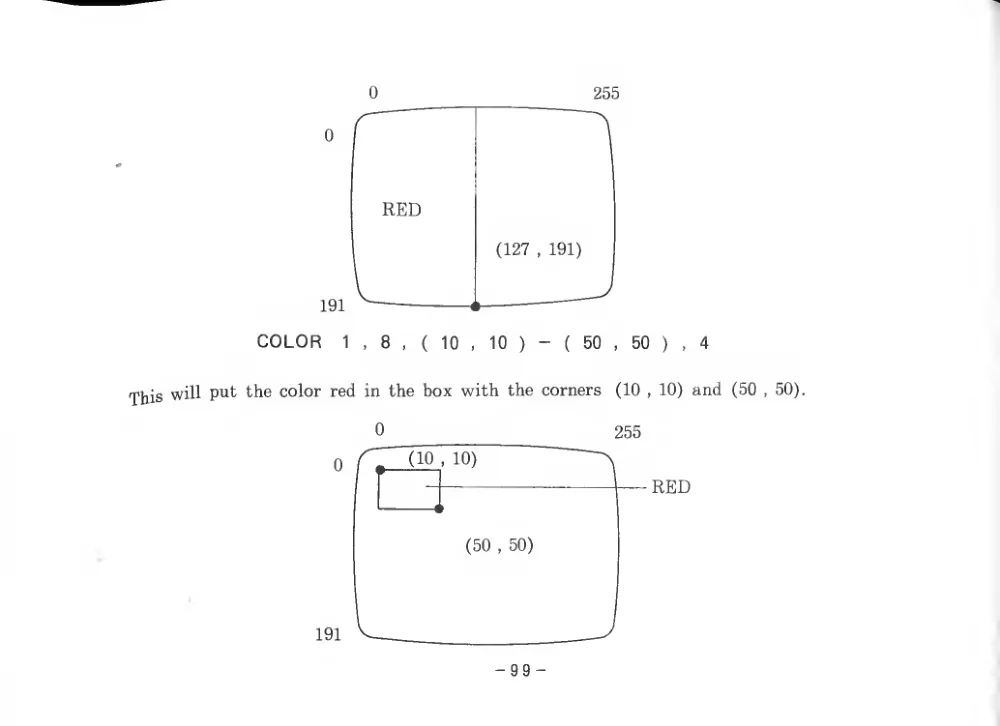
0
255
COLOR
1
,
8
,
(
10
.
10
)
-
(
50
,
50
)
,
4
This will put the color red in the box with the corners
(10
, 10) and
(50
, 50).
0
255
- 99 -
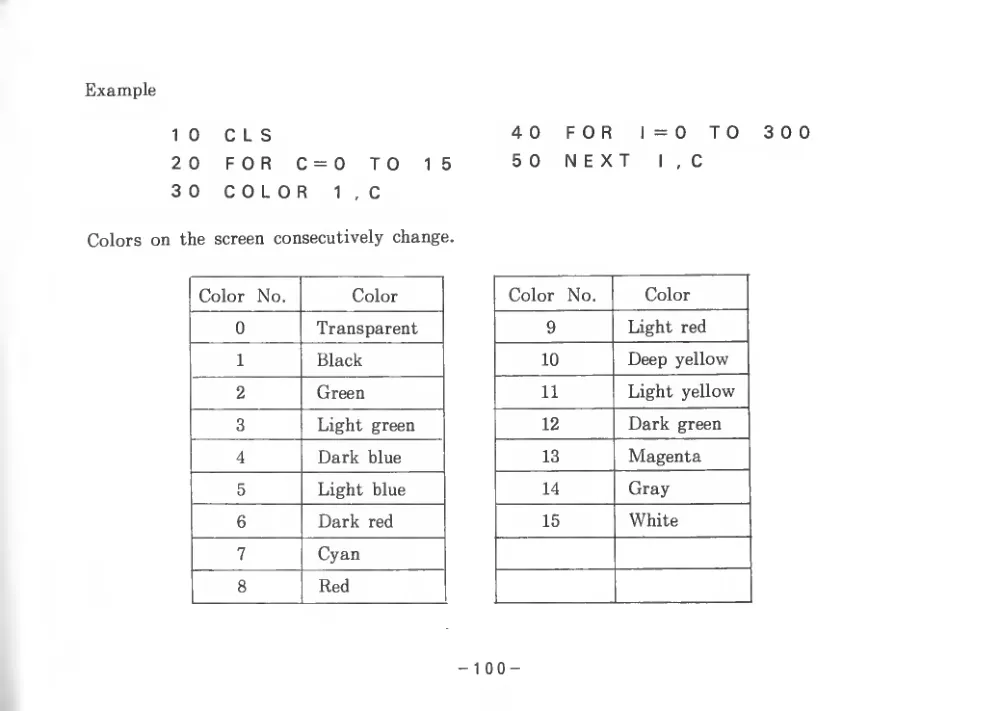
Example
10
C L S
20
FOR
C=0
TO
15
30
COLOR
1,C
Colors on the screen consecutively change.
Color
No.
Color
0
Transparent
1
Black
2
Green
3
Light green
4
Dark blue
5
Light blue
6
Dark red
7
Cyan
8
Red
4 0
5 0
FOR
1=0
TO
300
NEXT
I
, C
Color
No.
Color
9
Light red
10
Deep yellow
11
Light yellow
12
Dark green
13
Magenta
14
Gray
15
White
100 -
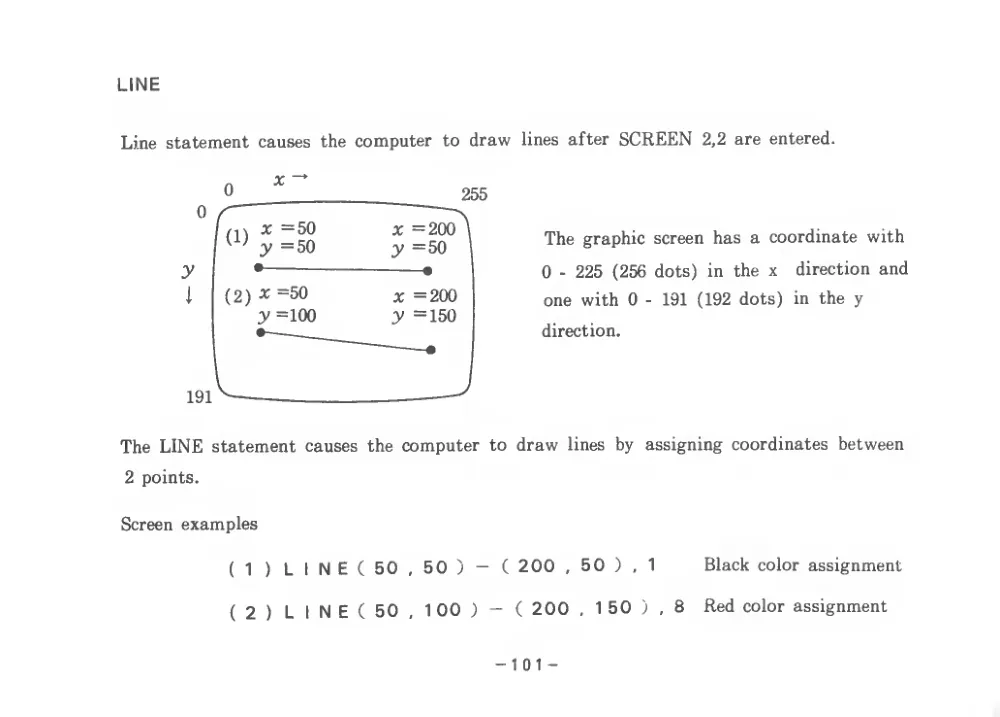
LINE
Line statenaent causes the computer
to draw
0
255
lines after SCREEN
2,2 are entered.
The graphic screen has a coordinate with
0
- 225
(256 dots)
in
the x
direction and
one with 0
-
191
(192 dots)
in
the y
direction.
The LINE statement causes the computer to draw
lines by
assigning coordinates between
2 points.
Screen examples
(
1
)
L
I N E
( 50
( 2
)
L
I N E
( 50
50
) -
( 200
, 50
)
,
1
1 00
) -
( 200
,
1 50
;
, 8
Black color assignment
Red color assignment
- 101 -
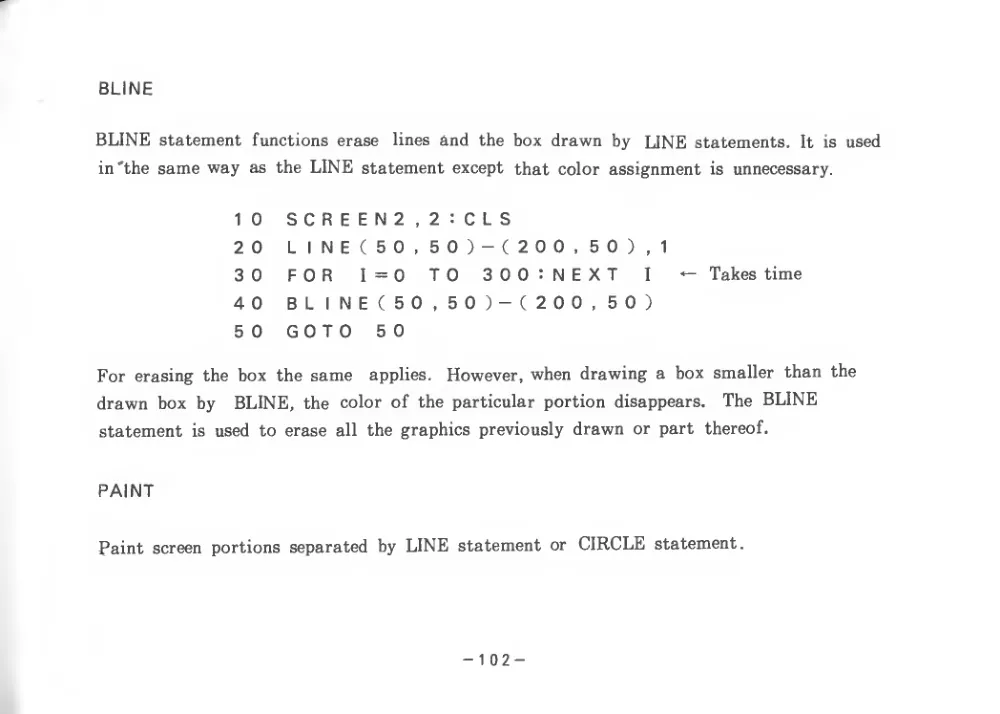
BLINE
BLINE statement
functions erase
lines and
the box drawn by
LINE statements.
It
is used
in 'the same way as the LINE statement except that color assignment
is unnecessary.
10
SCREEN2,2:CLS
20
LINE(50,50)-(200,50),1
30
FOR
1=0
TO
300:NEXT
I
Takes time
40
BLINE(50,50)-(200,50)
50
GOTO
50
For erasing the box the same
applies.
However, when drawing a box smaller than the
drawn box by
BLINE, the
color of the particular portion disappears.
The BLINE
statement
is used to erase
all
the graphics previously drawn or part
thereof.
PAINT
Paint screen portions separated by LINE statement or CIRCLE statement.
- 102 -
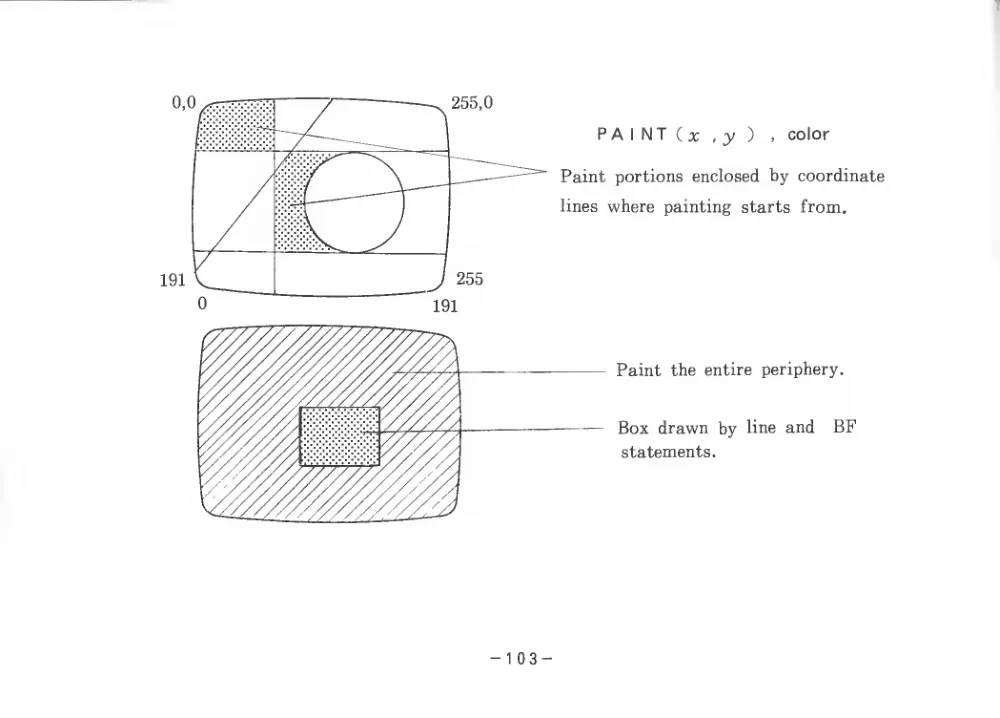
-103
PAINT (x,y)
,
color
Paint portions enclosed by coordinate
lines where painting starts from.
Paint the entire periphery.
—
Box drawn by
line and
BF
statements.
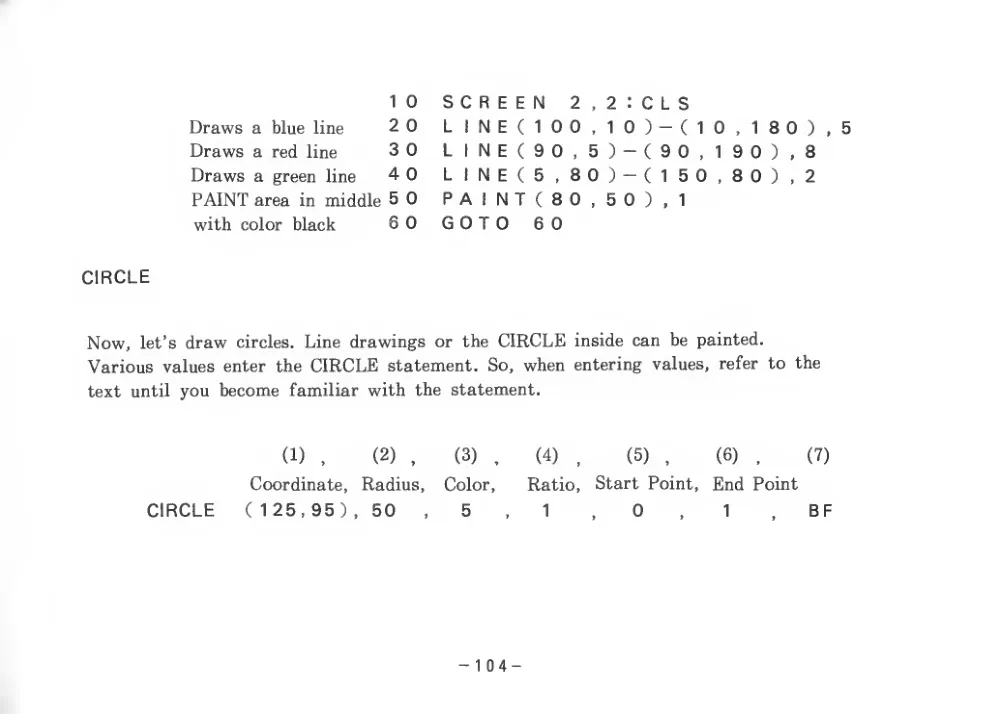
1 0
SCREEN
2
,
2
: C L S
Draws a
blue line
2 0
L
1 N E
(
1 0 0
.
1 0
) -
(
1 0
,
1 8 0
)
,
5
Draws a red
line
3 0
L
1 N E
( 9 0
.
5
) -
( 9 0
,
1
9 0
)
, 8
Draws a green
line
4 0
LINE(5,80)-(150
, 8 0
)
, 2
PAINT area
in middle 5 0
P A
1 N T
( 8 0
,
5 0
)
,
1
with color black
6 0
GOTO
60
CIRCLE
Now,
let’s draw
circles. Line drawings or the CIRCLE inside can be painted.
Various values enter the CIRCLE statement.
So, when entering
values,
refer to the
text
until you become familiar with the statement.
(1)
,
(2)
,
(3)
.
(4)
,
(5)
,
(6)
(7)
Coordinate,
Radius,
Color,
Ratio,
Start Point,
End Point
CIRCLE
(
1 25,95
)
,
50
,
5
1,0,
1
,
be
-104
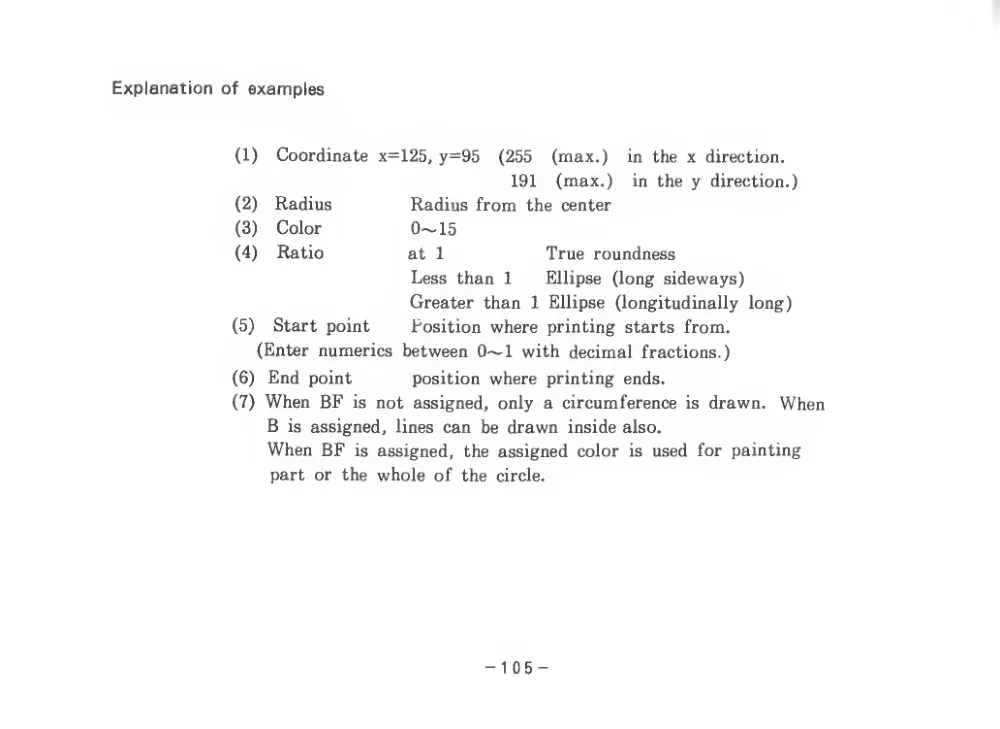
Explanation of examples
(1)
Coordinate x=125, y=95
(255
(max.)
in the x direction.
(2)
Radius
(3)
Color
(4)
Ratio
191
(max.)
in the y
direction.)
Radius from
the center
0~15
at
1
True roundness
(5)
Start point
Less than
1
Ellipse
(long sideways)
Greater than
1
Ellipse
(longitudinally
long)
Position where printing starts from.
(Enter numerics between 0~1 with decimal fractions.)
(6)
End point
position where printing ends.
(7) When BE
is not assigned, only a circumference
is drawn.
When
B
is assigned,
lines can be drawn
inside also.
When BF
is assigned,
the assigned color
is used
for painting
part or the whole of the
circle.
- 105 -
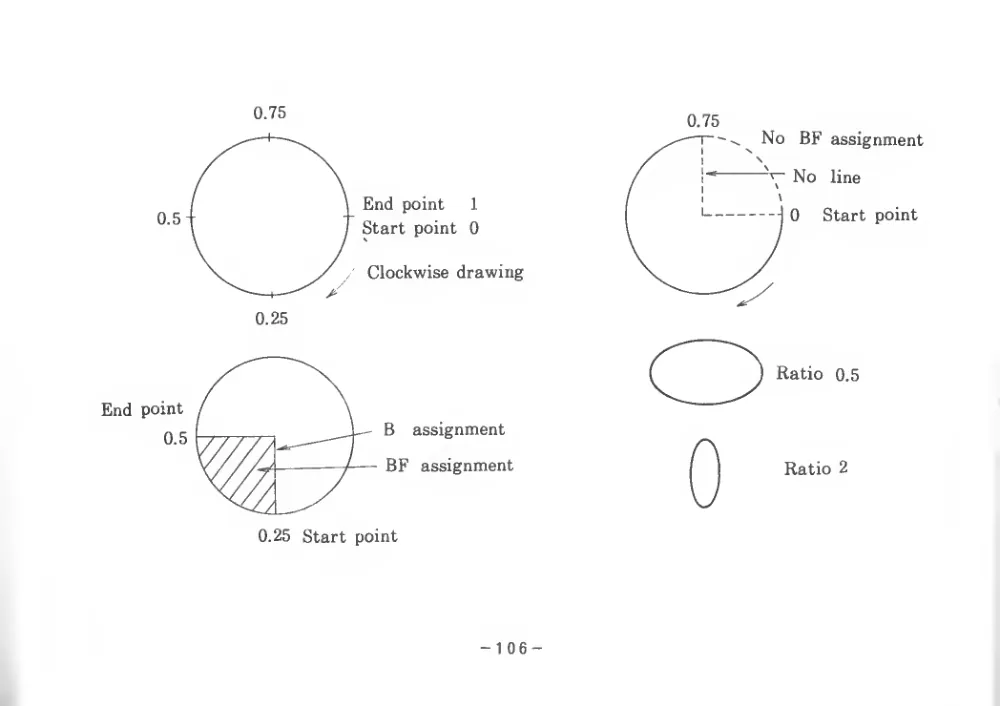
0.75
-106
0.75
Ratio 2
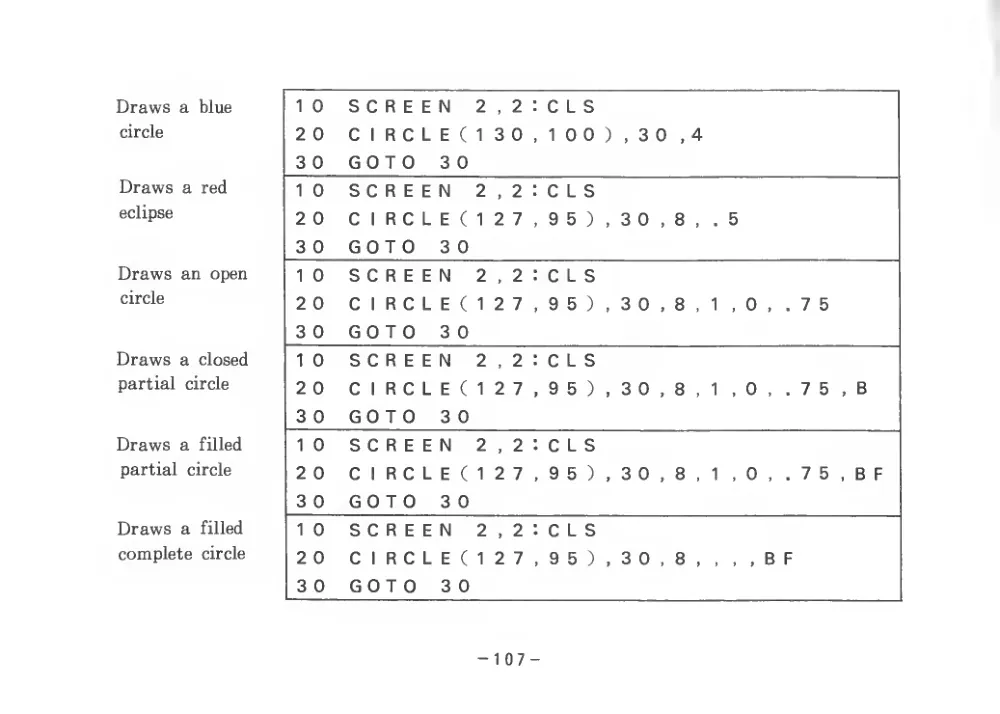
Draws a blue
circle
10
SCREEN
2,2:CLS
20
CIRCLE(130,100),30,4
30
GOTO
30
Draws a red
10
SCREEN
2,2:CLS
eclipse
20
CIRCLEC127,95),30,8,.5
30
GOTO
30
Draws an open
10
SCREEN
2,2:CLS
circle
20
CIRCLE(127,95),30,8.1 ,0, .75
30
GOTO
30
Draws a closed
10
SCREEN
2,2:CLS
partial
circle
20
CIRCLE(127,95),30,8,1,0,.75,B
30
GOTO
30
Draws a
filled
10
SCREEN
2,2:CLS
partial
circle
20
CIRCLE(127,95),30,8,1 ,0, .75, BE
30
GOTO
30
Draws a
filled
10
SCREEN
2,2:CLS
complete
circle
20
CIRCLE(127.95),30,8,,,,BF
30
GOTO
30
- 107 -
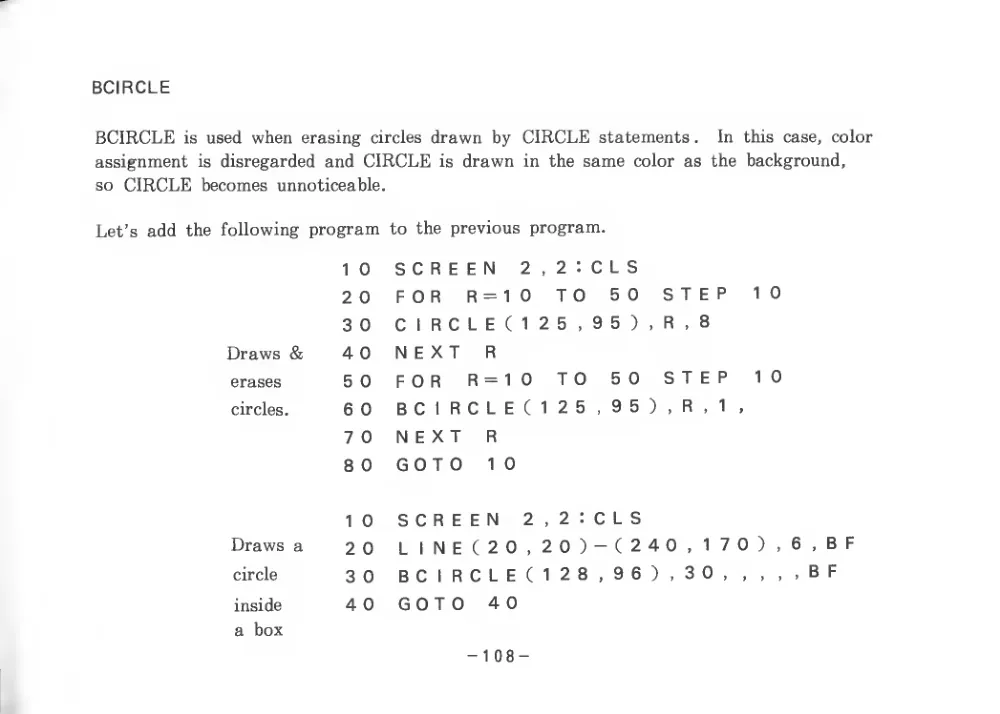
BCIRCLE
BCIRCLE
is used when erasing
circles drawn by CIRCLE statements
.
In
this
case,
color
assignment
is disregarded and CIRCLE
is drawn
in the same color as the background,
so CIRCLE becomes unnoticeable.
following program to the previous program.
1 0
SCREEN
2,2:CLS
2 0
FOR
R=10
TO
50
STEP
1 0
3 0
CIRCLE(125,95),R,8
Draws &
4 0
NEXT
R
erases
5 0
FOR
R=10
TO
50
STEP
1 0
circles.
6 0
BCIRCLE(125,95),R.1
»
7 0
NEXT
R
8 0
GOTO
10
1 0
SCREEN
2,2:CLS
Draws a
2 0
LINE(20,20)-(240,17 0
)
,
circle
3 0
BCIRCLE(128.96).30,
f
t
>
inside
4 0
GOTO
40
a box
6
, B F
, B F
- 108 -
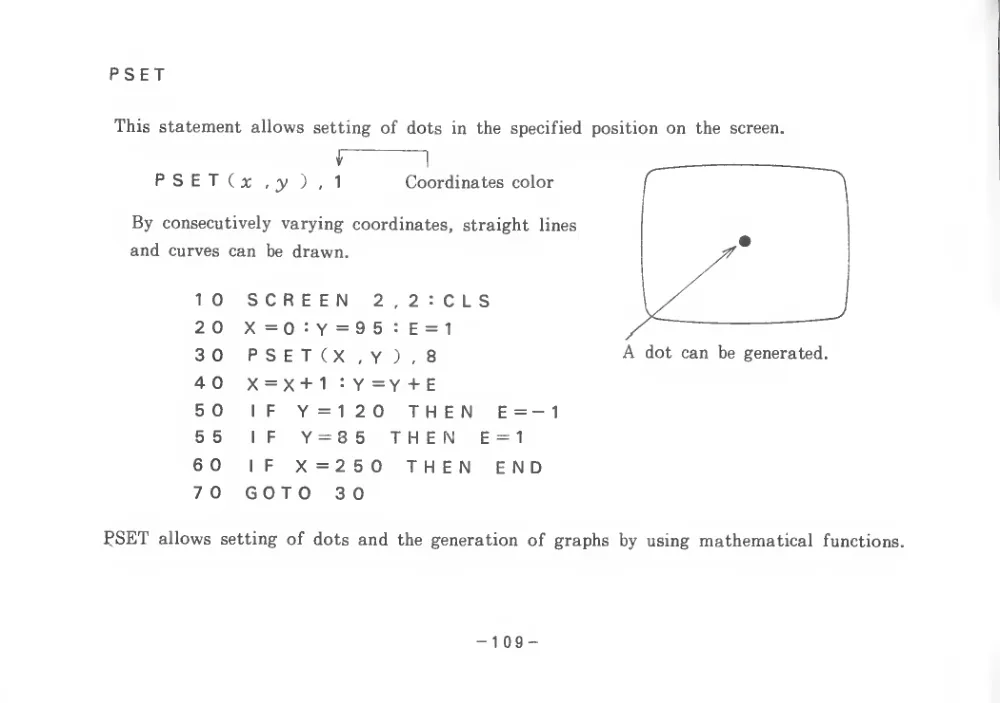
PSET
This statement allows setting of dots
in the specified position on
the screen.
^
!
PSET(x,y),1
Coordinates color
By consecutively varying coordinates,
straight
lines
and curves can
be drawn.
1 0
SCREEN
2
,
2
: C L S
2 0
II
>
o
II
X
9 5
:
E =
1
3 0
P S E T (X
, Y
)
,
8
4 0
X = X+
1
: Y = Y + E
5 0
IF
Y =
1
2 0
THEN
E =-
1
5 5
1
F
Y = 8 5
THEN
E =
1
6 0
IF
X = 2 5 0
THEN
END
7 0
GOTO
3 0
PSET allows setting of dots and the generation of graphs by using mathematical
functions.
- 109 -
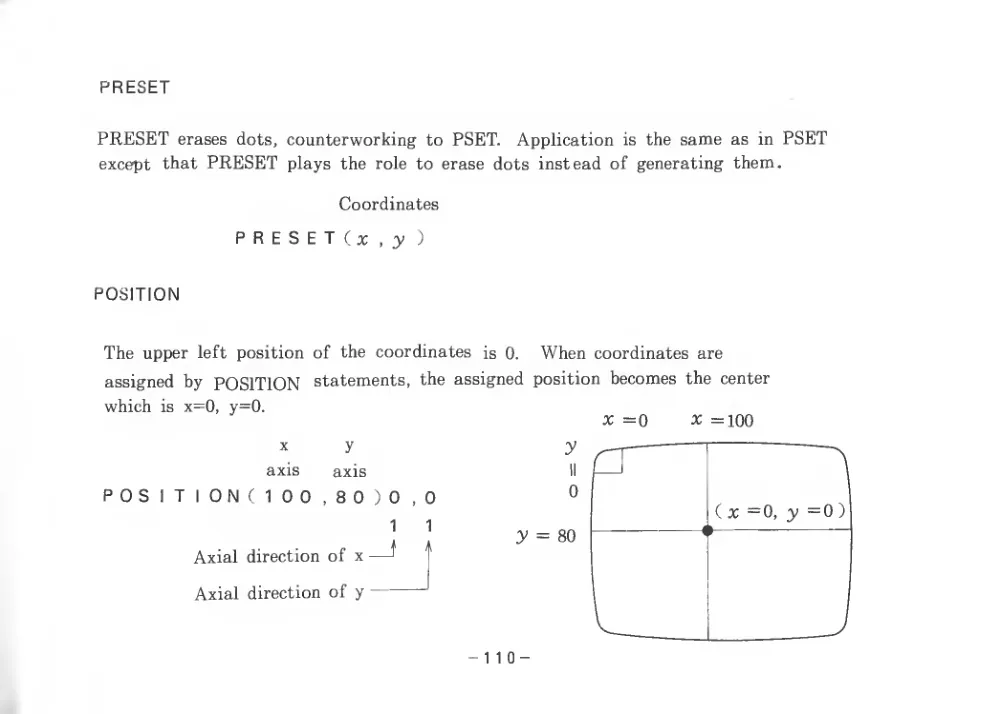
PRESET
PRESET erases dots, counterworking to PSET.
Application
is the same as
in PSET
except
that PRESET plays the role to erase dots instead of generating them.
Coordinates
PRESET(x,y)
POSITION
The upper
left position of the
coordinates
is
0.
assigned by POSITION
statements, the assigned
which
is x=0,
y=0.
X
y
axis
axis
POSITIONflOO, 80)0,0
1
I
^
Axial direction of x —
j
Axial direction of y
When coordinates are
position becomes the center
X =0
X =100
(x =0, y =0)
J
- 110 -
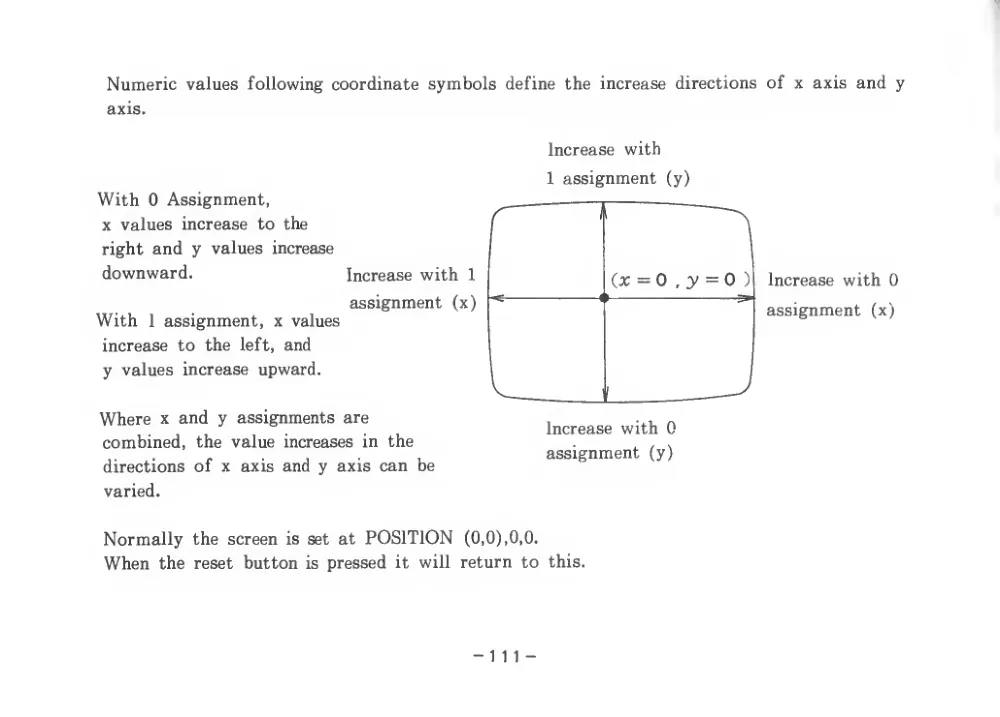
Numeric values
following coordinate symbols define the increase directions of x axis and y
axis.
Increase with
With 0 Assignment,
X values increase to the
right and y values increase
downward.
With
1 assignment,
x values
increase to the
left, and
y values increase upward.
1 assignment
(y)
Increase with
1
assignment
(x)
r"
1
(X = 0
, y = 0
)
Where x and y assignments are
combined,
the value increases
in the
directions of x
axis and y axis can be
varied.
Increase with 0
assignment
(y)
Increase with 0
assignment
(x)
Normally the screen
is set at POSITION
(0,0), 0,0.
When the reset button
is pressed
it
will return to
this.
-Ill-
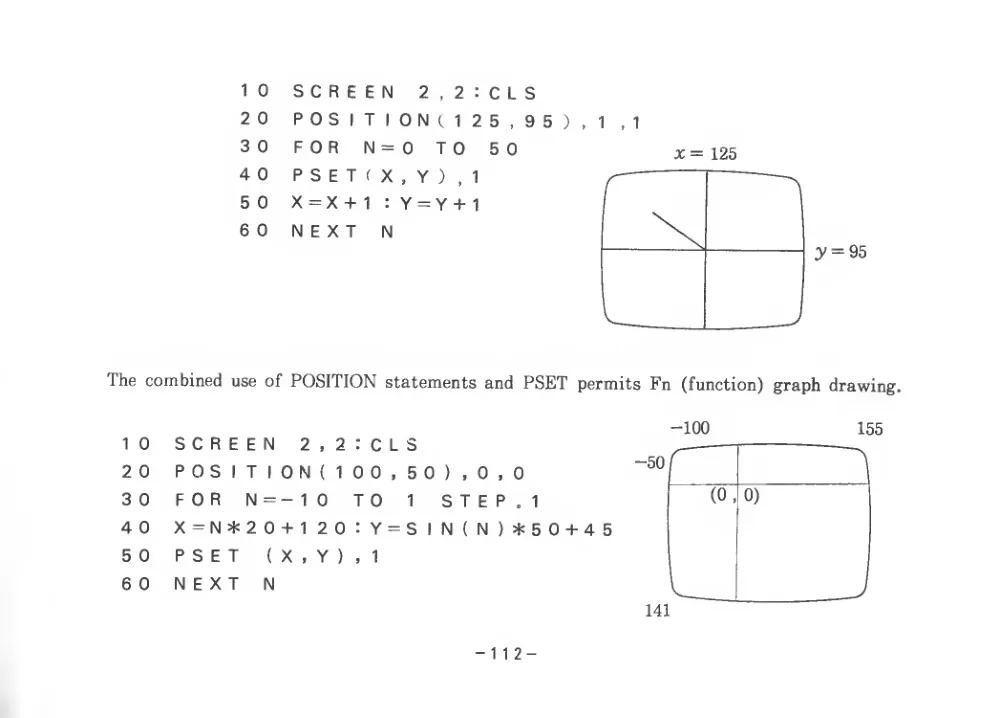
1 0
SCREEN
2
.
2
: C L S
2 0
P 0 S
1 T
1 0 N
(
1
2 5
,
9 5
)
,
1
3 0
FOR
N = 0
TO
5 0
4 0
P S E T
f X
. Y
)
.
1
5 0
X = X +
1
: Y = Y +
1
6 0
NEXT
N
1
,
1
125
y = 95
The combined use of POSITION statements and PSET permits Fn
(function) graph drawing.
-100
155
10
SCREEN
2,2:CLS
20
POSITION(100,50),0,0
30
FOR
N=-10
TO
1
STEP.1
40
X = N * 2 0 +
1
2 0
: Y = S
I N
( N
) * 5 0 + 4
5
50
PSET
(X,Y),1
60
NEXT
N
141
r
(0, 0)
L
- 112 -
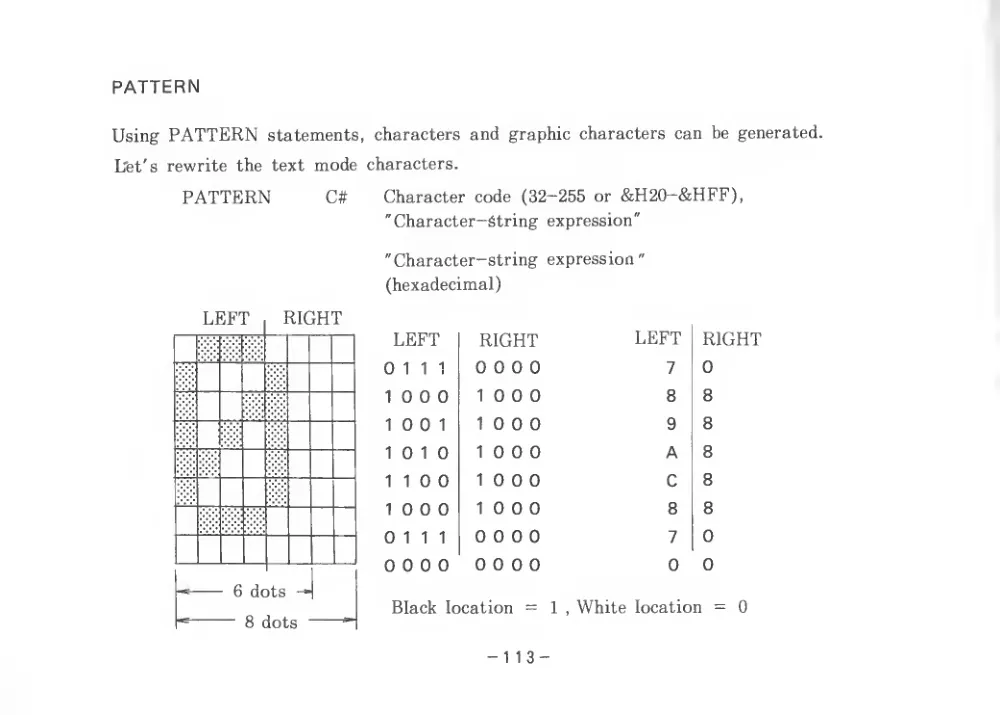
PATTERN
Using PATTERN statements,
characters and graphic characters can
be generated.
Let's rewrite the text mode characters.
PATTERN
C#
Character code (32—255 or &H20—&HFF),
"Character-String expression"
"Character-string expression
(hexadecimal)
LEFT
RIGHT
LEFT
RIGHT
0
1
1
1
0 0 0 0
7
0
1 0 0 0
1 0 0 0
8
8
1 0 0
1
1 0 0 0
9
8
1 0
1 0
1 0 0 0
A
8
1
1 0 0
1 0 0 0
C
8
1 0 0 0
1 0 0 0
8
8
0
1
1
1
0 0 0 0
7
0
0 0 0 0
0 0 0 0
0
0
Black location =
1
, White location =
0
- 113 -
Let's assign
the above graphic characters to the space key.
20 PATTERNC #&H20,
" 708898A8C8887000
"
RUN
Now,
press the space key. You
notice that “0”
is displayed.
This
is because “0” was
printed
in the
space. Push the
I RESETlI
button to return the character to
its normal
pattern. As above,
characters can be easily generated. Pattern characters to be displayed
on the graphic screen are also printed
in the same manner.
Make sure that application procedures are properly understood.
C#
Text mode assignment
Character code:
In the case of hexadecimal
numerals,
input numerics from &H
20 to &HFF.
In the case of
decimal numerals,
input numerics
from
32 to
255.
Character string expression:
Characters and patterns can be
drawn by painting 8x8 dots in
black.
- 114 -
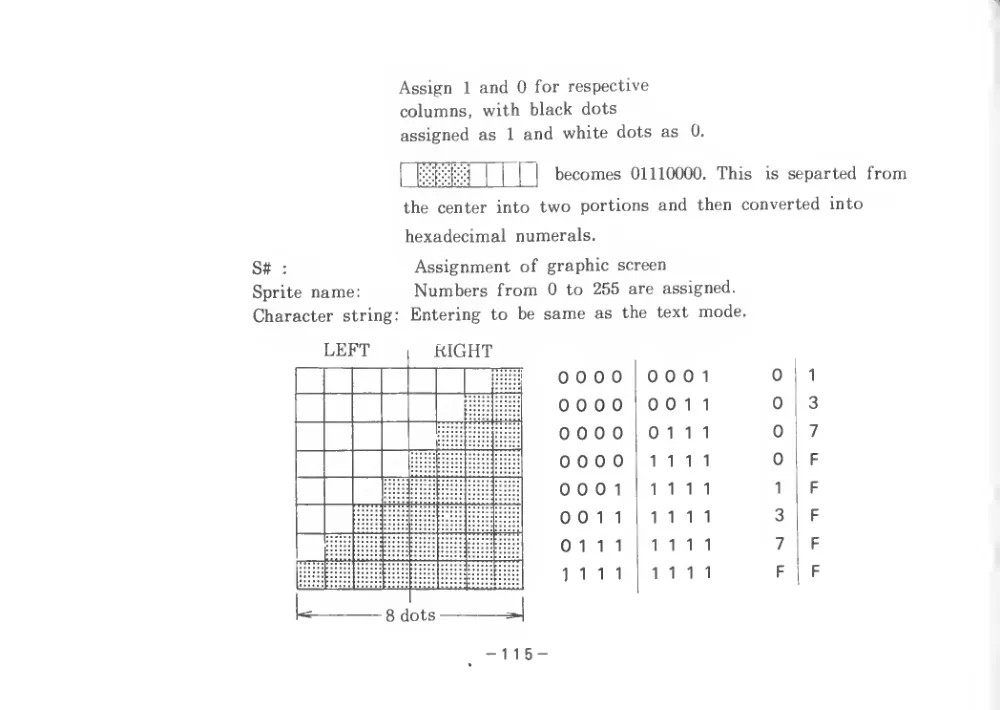
Assign
1 and 0 for respective
columns,
with
black dots
assigned
as
1 and white dots as
0.
becomes 01110000. This
is separted from
the center into two portions and
then converted
into
hexadecimal numerals.
S#
:
Assignment of graphic screen
Sprite name;
Numbers from 0 to 255 are assigned.
Character
string:
Entering to be same as
the text mode.
0 0 0 0
0 0 0
1
0
1
0 0 0 0
0 0
1
1
0
3
0 0 0 0
0
1
1
1
0
7
0 0 0 0
1
1
1
1
0
F
0 0 0
1
1
1
1
1
1
F
0 0
1
1
1
1
1
1
3
F
0
1
1
1
1
1
1
1
7
F
1
1
1
1
1
1
1
1
F
F
- 115 -
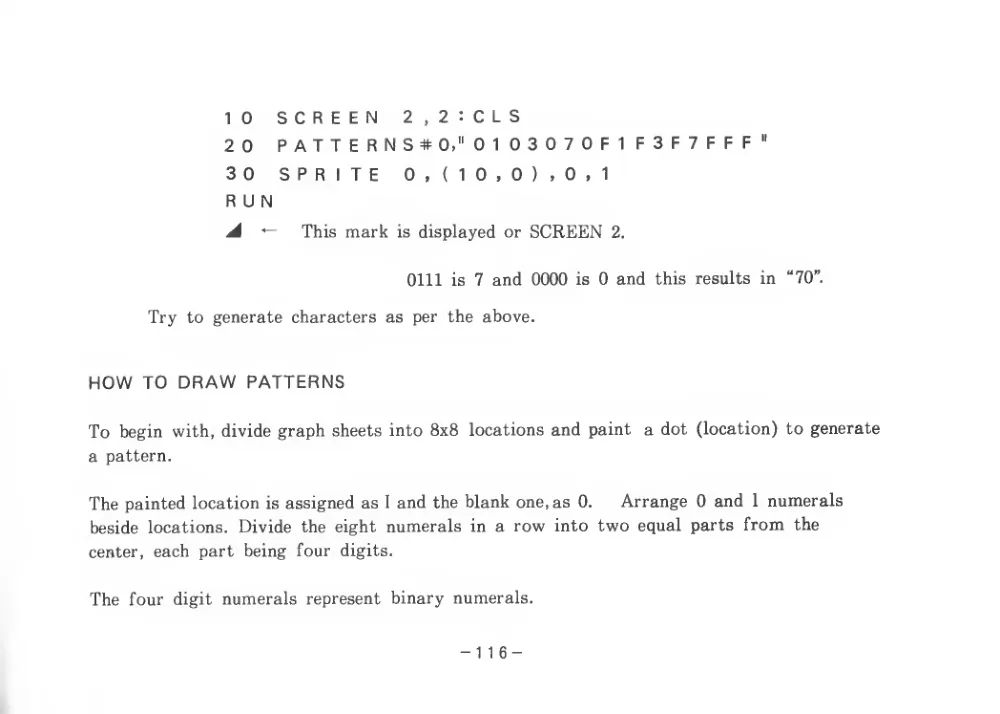
10
SCREEN
2,2:CLS
20
PATTERNS# 0," 0103070F1F3F7FFF''
30
SPRITE
0, (10,0), 0,1
RUN
A
^
This mark
is displayed or SCREEN
2.
0111
is
7 and 0000
is 0 and
this
results
in
“70”.
Try to generate characters as per the above.
HOW TO DRAW PATTERNS
To begin
with, divide graph sheets into 8x8
locations and paint
a dot (location) to generate
a pattern.
The painted location is assigned as
1 and the blank one, as
0.
Arrange 0 and
1 numerals
beside locations.
Divide the eight numerals
in a row into two equal parts from the
center, each part being
four
digits.
The four
digit numerals represent binary numerals.
- 116 -
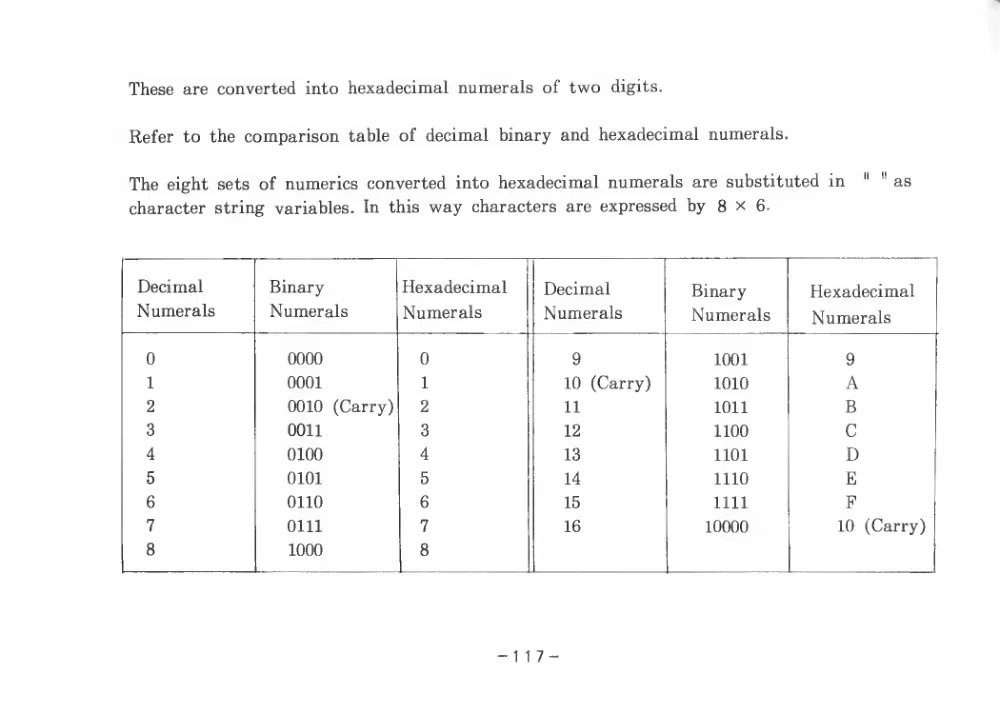
These are converted into hexadecimal numerals of two
digits.
Refer to the comparison table of decimal binary and hexadecimal numerals.
The eight sets of numerics converted into hexadecimal numerals are substituted
in
"
" as
character string
variables.
In
this way characters are expressed by 8x6.
Decimal
Numerals
Binary
Numerals
Hexadecimal
Numerals
Decimal
Numerals
Binary
Numerals
Hexadecimal
Numerals
0
0000
0
9
1001
9
1
0001
1
10 (Carry)
1010
A
2
0010
(Carry)
2
11
1011
B
3
0011
3
12
1100
C
4
0100
4
13
1101
D
5
0101
5
14
1110
E
6
0110
6
15
1111
F
7
0111
7
16
10000
10
(Carry)
8
1000
*
- 117 -
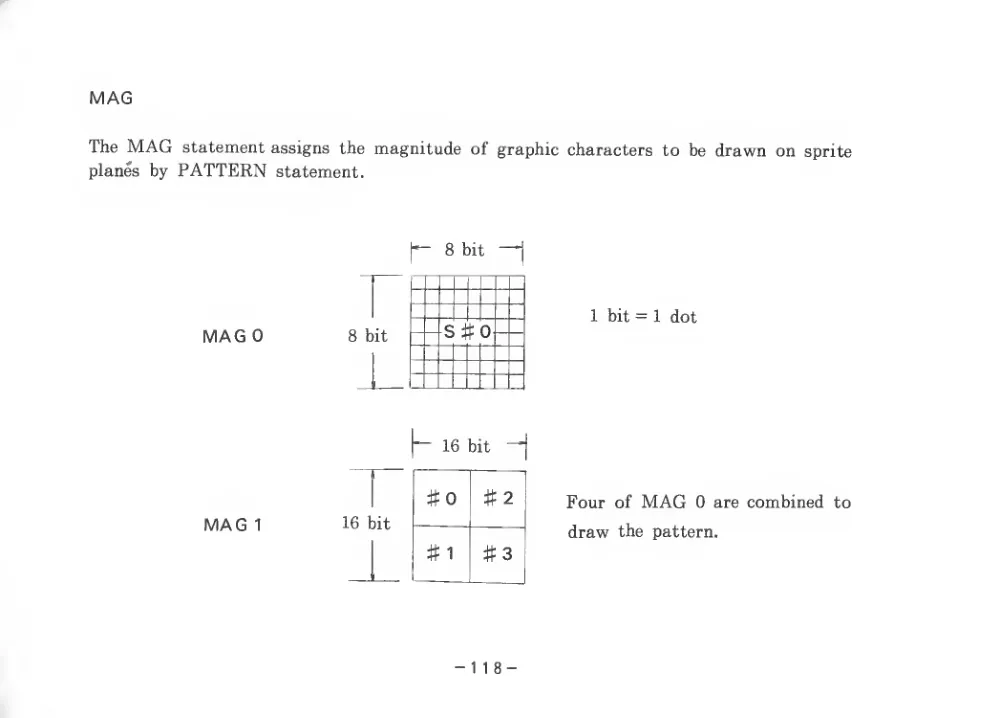
MAG
The MAG statement assigns the magnitude of graphic characters
to he drawn on sprite
planes hy PATTERN statement.
MAG 0
MAG
1
8 hit —
1
hit = 1 dot
16 hit ^
#0
#2
#1
# 3
Four of MAG 0 are combined to
draw the pattern.
- 118 -
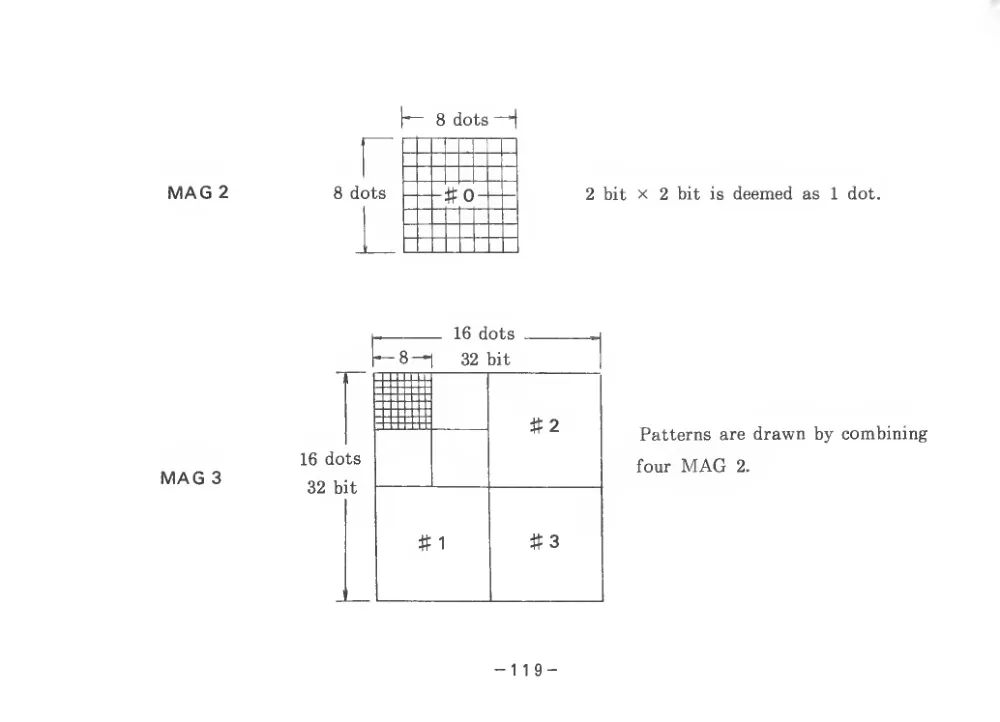
MAG 2
MAG 3
h~
8 dots
16 dots
32 bit
—
16 dots
8—1
32 bit
#2
#1
#3
- 119 -
2 bit
X
2
bit
is deemed as
1 dot.
Patterns are drawn by combining
four MAG
2.
In MAG
0,
patterns are drawn within 8x8 dot locations with
1
bit as
1 dot.
In MAG
1,
patterns can
be drawn within 16x16 dot locations by combining four locations,
i.e:, #0~3, #4~#7
#252~#255.
In MAG
2,
patterns are drawn within 8x8 dot locations with
2
bit x
2
bit as one
dot.
The
bit number
is
16
bit
x
16
bit.
In MAG
3,
patterns can
be drawn by combining four locations as assigned
in MAG
2.
In
this
case,
the
bit number
will
be 32 bit x
32
bit.
SPRITE
MAG statement, PATTERN statement and SPRITE statement are absolutely necessary when
using sprite
functions.
0~31
Coordinate
SPRITE Graphic screen No.,
(x,y).
Sprite name. Color
There are 32 graphic screens (0~31) and the SPRITE statement assigns
the number
of tbe graphic screen on which the sprite
is to
be drawn.
- 120 -
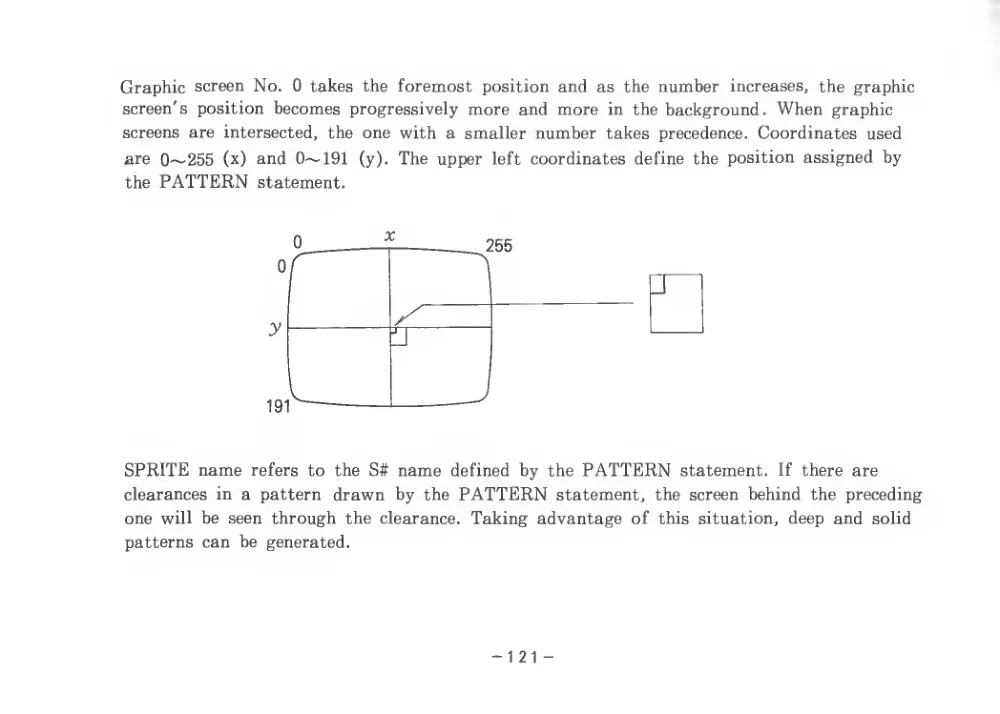
Graphic screen No.
0 takes the foremost position and as the number
increases,
the graphic
screen's position becomes progressively more and more
in the background. When graphic
screens are intersected,
the one with a smaller number takes precedence. Coordinates used
are 0~255
(x) and 0~191
(y). The upper
left coordinates define the position assigned by
the PATTERN statement.
SPRITE name
refers to the S# name defined by the PATTERN statement.
If there are
clearances in a pattern drawn by the PATTERN statement,
the screen behind the preceding
one will
be seen through the clearance. Taking advantage of
this
situation, deep and solid
patterns can be generated.
-12
1 -
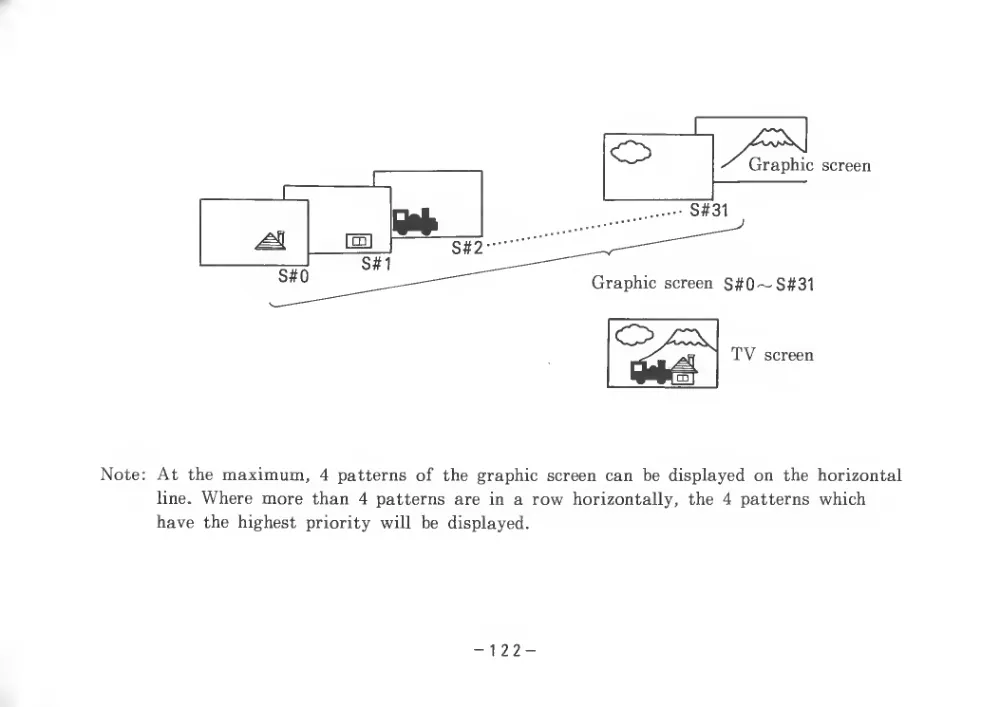
Note: At the maximum,
4 patterns of the graphic screen can
be displayed on
the horizontal
line. Where more than 4 patterns are
in a row horizontally,
the 4 patterns which
have the highest priority
will
be displayed.
- 122 -
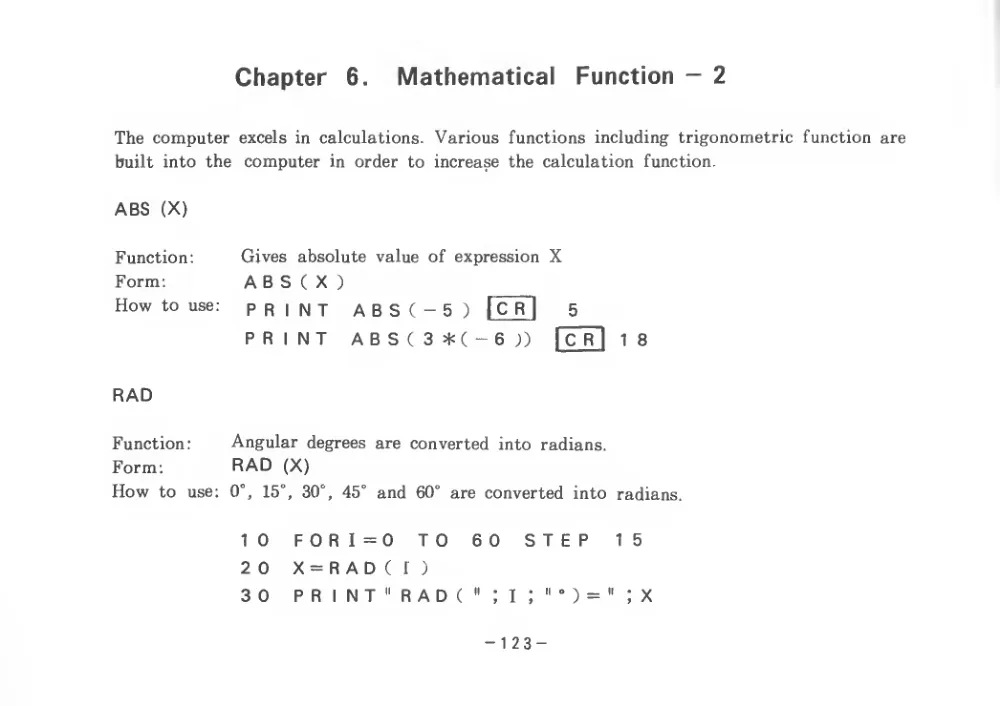
Chapter
6.
Mathematical
Function - 2
The computer excels
in calculations. Various functions
including trigonometric function are
built into the
computer
in order to increase the calculation
function.
ABS
(X)
Function:
Gives
absolute value of expression X
Form:
A B S
( X
)
How to
use:
print
ABS(-5)
| C R
|
5
PRINT
ABS(3*(-6i)
| C R
|
1
8
RAD
Function:
Form:
Angular degrees are converted into radians.
RAD
(X)
How to
use:
0°,
15°,
30°,
45° and
60°
are converted
into
radians.
10
F0RI=0
TO
60
STEP
15
2 0
X = R A D
(
1
)
3 0
P R
I N T
" R A D
(
"
:
I
;
"
°
:
123
-
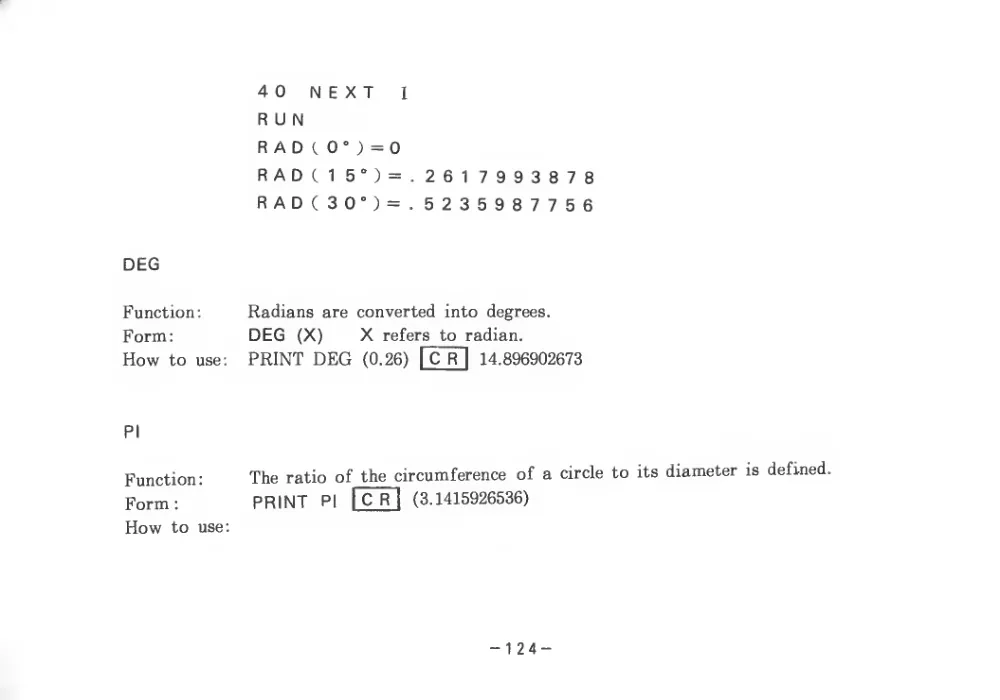
40
NEXT
I
RUN
DEG
Function:
Form:
How to
use:
PI
Function;
Form
;
How to use:
R AD
( 0“
J =0
RADC
1 5°) =
. 261 7993878
RAD(30°)=. 5235987756
Radians are converted into
degrees.
DEG
(X)
X
refers to radian.
PRINT DEG
(0.26)
| C R
|
14.896902673
The ratio of the circumference
of a
circle to
PRINT
PI
I C R
(3.1415926536)
its diameter
is defined.
- 124 -
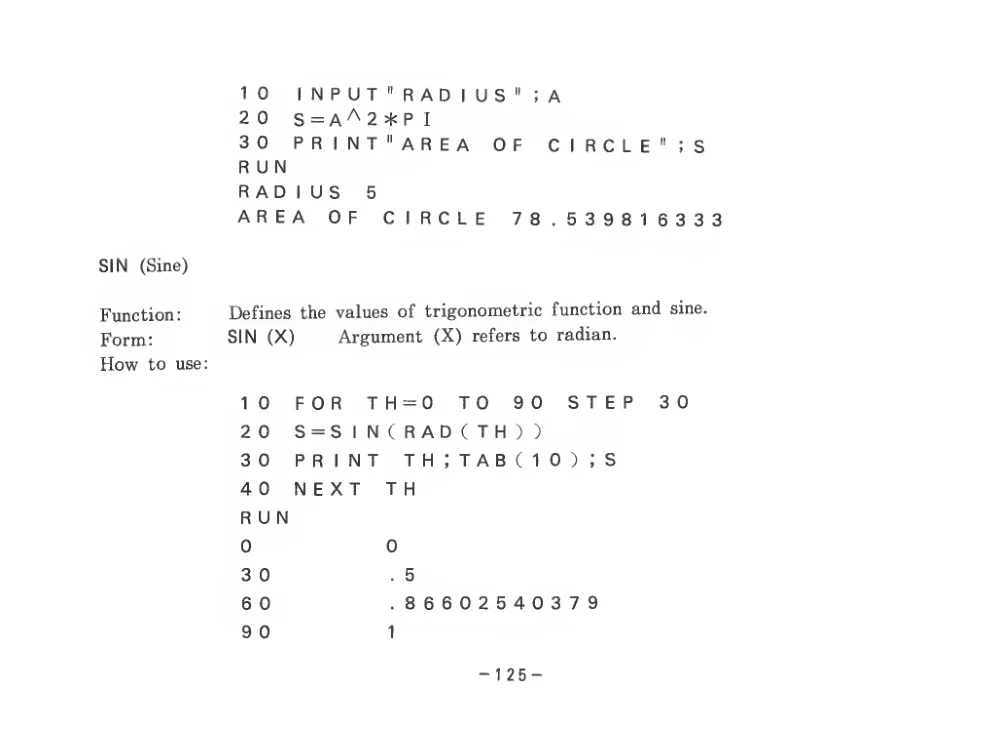
SIN
(Sine)
Function;
Form:
How to
use;
10
INPUT
" RADIUS ";A
20
S=A^2>I<PI
30
PRINT "AREA
OF
CIRCLE" ;S
RUN
RADIUS
5
AREA
OF
CIRCLE
78.539816333
Defines the values of trigonometric function and
sine.
SIN
(X)
Argument (X)
refers to radian.
1 0
FOR
TH=0
TO
90
STEP
2 0
S = S
1 N
( R A D
( T H
)
)
3 0
PRINT
th:tab(io) ;s
4 0
NEXT
T H
RUN
0
0
3 0
.
5
6 0
. 86602540379
9 0
1
- 125 -
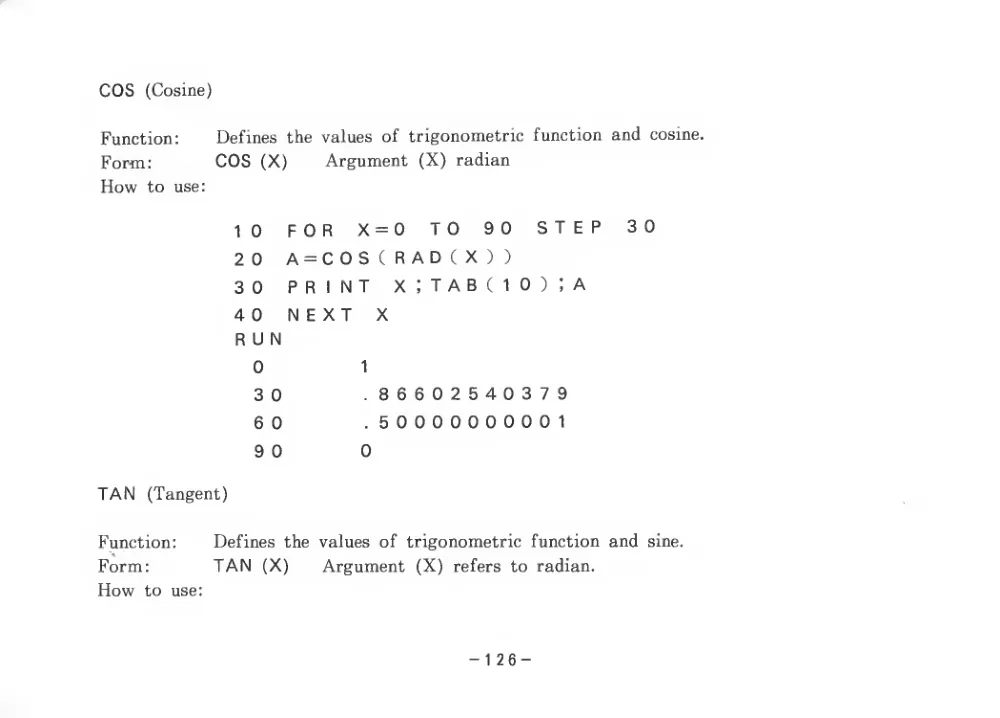
cos
(Cosine)
Function:
Defines the values of trigonometric function and
cosine.
For-m:
COS
(X)
Argument
(X) radian
How
to
use:
10
FOR
X=0
TO
90
STEP
30
20
A=COS(RADCX))
30
PRINT
x;tab(io);a
40
NEXT
X
RUN
0
1
30
.86602540379
60
.50000000001
9 0
0
TAN
(Tangent)
Function:
Defines the values of trigonometric function and
sine.
Form:
TAN
(X)
Argument
(X)
refers
to radian.
How
to
use:
- 126 -
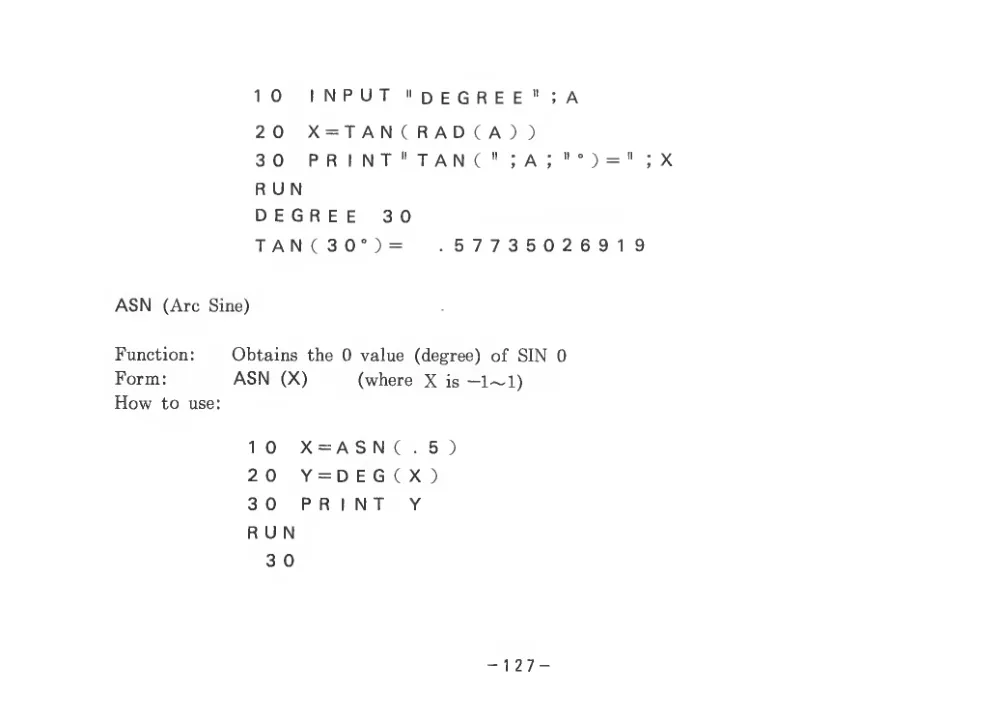
10
INPUT "degree" ;a
20
X=TAN(RAD(A))
3 0
P R
I N T
" T A N
(
"
; A
:
"
°
: X
RUN
DEGREE
30
TAN(30°)=
.57735026919
ASN
(Arc Sine)
Function:
Obtains the 0 value
(degree) of SIN 0
Form:
ASN
(X)
(where X
is —1~1)
How to
use:
10
X = A S N
(
.
5
)
20
Y=DEG(X)
30
PRINT
Y
RUN
3 0
- 127 -
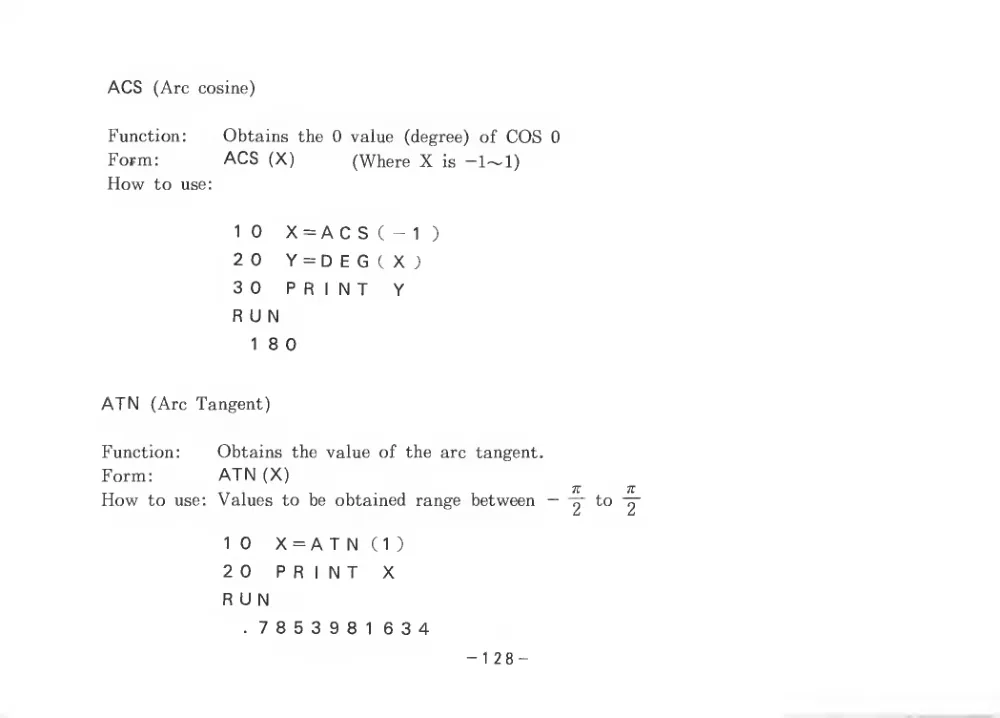
ACS
(Arc cosine)
Function;
Obtains the 0 value
(degree) of COS 0
Form:
ACS
(X)
(Where X
is -1~1)
How to
use;
10
X =A C S
( -
1
)
20
Y=DEG(XJ
30
PRINT
Y
RUN
1
8 0
ATN
(Arc Tangent)
Function;
Obtains the value of the arc tangent.
Form;
ATN (X)
TT
71
How
to
use;
Values to
be obtained range between —
to ^
10
X = A T N
(
1
)
20
PRINT
X
RUN
. 7853981 634
- 128 -
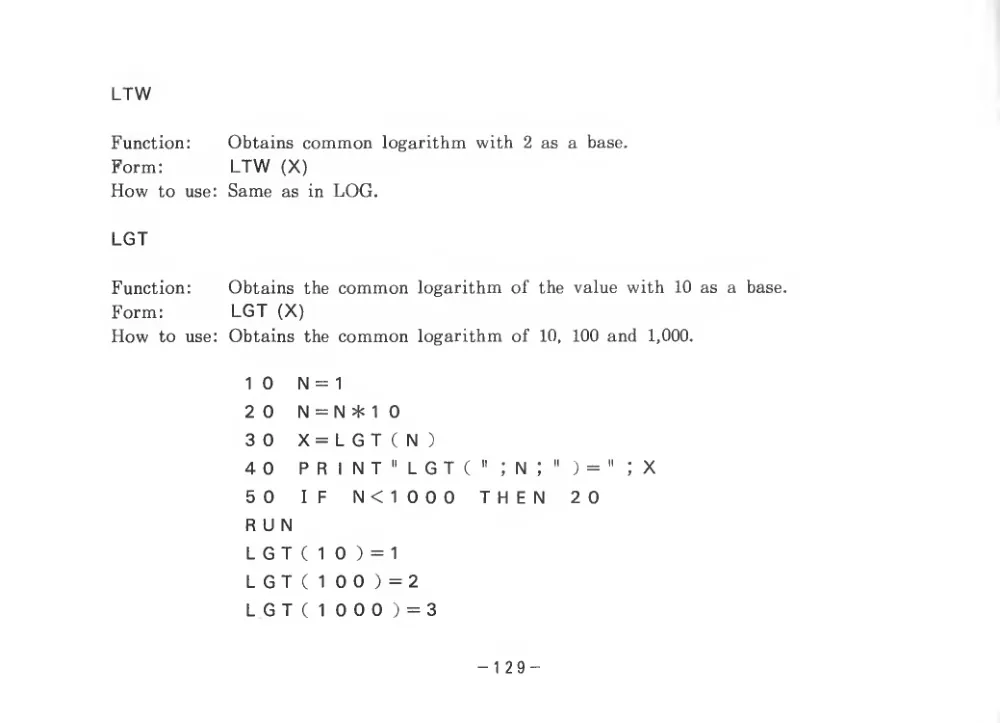
LTW
Function:
Form:
How to use:
LGT
Function:
Form:
How to
use:
Obtains common logarithm with
2 as a
base.
LTW
(X)
Same as
in LOG.
Obtains the common logarithm of the value with
10 as a
base.
LGT
(X)
Obtains the common logarithm of
10,
100 and
1,000.
1 0
N =
1
2 0
N = N *
1 0
3 0
X = L G T
( N
4 0
P R
1 N T
II
L G T
(
"
; N
:
"
} =
5 0
I
F
N <
1 0 0 0
THEN
20
R U N
L G T
(
1 0
) =
1
L G T
(
1 0 0
) = 2
L G T
(
1 0 0 0
) = 3
- 129 -
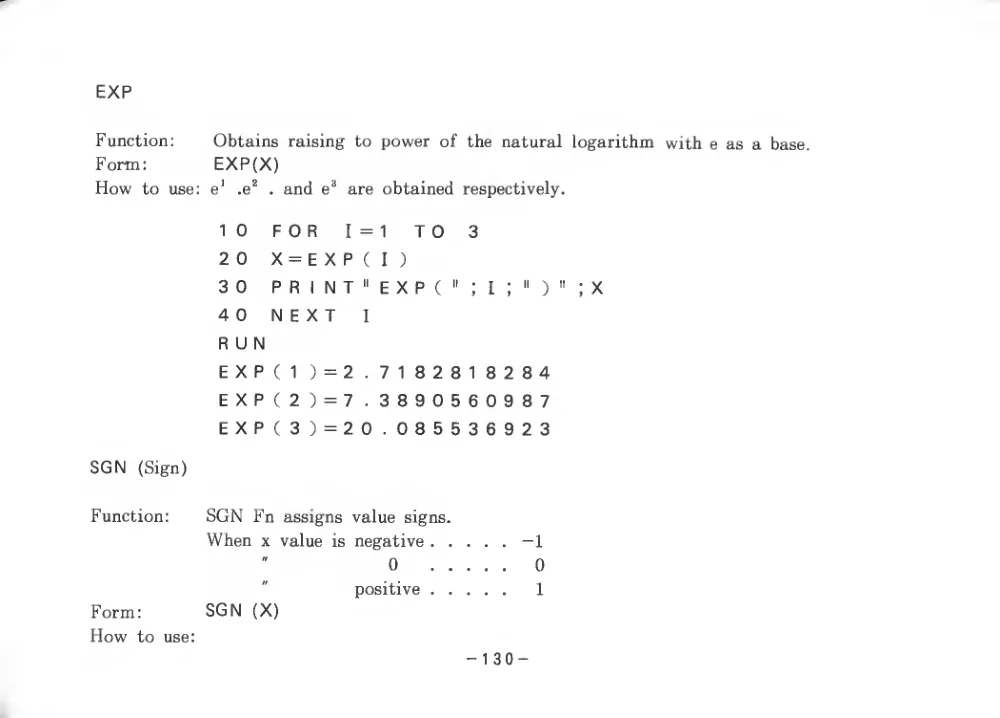
EXP
Function:
Form:
How
to
use:
SGN
(Sign)
Function:
Form:
How
to
use:
Obtains raising to power of the natural logarithm with
e as a base.
EXP(X)
.1
.e^
. and
e^
are obtained
respectively.
1 0
F 0 R
I =
1
T 0
3
2 0
X = E X p
(
I
)
3 0
P R
1 N T
II
E X p
(
"
:
1
;
"
)
"
4 0
N E X T
I
RUN
EXP(1 )=2. 7182818284
EXP(2) = 7. 3890560987
EXP(3)=20. 085536923
SGN Fn assigns value signs.
When X value
is negative
— 1
0
0
positive
1
SGN
(X)
- 130 -
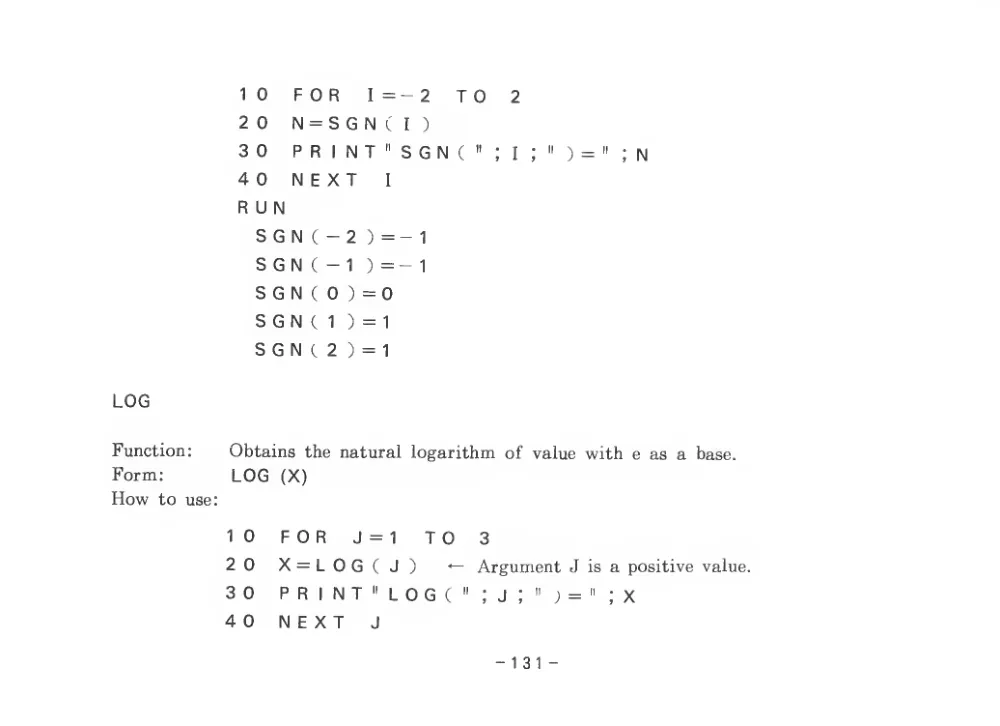
LOG
Function;
Form:
How to use:
10
FOR
I=-2
TO
2
2 0
N = S G N
i
I
)
3 0
P R
I N T
" S G N
{
"
;
I
;
"
) =
"
: N
40
NEXT
I
RUN
S G N
( - 2
) =-
1
S G N
( -
1
) =-
1
S G N
( 0
) = 0
S G N
(
1
) =
1
S G N
( 2
) =
1
Obtains the natural logarithm of value with
e as a
base.
LOG
(X)
1 0
FOR
J =
1
T 0
3
2 0
X = L 0 G
(
J
)
-
Argument J
is a positive value.
3 0
PRINT"
L 0 G
(
"
:
J
;
"
1 =
"
: X
4 0
NEXT
J
-13
1 -
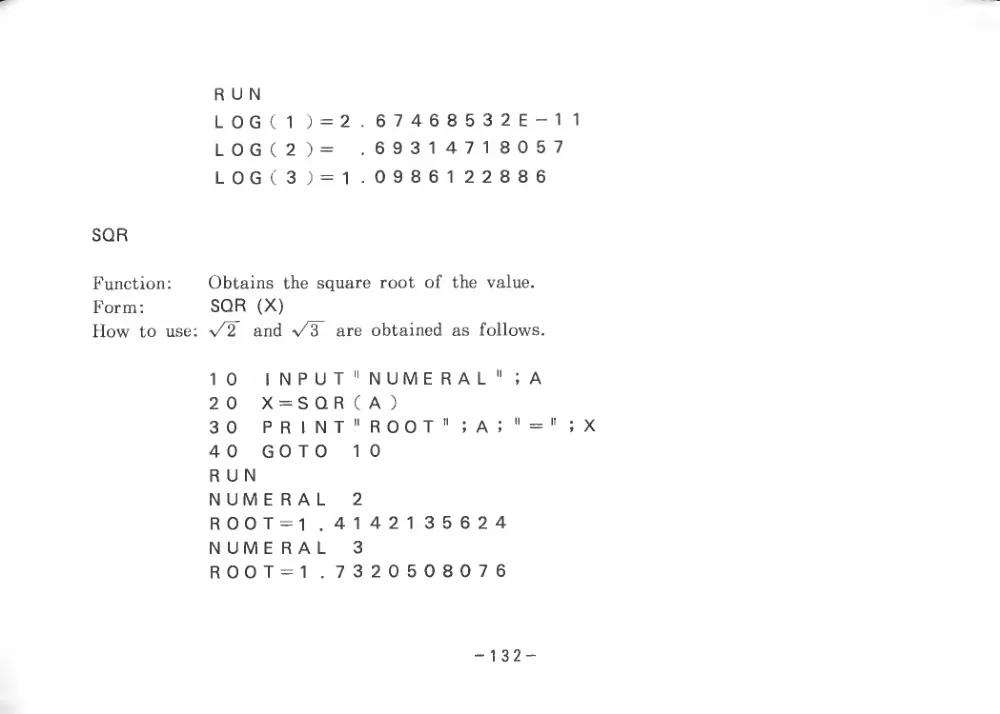
RUN
LOG(
1
) = 2
. 67468532E-1
1
L0G(2)=
.69314718057
LOG(3
) =
^ .09861 22886
SQR
Function:
Obtains the square root of the
value.
Form:
SQR
(X)
How to
use:
and
are obtained as
follows.
10
INPUT
" NUMERAL ";A
20
X=SQR(A)
3 0
P R
1 N T
"
R 0 0 T
"
; A
;
" =
"
;
40
GOTO
10
RUN
NUMERAL
2
ROOT=1 .4142135624
NUMERAL
3
R00T =
1 .7320508076
- 132 -
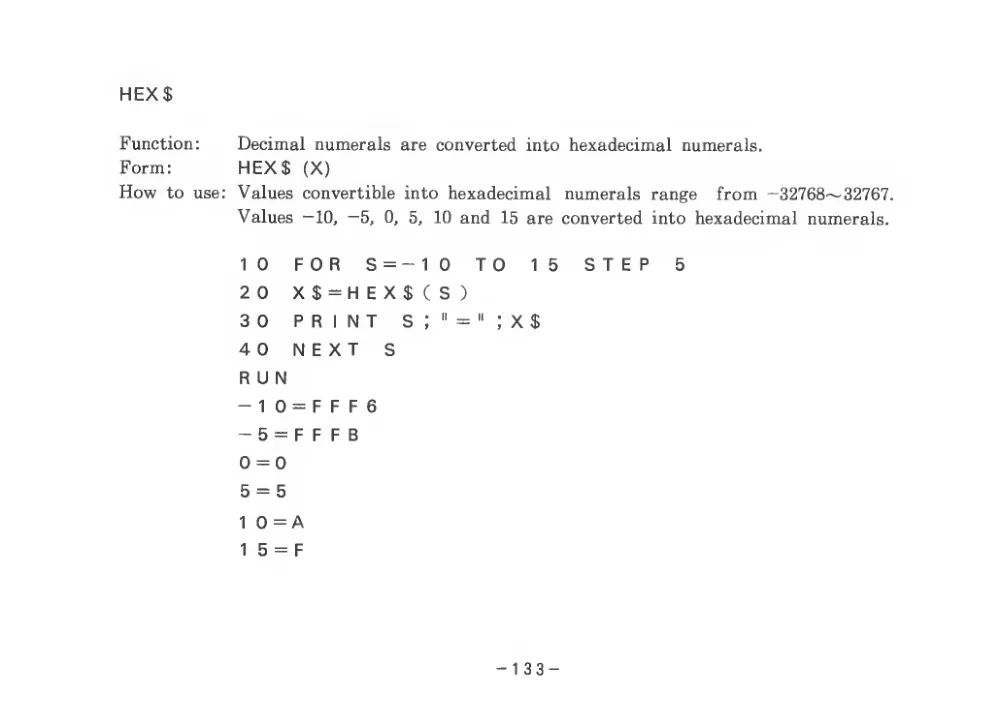
HEX$
Function:
Form:
How to
use:
Decimal numerals are converted into hexadecimal numerals.
HEX$
(X)
Values convertible into hexadecimal
numerals range
from —32768~32767.
Values —10, —5,
0,
5,
10 and
15 are converted into hexadecimal numerals.
10
FOR
S=-10
TO
15
STEP
5
20
X$=HEX$(S)
30
PRINT
s;"=":x$
40
NEXT
S
RUN
-
1 0 = F
F
F 6
- 5 = F F
F B
0 = 0
5 = 5
1 0=A
1
5 = F
- 133 -
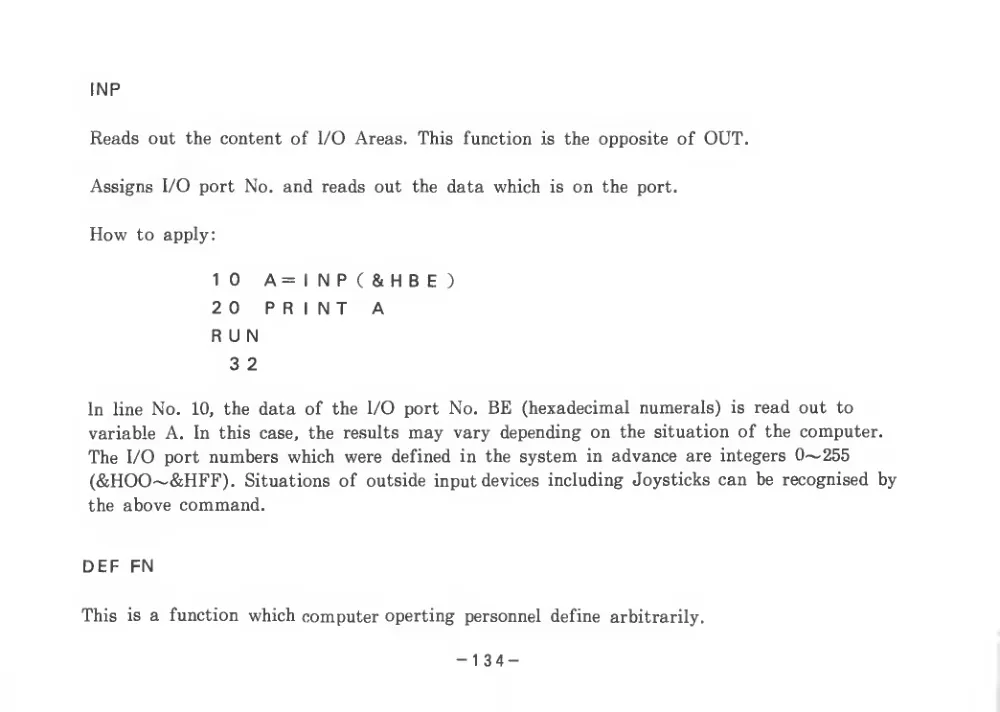
INP
Reads out the content of I/O Areas.
This function
is the opposite of OUT.
Assigns I/O port No. and reads out the data which
is on the port.
How
to apply:
10
A=INP(&HBE)
20
PRINT
A
RUN
3 2
In
line No.
10,
the data of the I/O port No. BE (hexadecimal numerals)
is read out to
variable A.
In
this case,
the results may vary depending on the situation of the computer.
The I/O port numbers which were defined
in the system
in advance are integers 0~255
(&HOO~&HFF).
Situations of outside input devices including Joysticks can be recognised by
the above command.
DEF FN
This
is a function which computer operting personnel define
arbitrarily.
- 134 -
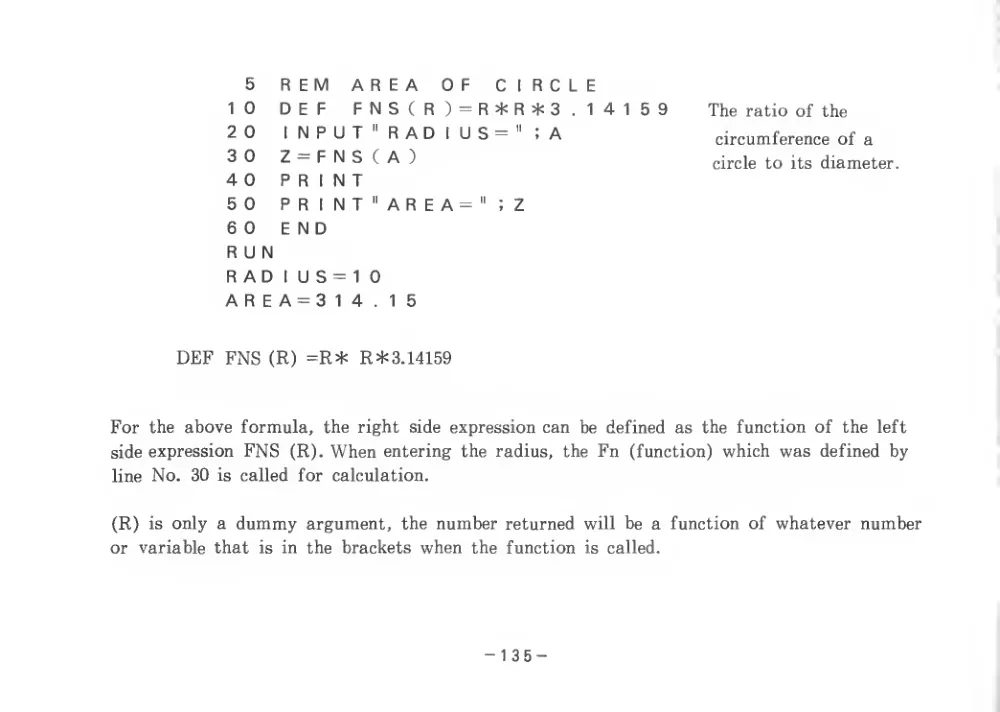
The ratio of the
circumference of a
circle to
its diameter.
5
REM
AREA
OF
CIRCLE
10
DEF
FNS(R)=R*R*3. 14159
20
INPUT "radius=";a
30
Z=FNS(A)
40
PRINT
50
PRINT "AREA=";Z
6 0
END
RUN
RAD
I U S =
1 0
AREA=314.15
DEF FNS (R) =R* R* 3. 14159
For the above formula, the right side expression can
be defined as
the function of the
left
side expression FNS
(R). When entering the radius,
the Fn
(function) which was defined by
line No.
30
is called
for calculation.
(R)
is only a dummy argument, the number returned
will
be a function of whatever number
or
variable that
is
in the brackets when
the function
is
called.
- 135 -
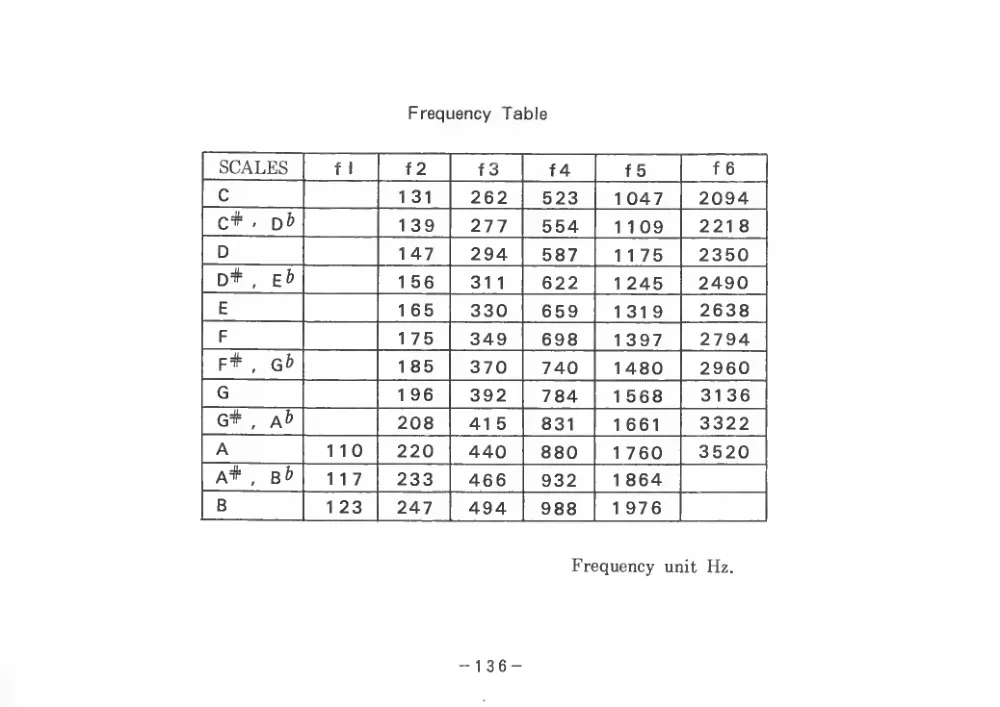
Frequency Table
SCALES
f
1
f 2
f3
f4
f 5
f 6
C
1 31
262
523
1 047
2094
C*
-
D&
1 39
277
554
1
1 09
221 8
D
1 47
294
587
1
1 75
2350
D+
,
eI>
1 56
31
1
622
1 245
2490
E
165
330
659
131 9
2638
F
1 75
349
698
1 397
2794
F+
,
1 85
370
740
1 480
2960
G
1 96
392
784
1 568
3136
G*
,
Ab
208
41 5
831
1 661
3322
A
1
1 0
220
440
880
1 760
3520
A*
,
Bb
1
1 7
233
466
932
1 864
B
1 23
247
494
988
1 976
Frequency
unit Hz.
- 136 -
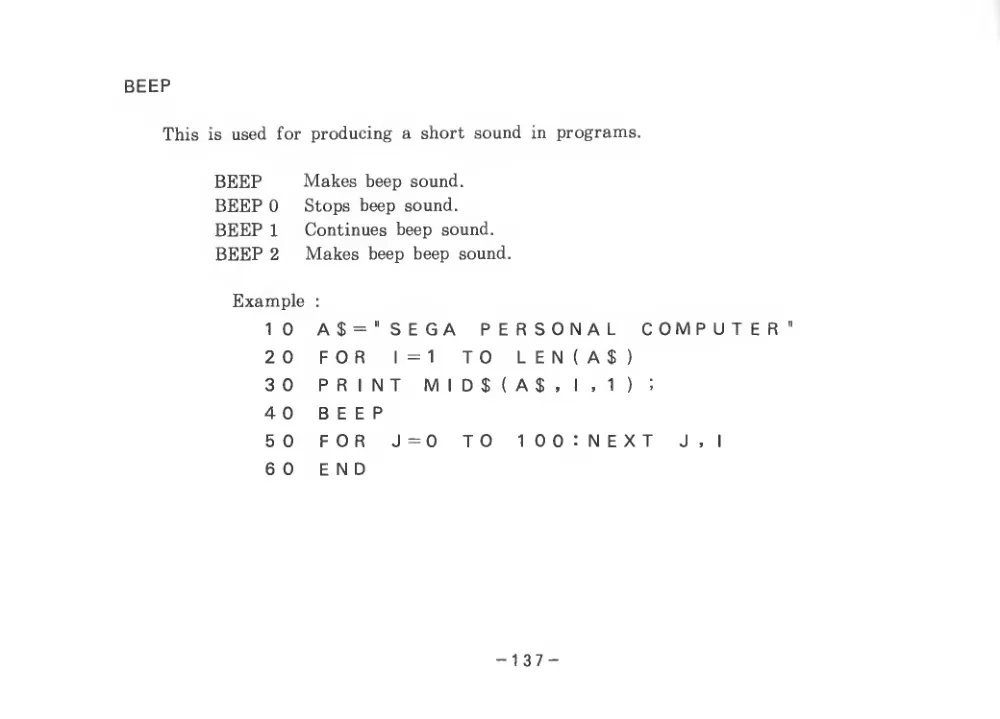
BEEP
This
is used for producing a short sound
in programs.
BEEP
Makes beep sound.
BEEP 0
Stops beep sound.
BEEP
1
Continues beep sound.
BEEP 2
Makes beep beep sound.
Example
;
1 0
A$="SEGA
PERSONA L
COMPUTER"
2 0
FOR
1=1
TO
LENI: A $
)
3 0
PRINT
IVIID$(A$,
1
,
1
)
:
4 0
BEEP
5 0
FOR
J=0
TO
100:: N EXT
J
,
1
6 0
END
- 137 -
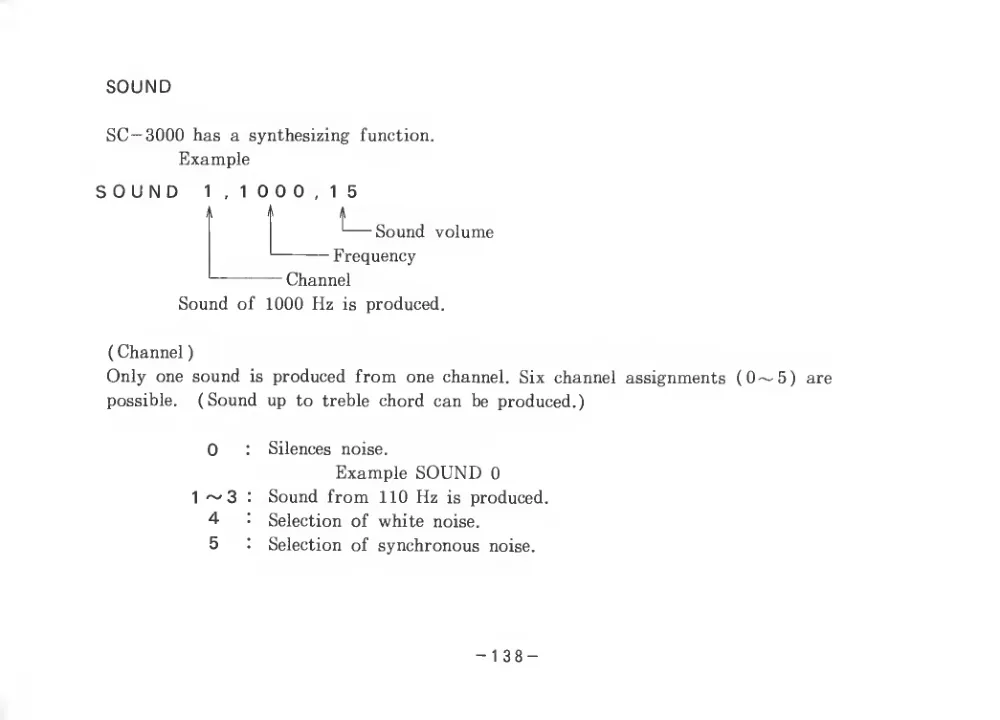
SOUND
SC — 3000 has a synthesizing function.
Example
SOUND
1,1000,15
t
Sound volume
Frequency
Channel
Sound of 1000 Hz
is produced.
( Channel
)
Only one sound
is produced from one channel. Six channel assignments
(0— 5)
are
possible.
(Sound up to
treble chord can be produced.)
0
:
Silences
noise.
Example SOUND 0
1 ~3
:
Sound from 110 Hz
is produced.
4
:
Selection of white
noise.
5
;
Selection of synchronous
noise.
- 138 -
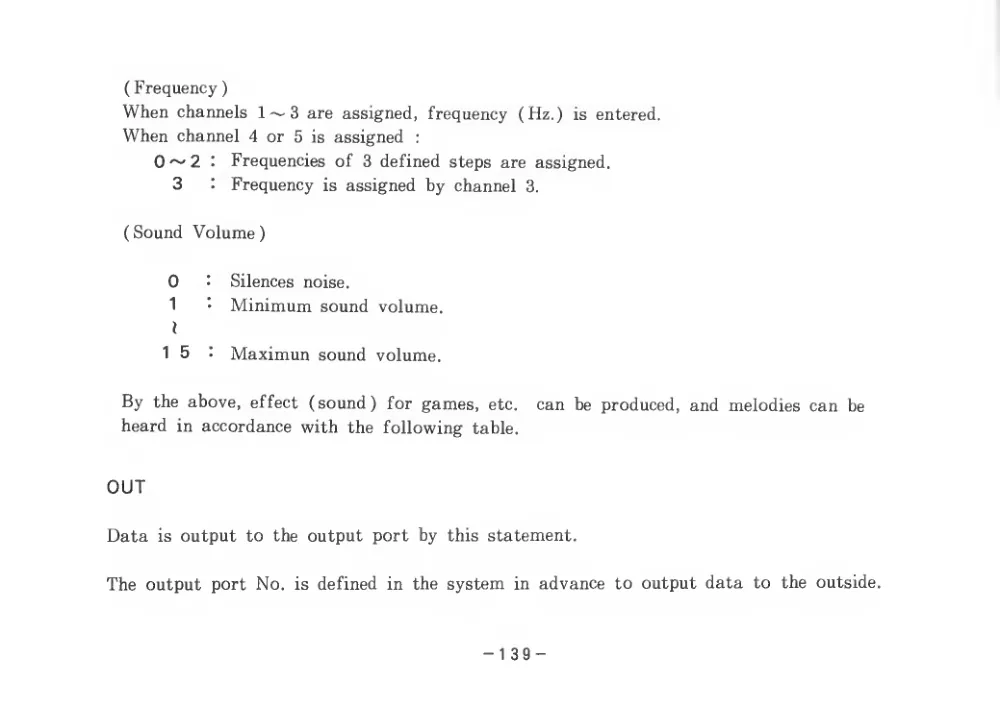
( Frequency
When channels 1~3 are assigned, frequency
(Hz.)
is entered.
When channel 4 or
5
is assigned
:
0~2
:
Frequencies of
3 defined steps are assigned.
3
:
Frequency
is assigned by channel
3.
( Sound Volume
0
:
Silences
noise.
1
•
Minimum sound volume.
I
1
5
:
Maximun sound volume.
By the above,
effect (sound)
for games,
etc.
can be produced, and melodies can be
heard
in accordance with
the following
table.
OUT
Data
is output
to the output port by
this statement.
The output port No.
is defined
in
the system
in advance
to output data
to
the
outside.
- 139 -
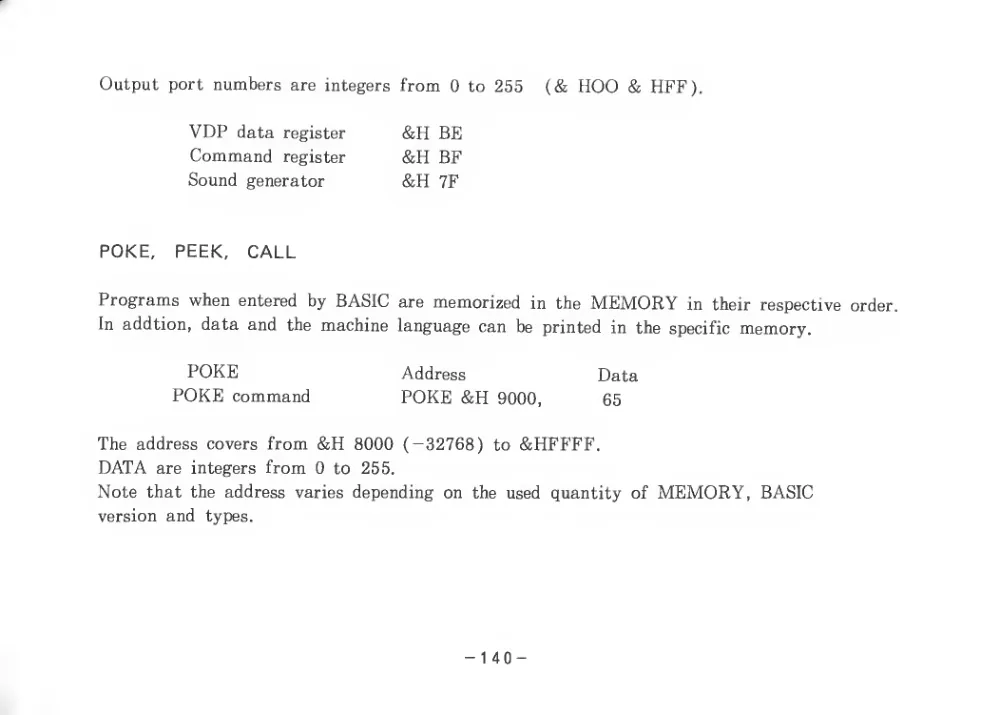
Output port numbers are integers from 0 to 255
(& HOO & HFF).
VDP data
register
Command
register
Sound generator
&H BE
&H BF
&H 7F
POKE,
PEEK,
CALL
Programs when entered by BASIC are memorized
in the MEMORY
in
their respective order.
In addtion, data and
the machine language can be printed
in the
specific memory.
POKE
POKE command
Address
Data
POKE &H 9000,
65
The address covers from &H 8000 (-32768)
to &HFFFF.
DATA are integers from
0 to
255.
Note that the address varies depending on the used quantity of MEMORY, BASIC
version and
types.
- 140 -
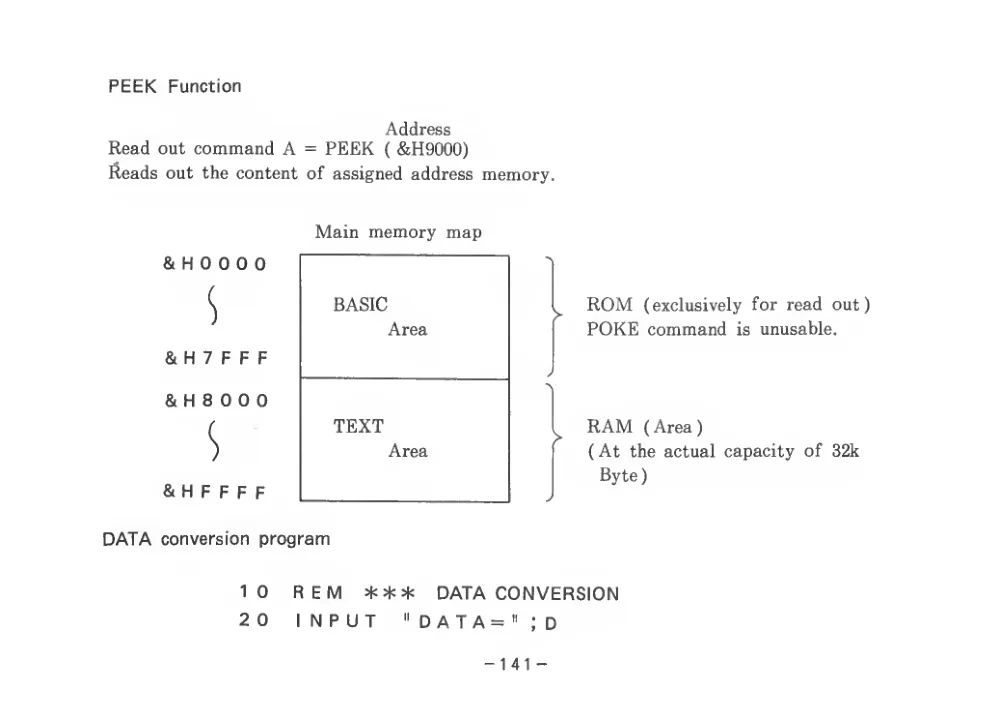
PEEK
Function
Address
Read out command A = PEEK
( &H9000)
fteads out the content of assigned address memory.
Main memory map
ROM
( exclusively for read out
)
POKE command
is unusable.
RAM (Area)
( At the actual capacity of 32k
Byte)
DATA conversion program
10
REM
***
DATA CONVERSION
20
INPUT
"data=";d
& H 0 0 0 0
& H 7 F F
F
& H 8 0 0 0
& H F F F F
BASIC
Area
TEXT
Area
-14
1 -
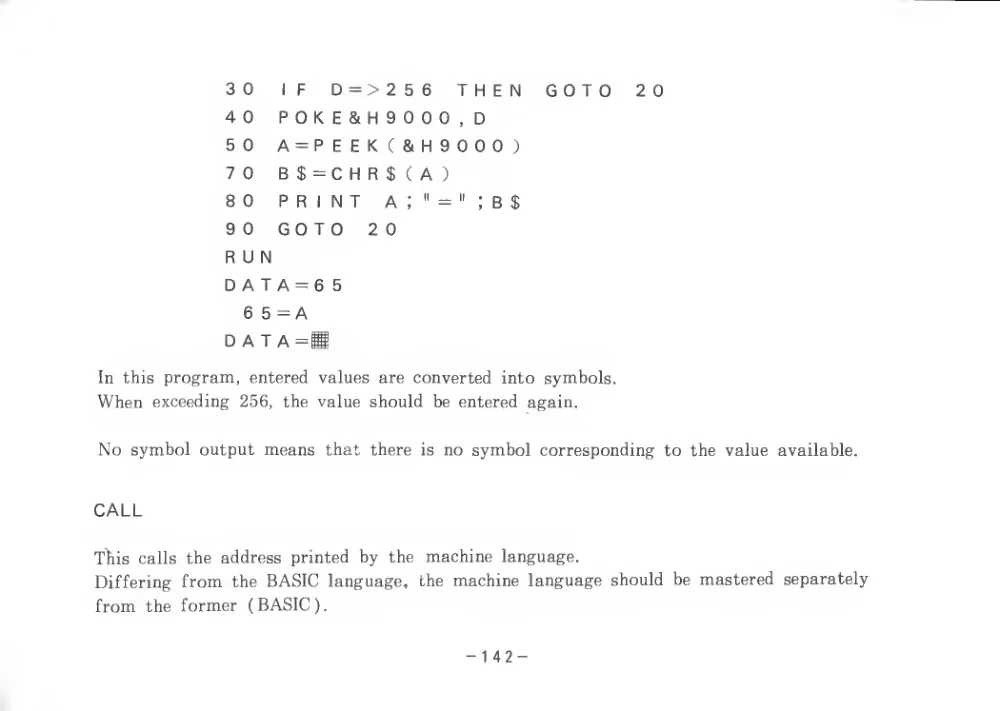
30
IF
D=>256
THEN
GOTO
20
40
P0KE&H9000,D
50
A=PEEK(&H9000J
70
B$=CHR$(A)
8 0
PRINT
A
;
" =
"
: B $
90
GOTO
20
RUN
D A T A = 6 5
6 5 = A
DATA =H
In
this program, entered values
are converted into symbols.
When exceeding
256,
the value should
be entered again.
No symbol output means
that
there
is no symbol corresponding
to the value available.
CALL
This
calls
the address printed by
the
machine language.
Differing from
the BASIC language,
the machine language should
be mastered separately
from
the former
( BASIC )
- 142 -
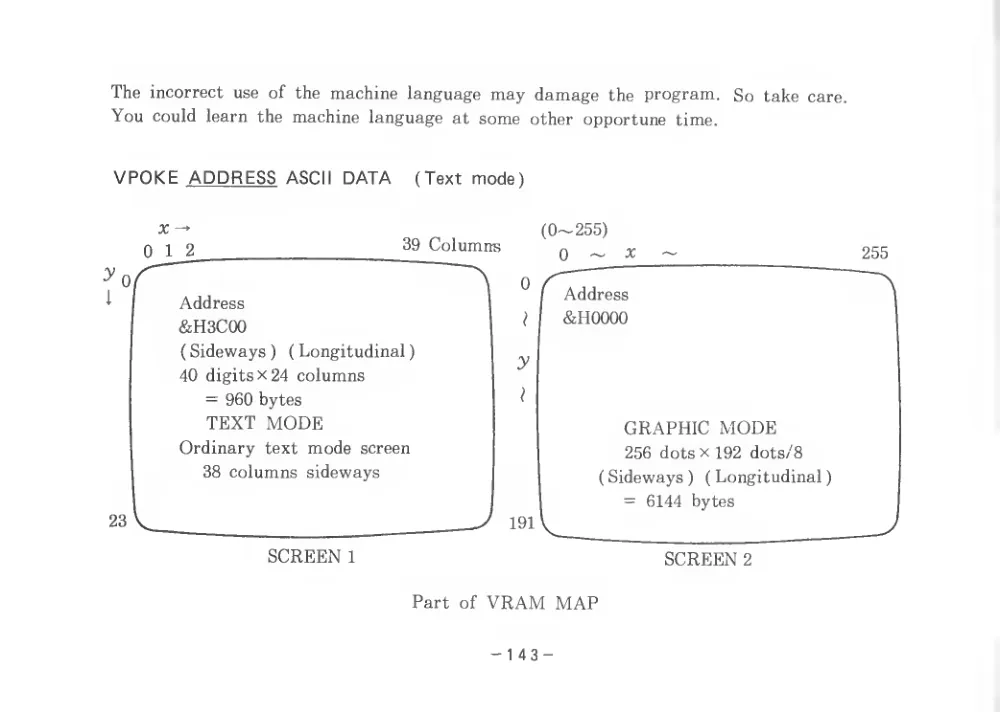
The incorrect
use of
the machine language may damage the program.
So take
care.
You could
learn
the machine language at some other opportune time.
V POKE ADDRESS ASCII DATA
(Text mode)
0
1
2
23
39 Columns
Address
&H3C00
( Sideways
)
( Longitudinal
40 digits X 24 columns
= 960 bytes
TEXT MODE
Ordinary text mode screen
38 columns sideways
SCREEN
1
(0-255)
0
~
255
Address
&H0000
191'
GRAPHIC MODE
256 dots X 192 dots/8
( Sideways
)
( Longitudinal
=
6144 bytes
SCREEN 2
Part of VRAM MAP
- 143 -
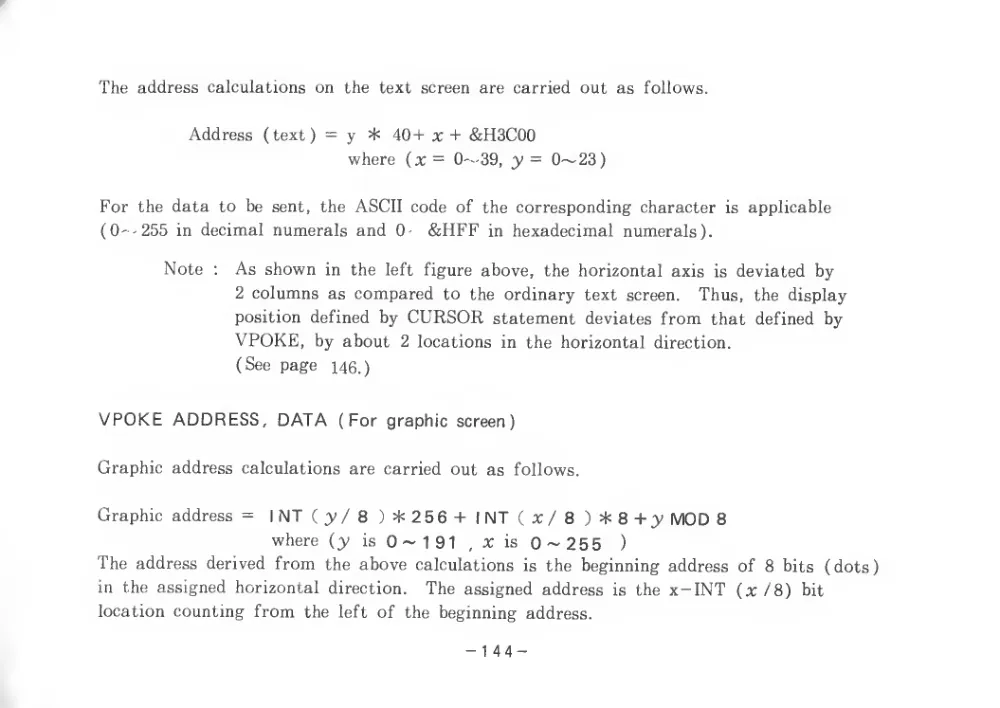
The address calculations on
the
text screen are carried out as follows.
Address
(text) = y
40+ x + &H3C00
where (x = 0—39, y = 0~23)
For
the data
to be
sent,
the ASCII code of the corresponding character
is applicable
(0-'255
in decimal numerals and
0-
&HFF
in hexadecimal numerals).
Note
:
As shown
in
the
left
figure above,
the horizontal axis
is deviated by
2 columns as compared
to the ordinary
text
screen.
Thus,
the display
position defined by CURSOR statement
deviates from
that defined by
VPOKE,
by about
2 locations
in
the horizontal
direction.
(See page
i46.)
VPOKE ADDRESS, DATA
(For graphic screen)
Graphic address calculations are carried out as follows.
Graphic address = INT(y/8)*256+INT(x/8)>h8+y MOD 8
where
( 3
^
is 0—191 ,xis 0-255
)
The address derived from
the above calculations
is
the beginning address of 8
bits
( dots
)
in
the assigned horizontal
direction.
The assigned address
is the x-INT (x
/ 8 )
bit
location counting from
the
left of the beginning address.
- 144 -
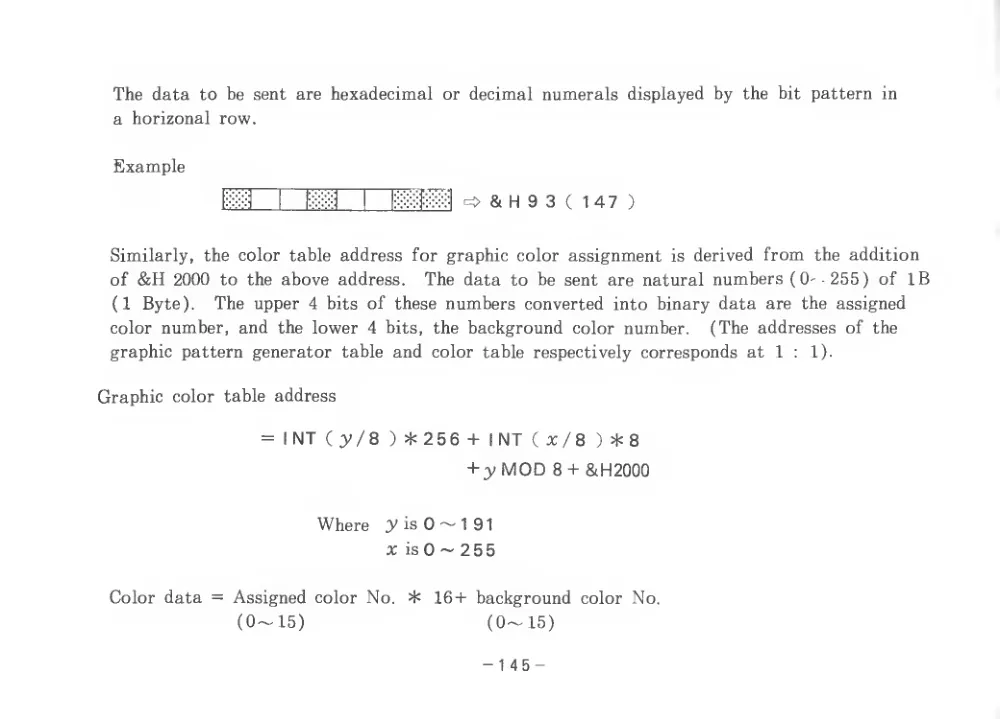
The data to be sent are hexadecimal or decimal numerals displayed by
the
bit pattern
in
a horizonal row.
Example
I
'mi
I
O & H 9 3
(
1 47
)
Similarly,
the color table address
for graphic color assignment
is derived from
the addition
of &H 2000
to the above address.
The data to be sent are natural numbers (0-
255)
of IB
(1
Byte).
The upper 4 bits of these numbers converted into binary data are
the assigned
color number, and the lower
4
bits,
the background color number.
(The addresses of the
graphic pattern generator
table and color table respectively corresponds at
1
:
1).
Graphic color table address
= INT(y/8 )*256+INT(x/8 1*8
+ 3; MOD 8 + &H2000
Where
O' is 0 ~ 1 9
X
is 0 ~ 2 5 5
Color data = Assigned color No.
16+ background color No.
(0---15)
(0~15)
- 145 -
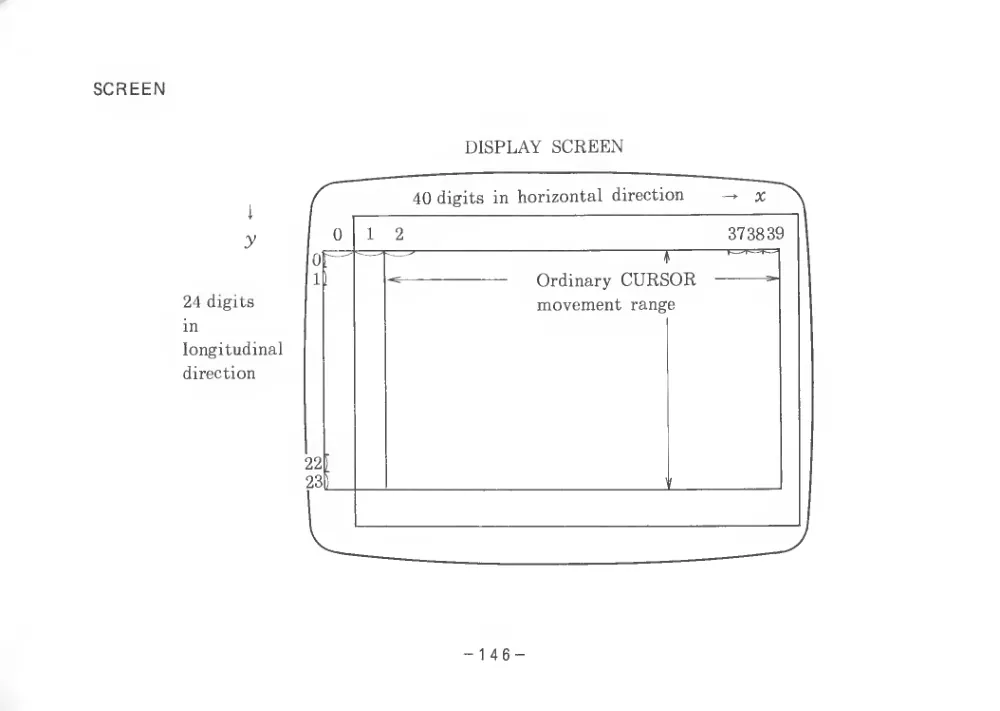
SCREEN
DISPLAY SCREEN
1
y
24 digits
in
longitudinal
direction
- 146 -
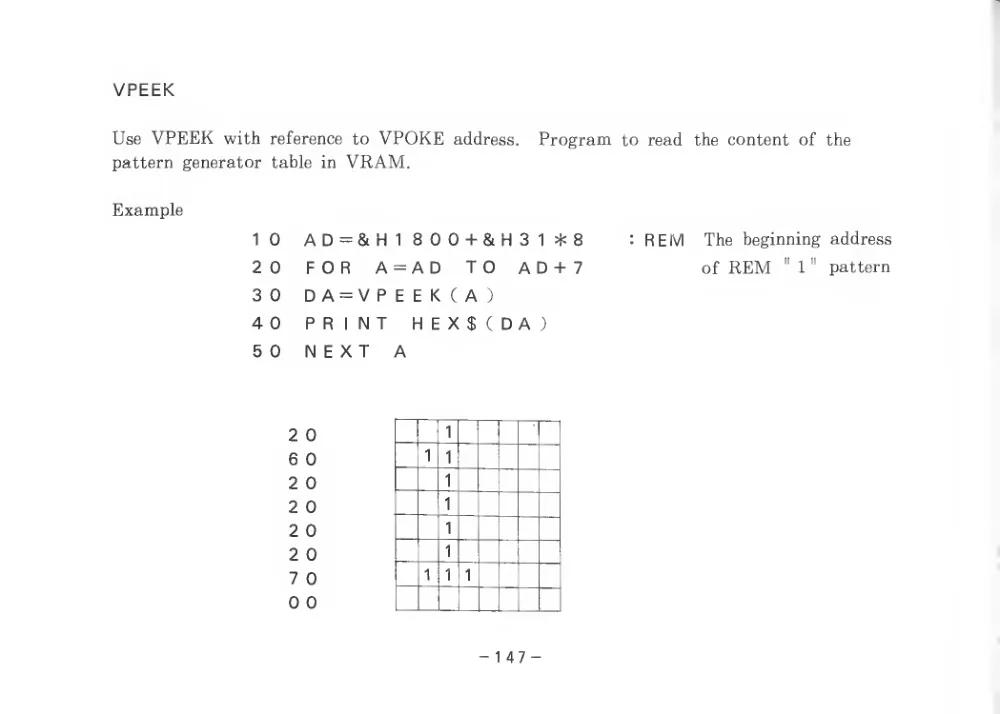
VPEEK
Use VPEEK with reference
to VPOKE
address.
Program
to read
the content of
the
pattern generator
table
in VRAM.
Example
1 0
2 0
3 0
4 0
5 0
2 0
6 0
2 0
2 0
2 0
2 0
7 0
0 0
1
1
1
1
1
1
1
1
1
1
AD = &H1800+&H31=)«8
:REI\/1
The beginning address
FORA=ADTOAD + 7
of REM
"
1
"
pattern
DA = VPEEK(A
)
PRINT
HEX$(DAJ)
NEXT
A
- 147 -
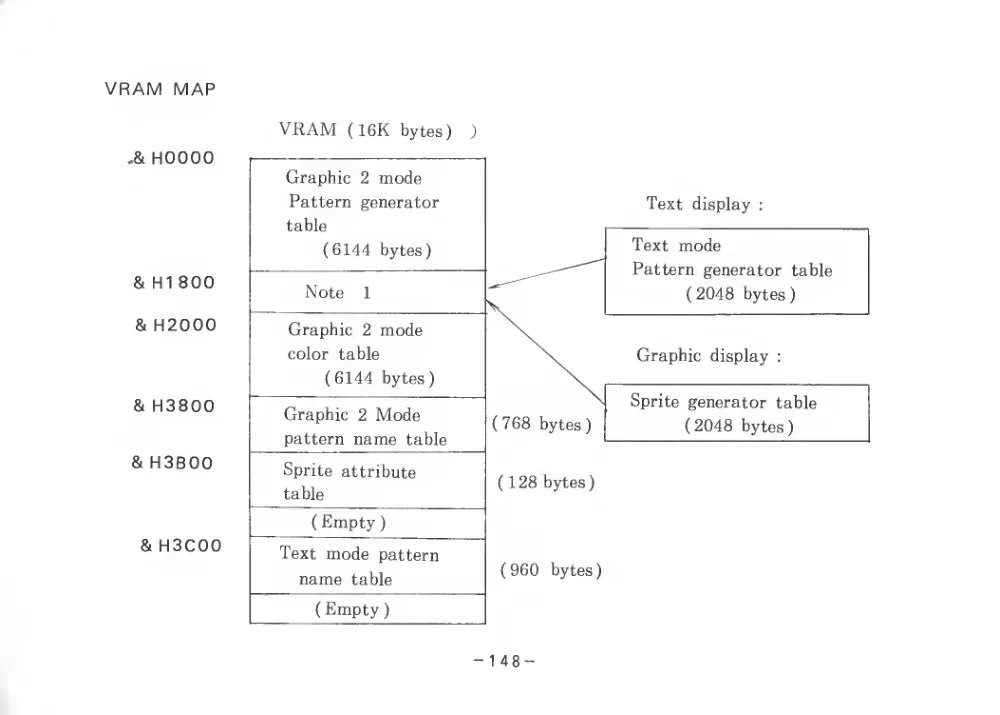
VRAM MAP
,& HOOOO
& HI 800
& H2000
& H3800
& H3B00
& H3C00
VRAM
( 16K
bytes)
)
Graphic
2 mode
Pattern generator
table
( 6144 bytes
)
Note
1
Graphic
2 mode
color table
( 6144 bytes
)
Graphic
2 Mode
pattern name table
Sprite attribute
table
( Empty
)
Text mode pattern
name table
{ Empty
)
1 48-
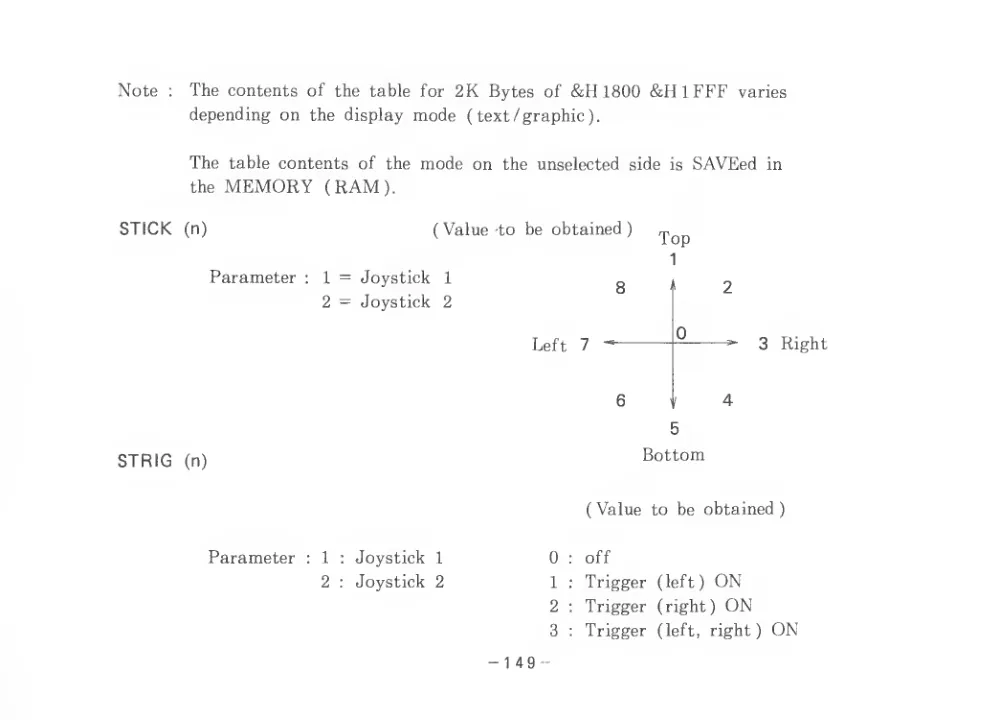
Note
:
STICK
STRIG
The contents of the table
for 2K Bytes
of &H1800 &H 1 FFF
varies
depending on
the display mode
( text /graphic ).
The
table contents of the mode on
the unselected
side
is SAVEed
in
the MEMORY (RAM).
(n)
(Value -to be obtained)
1
Parameter
:
1 = Joystick
1
2 = Joystick
2
(n)
Left
7
8
'
2
0
6
'
4
3
Right
5
Bottom
( Value
to be obtained
^
Parameter
:
1
:
Joystick
1
2
:
Joystick
2
0
:
off
1
:
Trigger
(left) ON
2
:
Trigger
(right) ON
3
:
Trigger
(left,
right) ON
-
1 4 9 -
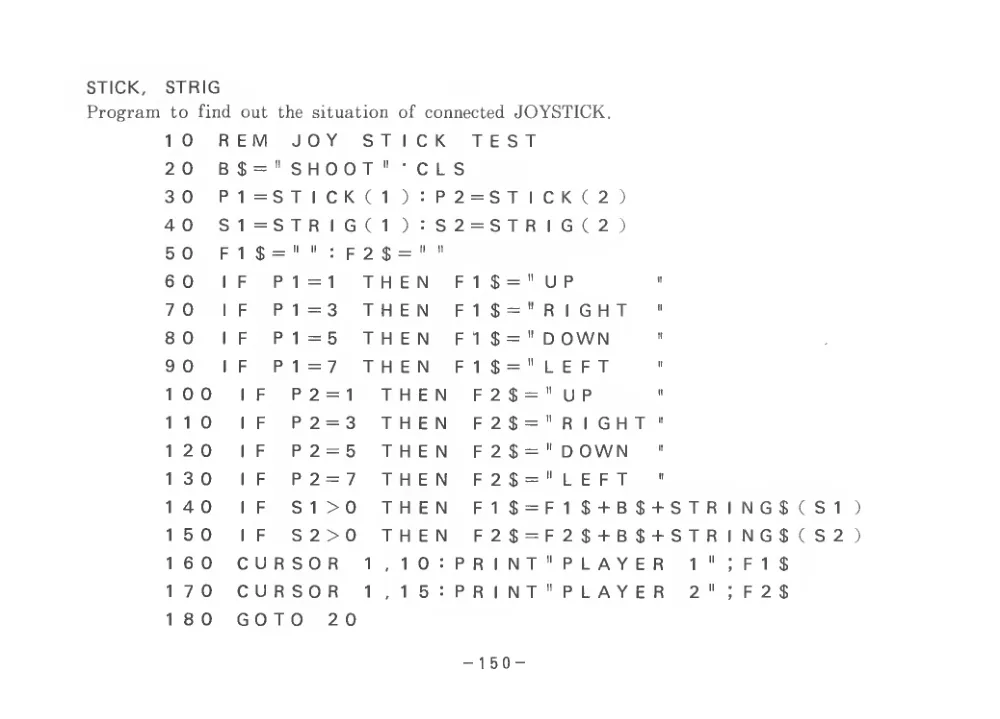
STICK,
STRIG
Program
to
find out
the situation of connected JOYSTICK.
1 0
R E M
JOY
S T
1 C K
T E S T
2 0
B $ =
" SHOOT
II
C L S
3 0
P
1 = S T
1 C K
(
1
)
P 2 = S T
1 C K
( 2
)
4 0
S
1 = S T R
1 G
(
1
)
: S 2 = S T R
1 G
C 2
)
5 0
F
1
$ _
II
"
:
F 2 $ =
II
II
6 0
1
F
P
1 =
1
T H E N
F
1
$ _
11 U P
II
7 0
1
F
P
1 = 3
T H E N
F
1
$ _
II
R
1 G H T
II
8 0
1
F
P
1 = 5
T H
E N
F
1
$ _
It D OWN
tl
9 0
1
F
P
1 = 7
T H
E N
F
1
$ _
II
L EFT
II
1 0 0
1
F
P 2 =
1
T H E N
F 2 $ =
U P
II
1
1 0
1
F
P 2 = 3
T H E N
F 2 $ =
RIGHT
IT
1
2 0
1
F
P 2 = 5
T H E N
F 2 $ =
D OWN
It
1
3 0
1
F
P 2 = 7
T H E N
F 2 $ =
LEFT
II
1 4 0
1
F
S
1 >0
T H E N
F
1
$ = F
1
$ + B $ + S T R
N G $
1
5 0
1
F
s 2 > 0
T H E N
F 2 $ = F 2$+B$+STR
N G $
1
6 0
C U R S 0 R
1
1 0
P R
1 N T
P L A Y E R
1
"
F
1
$
1
7 0
C U R S 0 R
1
1
5
P R
1 N T
P L A Y E R
2
"
F 2 $
1
8 0
GOTO
2 0
- 150 -
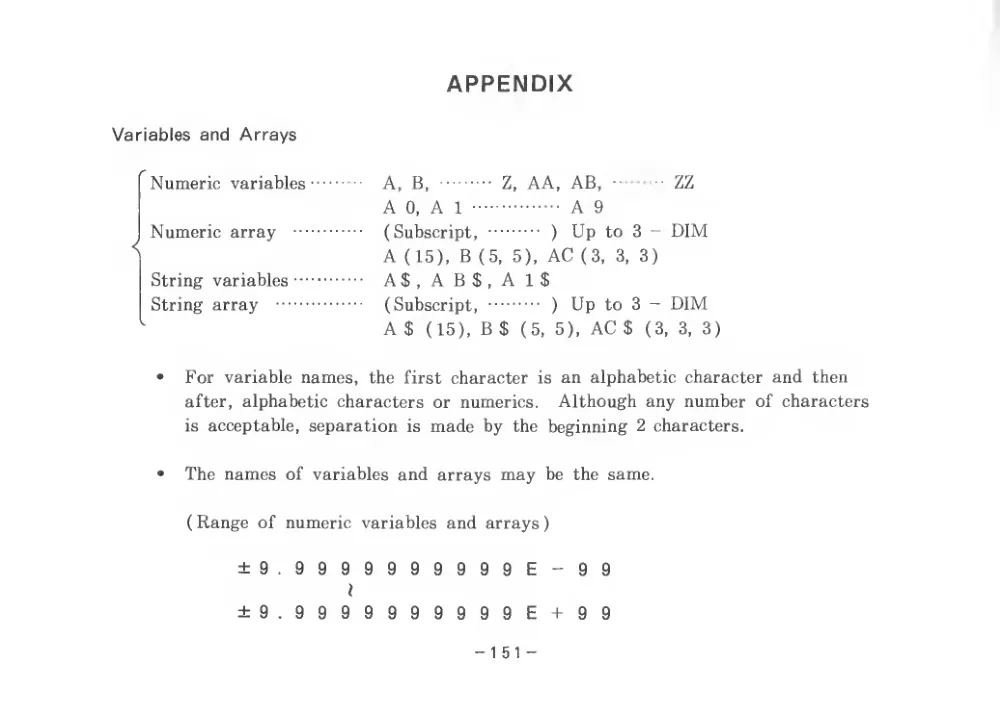
APPENDIX
Variables and Arrays
A,
B.
Z, AA, AB,
ZZ
A
0. A
1
A
9
(Subscript,
)
Up to
3 - DIM
A (15), B (5,
5), AC (3,
3,
3)
A$,AB$,A1$
(Subscript,
)
Up
to
3 — DIM
A $
( 15), B $
(5,
5), AC $
(3,
3,
3)
•
For
variable names,
tbe
first character
is an alphabetic character and
then
after, alphabetic characters or numerics.
Although any number of characters
is acceptable, separation
is made by the beginning 2 characters.
•
The names of variables and arrays may
be the same.
( Range of numeric
variables and arrays
±9.9999999999E-99
I
±9.9999999999E
+ 99
Numeric variables
Numeric array
String variables
-
String array
-15
1 -
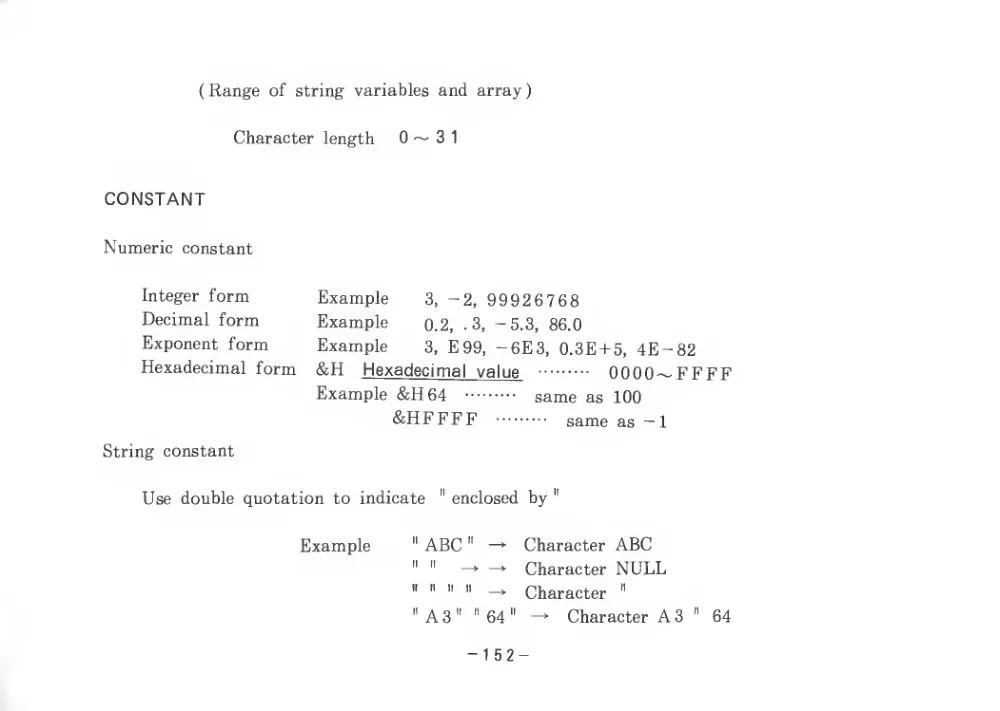
( Range of string variables and array
Character length
0 — 3
1
CONSTANT
Numeric constant
Integer form
Example
3, -2, 99926768
Decimal form
Example
0.2,
.3, -5.3,
86.0
Exponent form
Example
3, E99, -6E3, 0.3E + 5, 4E-82
Hexadecimal form
&H
Hexadecimal
value
0000~FFFF
Example &H 64
same as 100
&HFFFF
same as — 1
String constant
Use double quotation to indicate
" enclosed by
"
Example
" ABC
" —*
Character ABC
"
"
^ ^
Character NULL
"
"
"
" ^
Character
"
"A3"
" 64
" ^
Character A3"
64
- 152 -
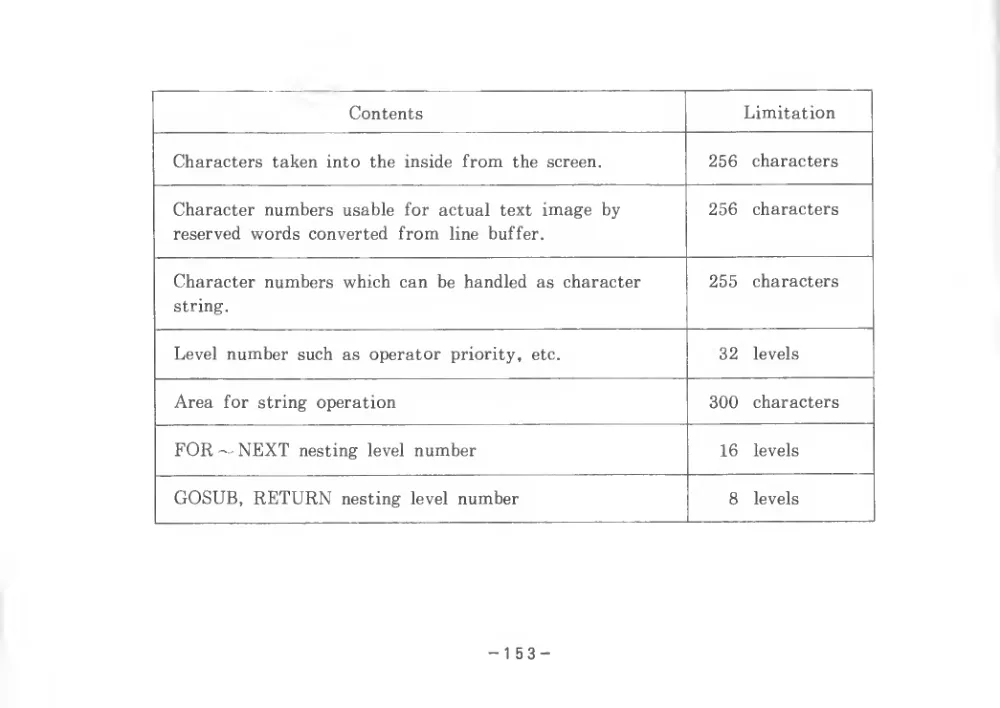
Contents
Limitation
Characters taken into the
inside from
the screen.
256
characters
Character numbers usable
for actual text image by
reserved words converted from
line
buffer.
256
characters
Character numbers which can be handled as character
string.
255
characters
Level number such as operator
priority,
etc.
32
levels
Area
for string operation
300
characters
FOR
NEXT nesting
level number
16
levels
GOSUB, RETURN nesting
level number
8
levels
- 153 -
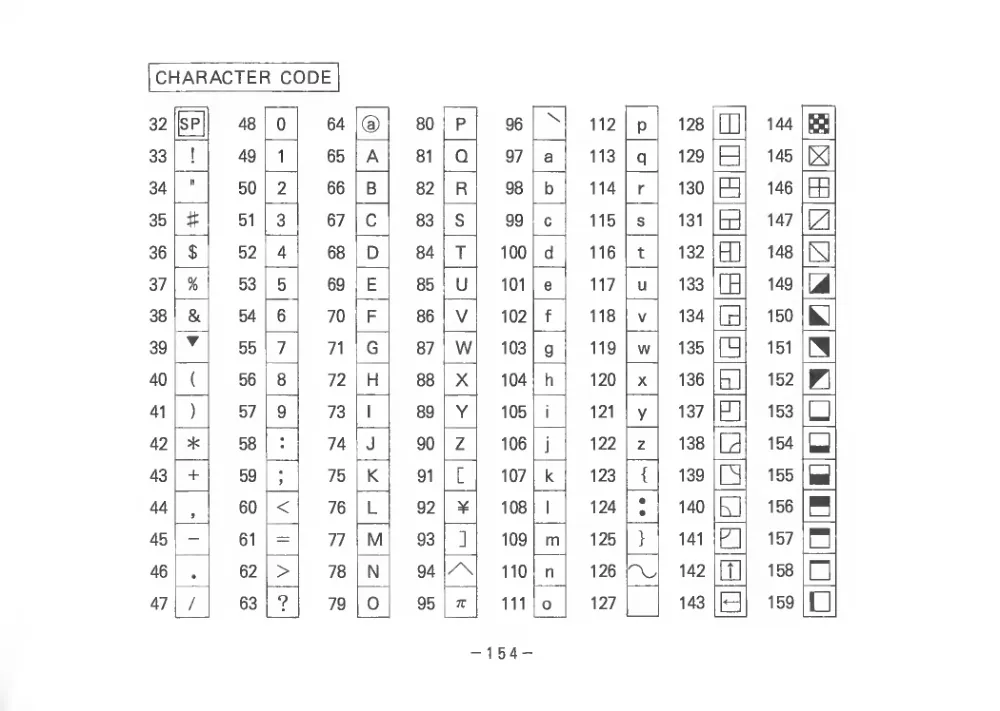
CHARACTER CODE
32
SP
48
0
64
(a)
80
P
33
!
49
1
65
A
81
Q
34
It
50
2
66
B
82
R
35
#
51
3
67
C
83
S
36
$
52
4
68
D
84
T
37
%
53
5
69
E
85
U
38
&
54
6
70
F
86
V
39
T
55
7
71
G
87
w
40
(
56
8
72
H
88
X
41
)
57
9
73
1
89
Y
42
*
58
:
74
J
90
Z
43
+
59
f
75
K
91
[
44
f
60
<
76
L
92
¥
45
-
61
=
77
M
93
]
46
62
>
78
N
94 /\
47
/
63
7
79
0
95
TT
96
\
112
P
97
a
113
q
98
b
114
r
99
c
115
s
100
d
116
t
101
e
117
u
102
f
118
V
103
g
119
w
104
h
120
X
105
i
121
y
106
j
122
Z
107
k
123
{
108
1
124
•
•
109
m
125
}
110
n
126
111
0
127
m
144
B
145
B
146
ffl
B
147 0
ffl
148 B
m
149 a
B
150
B
151
B
152 B
153
154 U
155 H
156 H
157 n
ffl
158 n
B
159
128
129
130
131
132
133
134
135
136
137
138
139
140
141
142
143
154 -
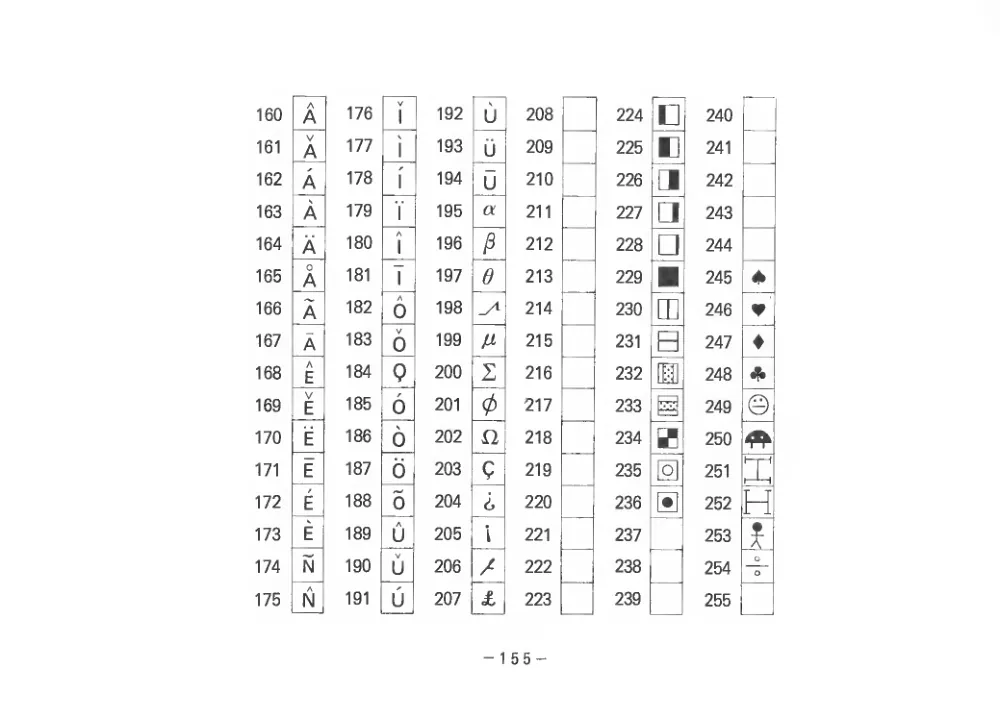
160
AA
176
1
192
U
161
VA
177
i
193
ij
162
A
178
1
194
0
163
A
179
Y
195
a
164
A
180
1
196
165
0A
181
T
197
e
166
A
182
A
0
198
167
A
183
6
199
168
A
E
184
9
200
2
169
V
E
185
6
201
0
170
E
186
6
202 O
171
E
187
0
203
9
172
E
188
6
204
6
173
E
189
u
205
1
174
N
190
V
U
206
/
175
N
191
U
207
£
224 c
240
225 n
241
226
[i
242
227
243
228
244
229
245
4
230 m
246
V
231 B
247
232
i]
248
233 g
249 ©
234
250
235
251
236
252 H
237
253
238
254
o
_
239
255
208
209
210
211
212
213
214
215
216
217
218
219
220
221
222
223
- 155 -
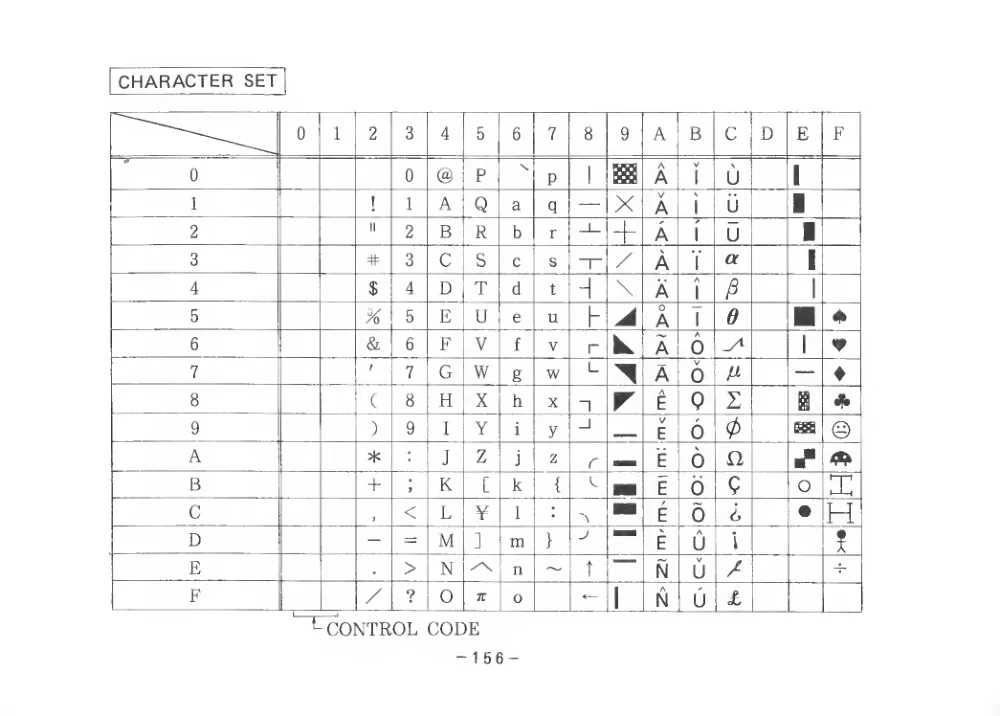
CHARACTER SET
0
1
2
3
4
5
6
7
8
9
A
B
c
D
E
F
0
0
@
P
\
P
1 m
AA
1
u
1
1
!
1
A
Q
a
q — X
VA
i
u
1
2
11
2
B
R
b
r
+
A
1
u
1
3
#
3
C
S
c
s
-T- /
A
Y
a
1
4
$
4
D
T
d
t
H
\
A
A
1
1
5
%
5
E
U
e
u
h
OA
T
e
4
6
&
6
F
V
f
V
r
A
6
1
4
7
t
7
G
W
g
w
L
A
6
—
8
(
8
H
X
h
X
n r
E
9
2
i
9
)
9
I
Y
i
y
_l
V
E
6
0
m ©
A
*
J
Z
j
Z
r MM
E
6
n
B
+
K
[
k
{
L
E
0
9
o X
C
<
L
¥
1
E
0
6
• H
D
-
=
M
]
m
}
J
E
A
u
i
!
E
>
N
/\
n
T
N
u
/
F
/
?
0
TT
0
1
AN
u
£
Control code
- 156 -
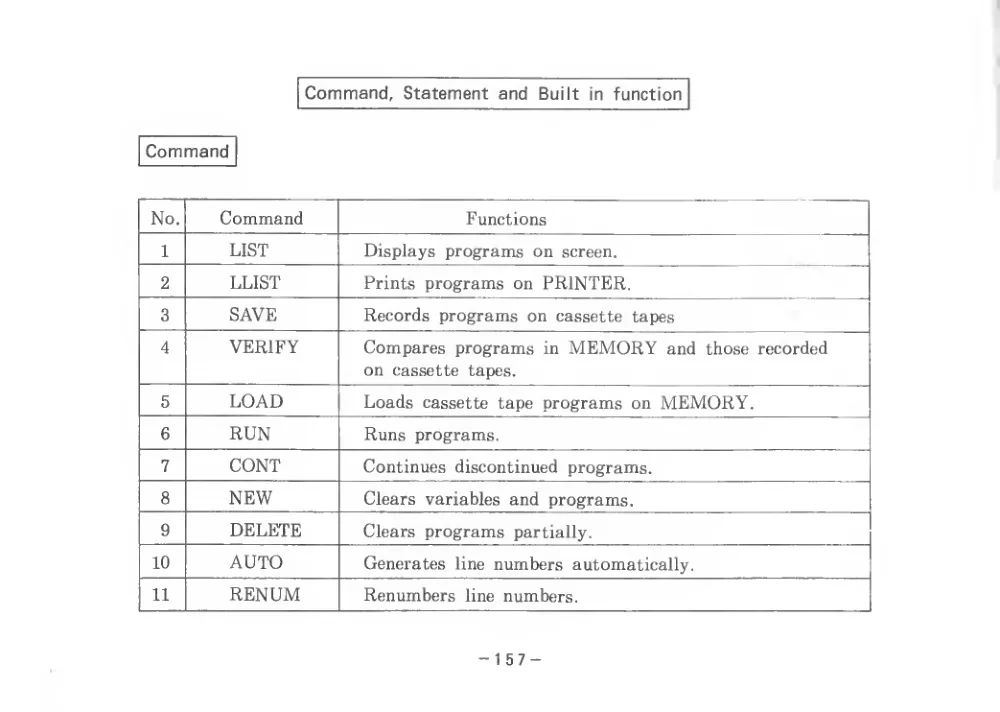
Command, Statement and
Built
in function
Command
No.
Command
Functions
1
LIST
Displays programs on screen.
2
LLIST
Prints programs on PRINTER.
3
SAVE
Records programs on cassette tapes
4
VERIFY
Compares programs
in MEMORY and those recorded
on cassette
tapes.
5
LOAD
Loads cassette tape programs on MEMORY.
6
RUN
Runs programs.
7
CONT
Continues discontinued programs.
8
NEW
Clears variables and programs.
9
DELETE
Clears programs partially.
10
AUTO
Generates
line numbers automatically.
11
RENUM
Renumbers
line numbers.
- 157 -
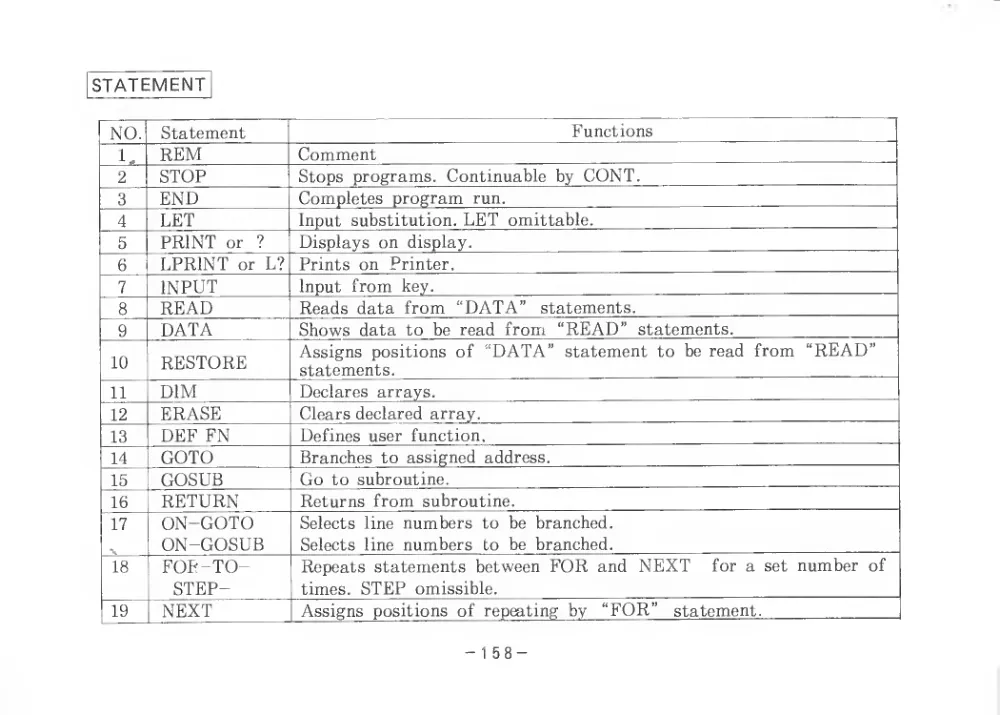
STATEMENT
NO.
Statement
Functions
1
,
REM
Comment
2
STOP
Stops programs. Continuable by CONT.
3
END
Completes program
run.
4
LET
Input substitution. LET omittable.
5
PRINT
or
?
Displays on display.
6
LPRINT or L?
Prints on
Printer.
7
INPUT
Input from
key.
8
READ
Reads data from “DATA”
statements.
9
DATA
Shows data to
be read from “READ”
statements.
10
RESTORE
Assigns positions of “DATA” statement
to be read from “READ”
statements.
11
DIM
Declares arrays.
12
ERASE
Clears declared array.
13
DEE FN
Defines user function.
14
GOTO
Branches to assigned address.
15
GOSUB
Go to subroutine.
16
RETURN
Returns from subroutine.
17
ON-GOTO
Selects
line numbers to be branched.
ON-GOSUB
Selects
line numbers
to
be branched.
18
FOP -TO-
Repeats statements between FOR and NEXT
for a
set number of
STEP-
times. STEP omissible.
19
NEXT
Assigns positions of repeating by
“FOR”
statement.
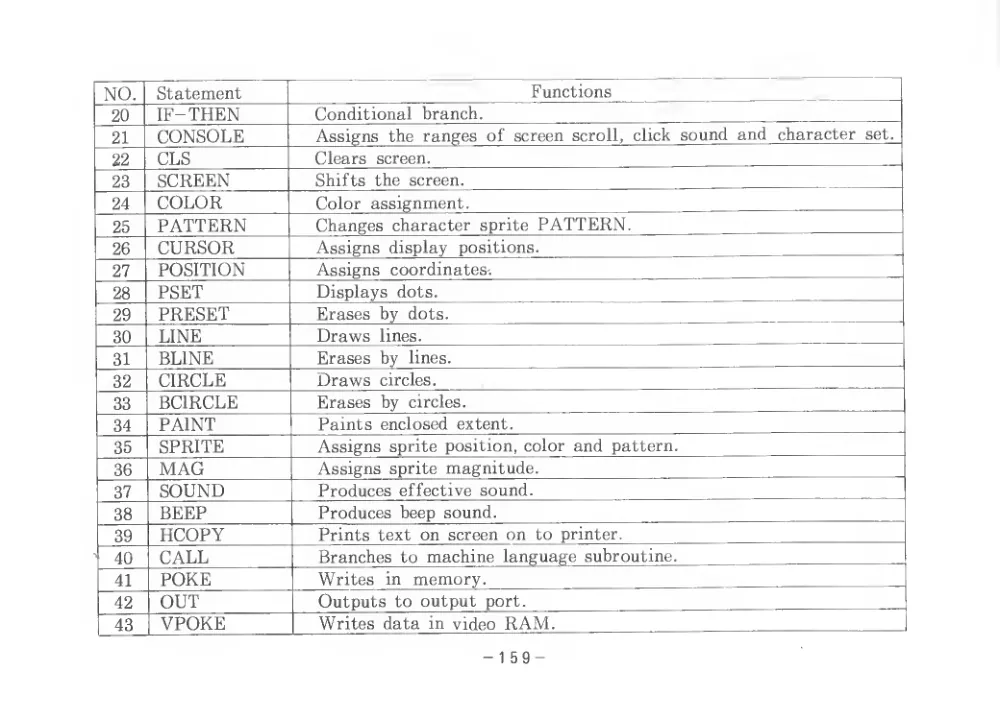
NO.
Statement
Functions
20
IF-THEN
Conditional branch.
21
CONSOLE
Assigns
the ranges of screen
scroll,
click sound and
character
set.
22
CLS
Clears
screen.
23
SCREEN
Shifts the screen.
24
COLOR
Color assignment.
25
PATTERN
Changes character
sprite PATTERN.
26
CURSOR
Assigns display
positions.
27
POSITION
Assigns
coordinates-.
28
PSET
Displays
dots.
29
PRESET
Erases by dots.
30
LINE
Draws
lines.
31
BLINE
Erases by
lines.
32
CIRCLE
Draws
circles.
33
BCIRCLE
Erases by
circles.
34
PAINT
Paints enclosed extent.
35
SPRITE
Assigns sprite position, color and pattern.
36
MAG
Assigns sprite magnitude.
37
SOUND
Produces effective sound.
38
BEEP
Produces beep sound.
39
HCOPY
Prints text on screen on to printer.
40
CALL
Branches to machine language subroutine.
41
POKE
Writes
in memory.
42
OUT
Outputs to output port.
43
VPOKE
1
Writes data
in video RAM.
- 159 -
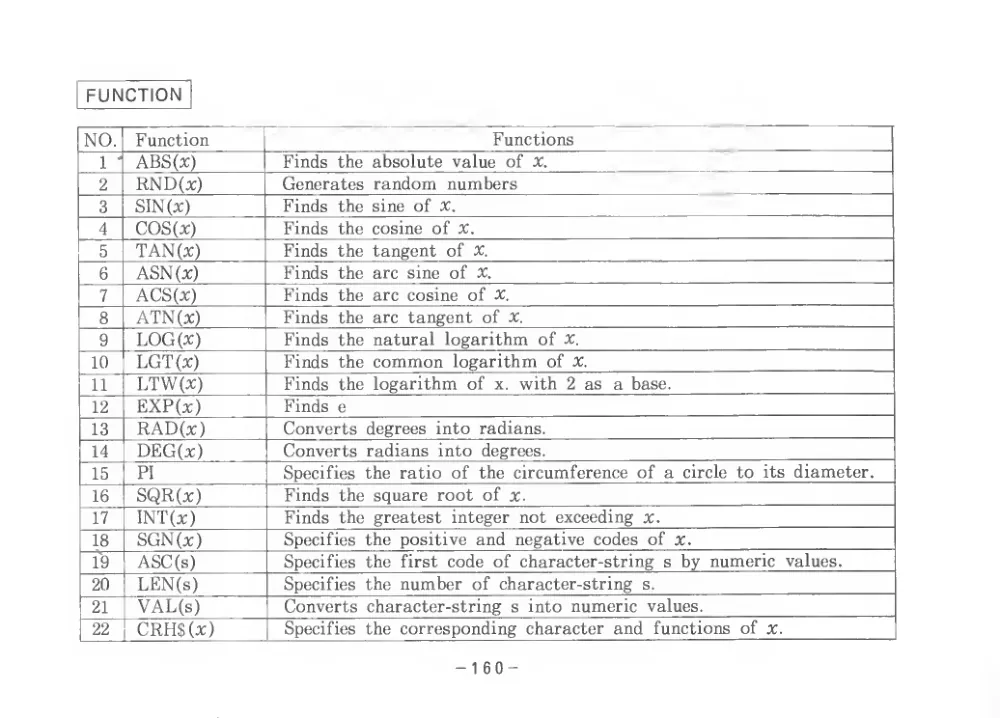
FUNCTION
NO.
Function
Functions
1
'
ABS(X)
Finds the absolute value of
X.
2
RND(x)
Generates random numbers
3
SIN(x)
Finds the sine of X.
4
COS(x)
Finds the cosine of x.
5
TAN(x)
Finds the tangent of
X.
6
ASN(x)
Finds the arc
sine of
X.
7
ACS(x)
Finds the arc cosine of x.
8
ATN(x)
Finds the arc tangent of X.
9
LOG(x)
Finds the natural logarithm of X.
10
LGT(x)
Finds the common logarithm
of X.
11
LTW(x)
Finds the logarithm of
x. with
2 as
a base.
12
EXP(x)
Finds e
13
RAD(x)
Converts degrees into radians.
14
DEG(x)
Converts radians
into
degrees.
15
PI
Specifies the ratio of the circumference of a
circle to
its diameter.
16
SQR(x)
Finds the square root of x.
17
INT(x)
Finds the greatest
integer not exceeding x.
18
SGN(x)
Specifies the positive and negative codes of x.
19
ASC(s)
Specifies the
first code of character-string
s by numeric
values.
20
LEN(s)
Specifies the number of character-string
s.
21
VAL(s)
Converts character-string
s into numeric
values.
22
CRH${x)
Specifies the corresponding character and
functions
of x.
- 160 -
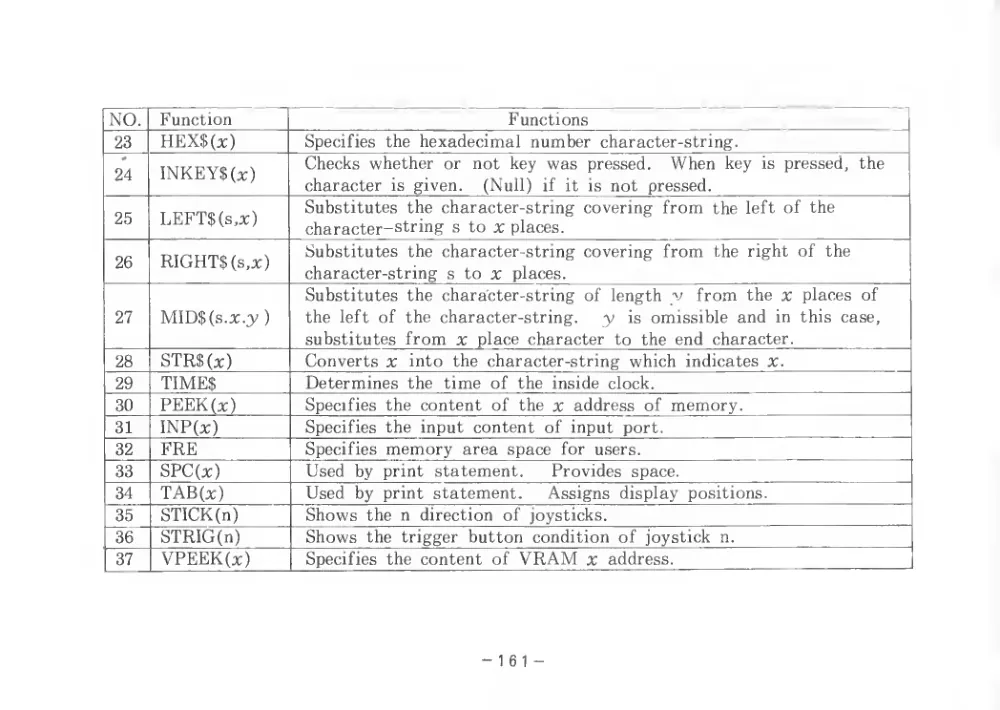
NO.
Function
Functions
23
HEX$(x)
Specifies
the hexadecimal number character-string.
24
INKEY$(x)
Checks whether or
not key was
pressed.
When key
is
pressed,
the
character
is given.
(Null)
if
it
is not
pressed.
25
LEFTS (s,x)
Substitutes the character-string covering from the
left of the
character-string
s to x places.
26
RIGHTS (s,x)
Substitutes the character-string covering from
the
right of the
character-string
s
to x
places.
27
MIDS(s.x.y
)
Substitutes tbe character-string of length y
from the x
places of
the
left of the character-string.
y
is omissible and
in
this case,
substitutes from x
place character
to
the end character.
28
STRS(x)
Converts x
into
the character-string which
indicates
x.
29
TIMES
Determines the time of the
inside clock.
30
PEEK(x)
Specifies the content of the x address of memory.
31
INP(x)
Specifies the input content of input
port.
32
FRE
Specifies memory area space
for
users.
33
SPC(x)
Used by
print
statement.
Provides space.
34
TAB(x)
Used by print statement.
Assigns display
positions.
35
STICK(n)
Shows the n direction of joysticks.
36
STRIG(n)
Shows
the trigger button condition of joystick
n.
37
VPEEK(x)
Specifies the content of VRAM x
address.
- 161 -
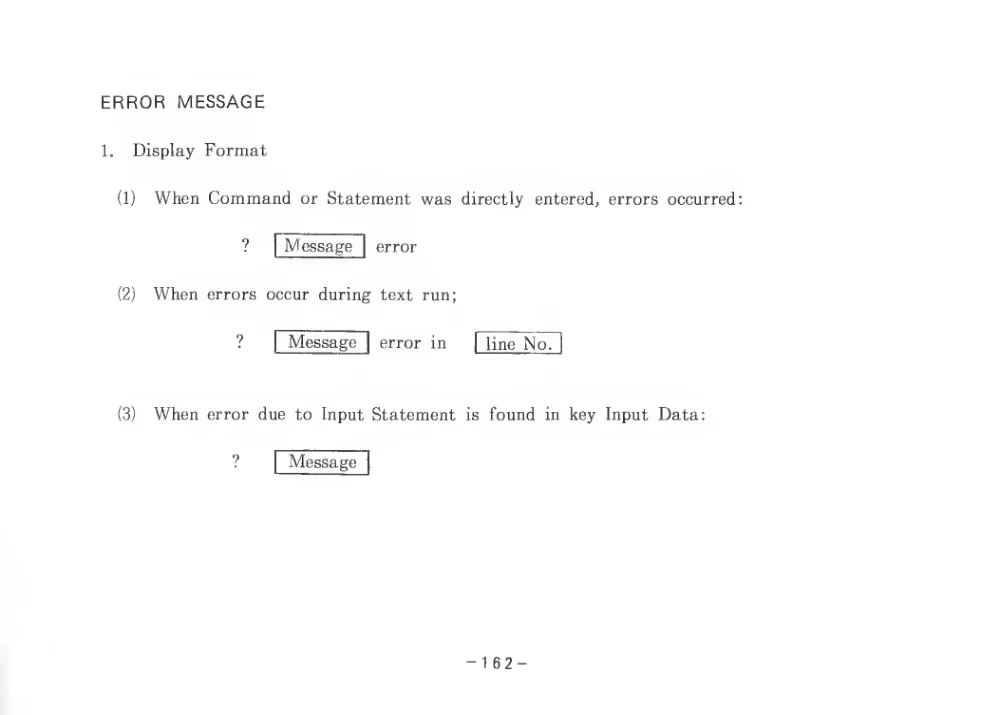
ERROR MESSAGE
1.
Display Format
(1)
When Command
or Statement was
directly
entered, errors occurred:
Message
(2)
When errors occur during text run;
?
I
Message"!
error
in
|
line No.
(3)
When error due
to Input Statement
is found
in key Input Data:
Message
- 162 -
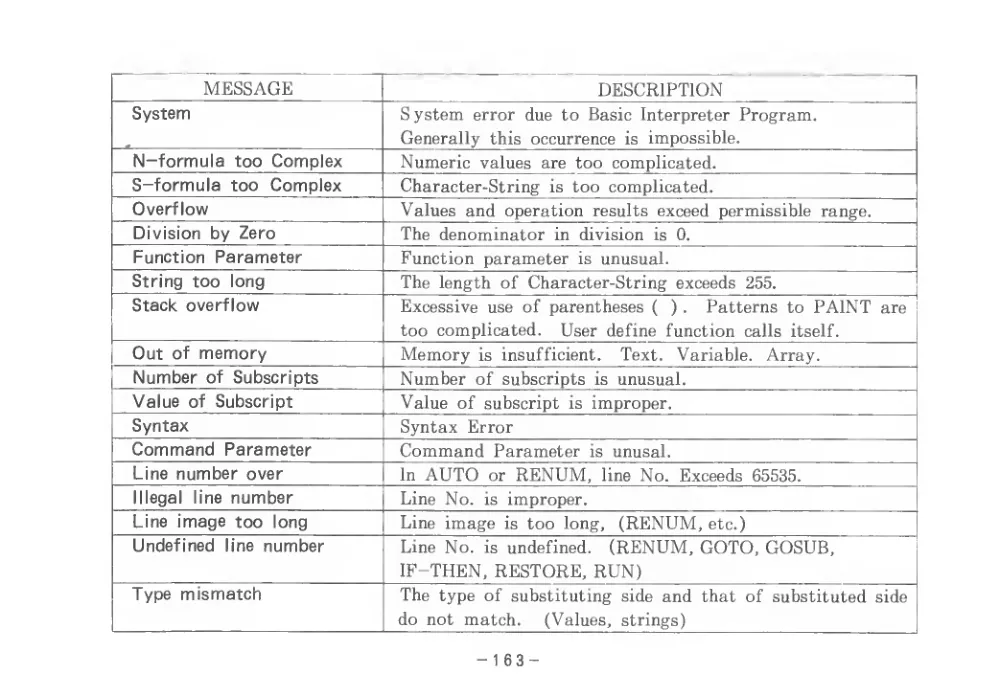
MESSAGE
DESCRIPTION
System
System error due to Basic Interpreter Program.
Generally
this occurrence
is impossible.
N-formula too Complex
Numeric values
are too complicated.
S-formula too Complex
Character-String
is too complicated.
Overflow
Values and operation
results exceed permissible range.
Division by Zero
The denominator
in division
is
0.
Function Parameter
Function parameter
is unusual.
String too
long
The length of Character-String exceeds
255.
Stack overflow
Excessive use of parentheses
(
)
.
Patterns to PAINT are
too complicated.
User
define function
calls
itself.
Out of memory
Memory
is insufficient.
Text.
Variable.
Array.
Number of Subscripts
Number of subscripts
is unusual.
Value of Subscript
Value of subscript
is improper.
Syntax
Syntax Error
Command Parameter
Command Parameter
is
unusal.
Line number over
In AUTO
or RENUM,
line No.
Exceeds
65535.
Illegal
line number
Line No.
is improper.
Line image too
long
Line image
is too
long, (RENUM, etc.)
Undefined
line number
Line No.
is
undefined.
(RENUM, GOTO, GOSUB,
IF-THEN, RESTORE, RUN)
Type mismatch
The type of substituting
side and that of substituted
side
do not match.
(Values,
strings)
- 163 -
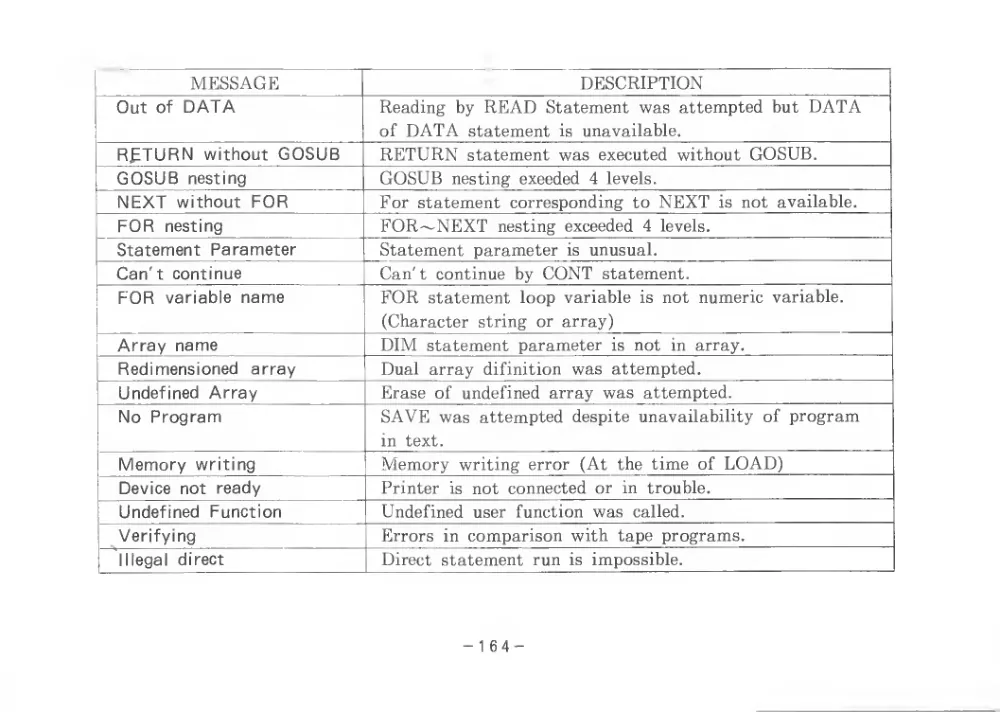
MESSAGE
DESCRIPTION
Out of DATA
Reading by READ Statement was attempted but DATA
of DATA statement
is unavailable.
RETURN without GOSUB
RETURN statement was executed without GOSUB.
GOSUB
nesting
GOSUB nesting exeeded
4
levels.
NEXT without FOR
For statement corresponding to NEXT
is not available.
FOR
nesting
FOR~NEXT nesting exceeded
4
levels.
Statement Parameter
Statement parameter
is unusual.
Can't continue
Can't continue by CONT statement.
FOR
variable name
FOR statement loop variable
is not numeric variable.
(Character string or array)
Array name
DIM statement parameter
is not
in array.
Redimensioned
array
Dual array
difinition was attempted.
Undefined Array
Erase of undefined array was attempted.
No Program
SAVE was attempted despite unavailability of program
in
text.
Memory writing
Memory writing error
(At
the time of LOAD)
Device not ready
Printer
is not connected or
in
trouble.
Undefined
Function
Undefined user function was
called.
Verifying
Errors
in comparison with tape programs.
Illegal
direct
Direct statement run
is impossible.
- 164 -
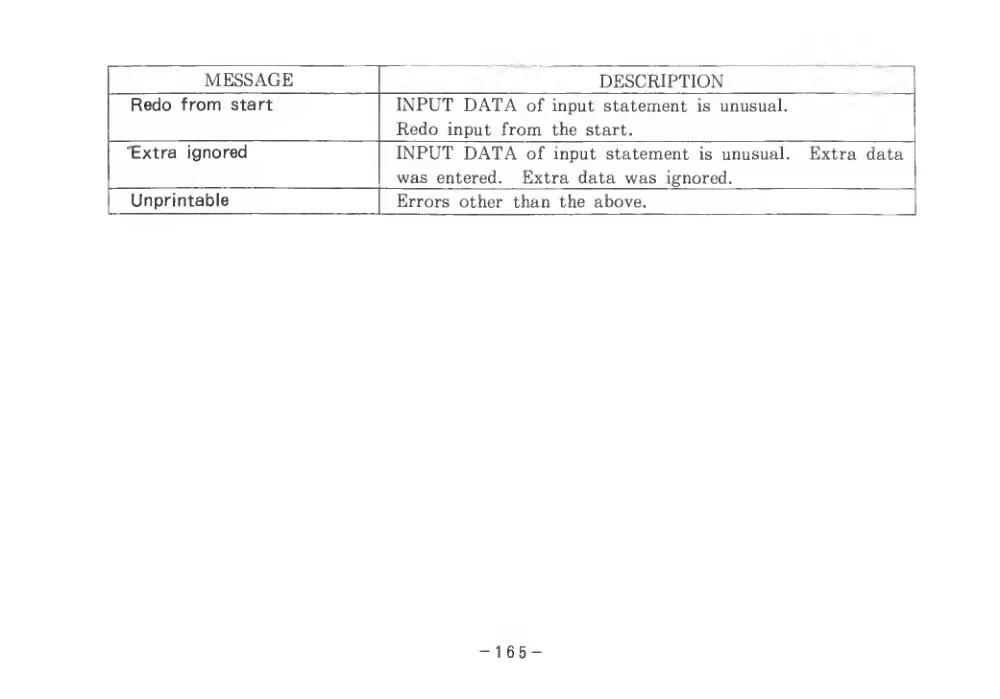
MESSAGE
DESCRIPTION
Redo from
start
INPUT DATA of input statement
is unusual.
Redo input from
the start.
"Extra
ignored
INPUT DATA of input statement
is unusual.
Extra data
was entered.
Extra data was ignored.
Unprintable
Errors other than the above.
- 165 -
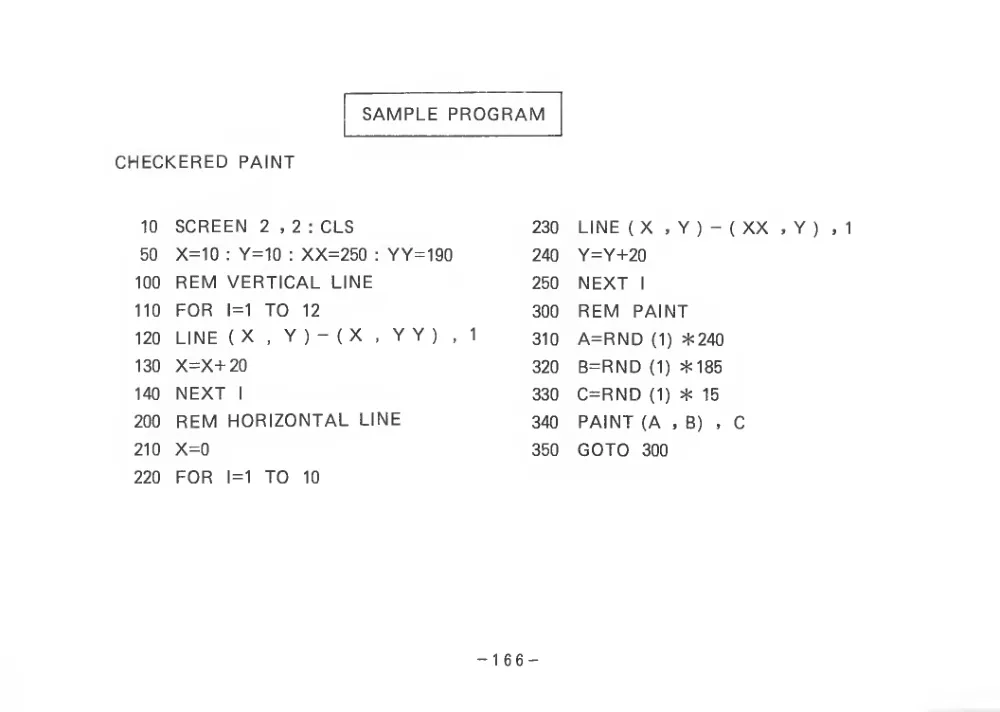
SAMPLE PROGRAM
CHECKERED PAINT
10
SCREEN 2,2: CLS
230
LINE (X
, Y
) -
( XX
, Y
50
X=10
: Y=10
: XX=250
: YY=190
240
Y=Y+20
100 REM VERTICAL LINE
250
NEXT
1
110
FOR
1=1 TO
12
300
REM
PAINT
120
LINE (X,Y)-(X.YY),1
310
A=RND
(1) *240
130 X=X+ 20
320
B=RND
(1) *185
140
NEXT
1
330
C=RND
(1) *
15
200
REM HORIZONTAL LINE
340
PAINT (A
, B)
,
C
210
X=0
350
GOTO
300
220
FOR
1=1 TO
10
- 166 -
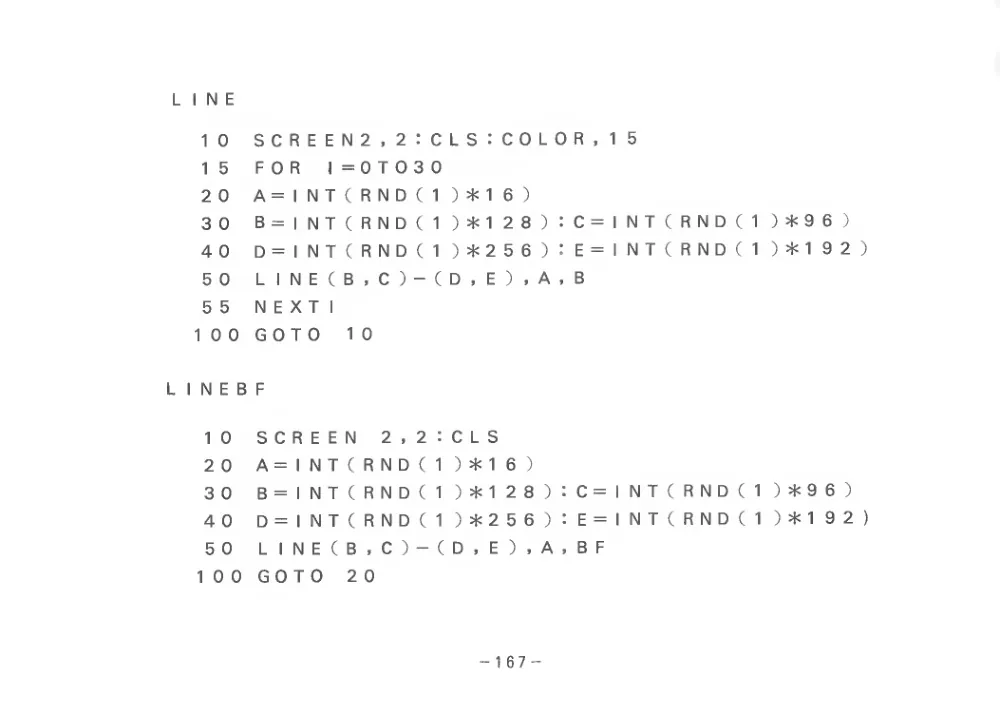
LINE
1 0
SCREEN2,2: C L S
: C 0 L 0 R
,
1
5
1
5
FOR
l=0TO30
2 0
A=
1 N T
( R N D
(
1
) *
1
6
)
3 0
B =
1 N T
( R N D
(
1
) *
1
2 8
)
: C =
!1 N T
( R N D
(
1
) * 9 6
)
4 0
D =
1 N T
( R N D
(
1
) * 2 5 6
)
:
E =
1 N T
C R N D
(
1
) *
1
9 2
)
5 0
LINE(B,C)-
( D
,
E
)
, A
, B
5 5
N E X T
1
1 0 0 GOTO
10
L
I N E B F
1 0
SCREEN
2,2
C L S
2 0
A =
1 N T
( R N D
(
1
) *
1
6
)
3 0
B =
1 N T
( R N D
(
1
00
CM
)
:: C =
1INT(RNDC1 )*96)
4 0
D =
1 N T
( R N D
(
1
) * 2 5 6
)
::
E =
1INT(RND(1 )>i:192
5 0
L
I N E
( B
, C
) -
( D
,
E
)
, A
,, B F
1 0 0 GOTO
20
- 167 -
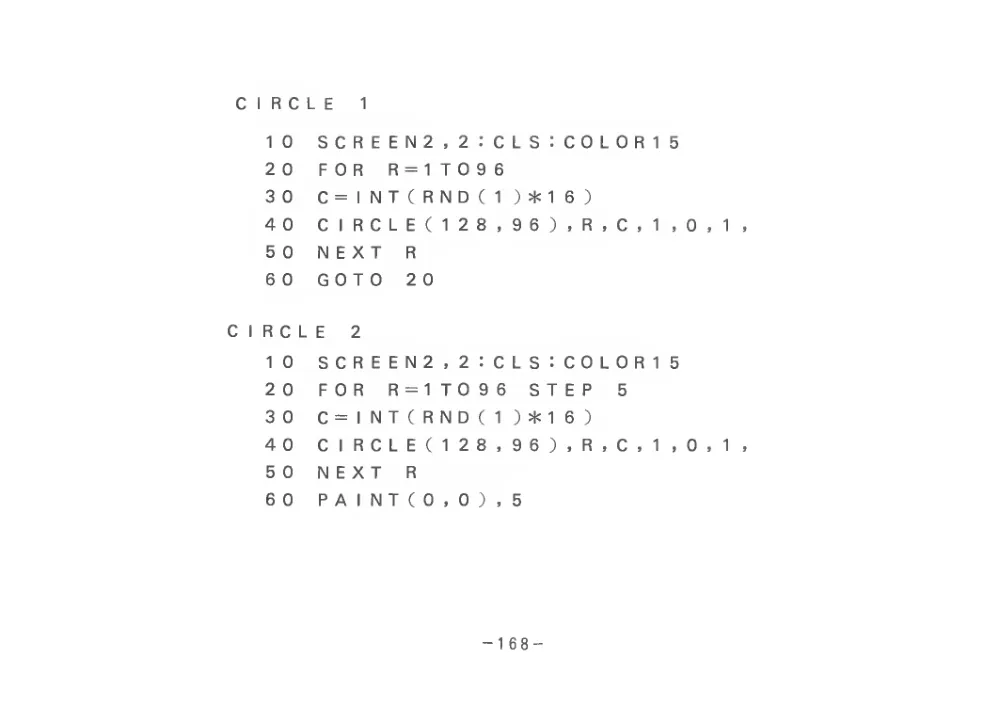
C
1
R C
L. E
1
1 0
SCREE N 2
, 2
: c L S
:
2 0
FOR
R =
1 T 0 9 6
3 0
C =
1 N T
( R N D
(
1
) *
1
4 0
C
1
R C L E
(
1
2 8
i
9 6
)
5 0
NEXT
R
6 0
GOTO
2 0
C
1
R C L E
2
1 0
SCREE N 2
,
2
: C L S
:
2 0
FOR
R =
1 T 0 9 6
S T
3 0
C =
1 N T
( R N D
(
1
) *
1
4 0
C
1
R C L E
(
1
2 8
9
9 6
)
5 0
NEXT
R
6 0
PAINT
( 0
, 0
)
9
5
C 0 L 0 R
1
5
6
)
, R
, C
,
1 ,0,1
,
C 0 L 0 R
1
5
E P
5
6
)
, R
, C
,
1 ,0,1
,
- 168 -
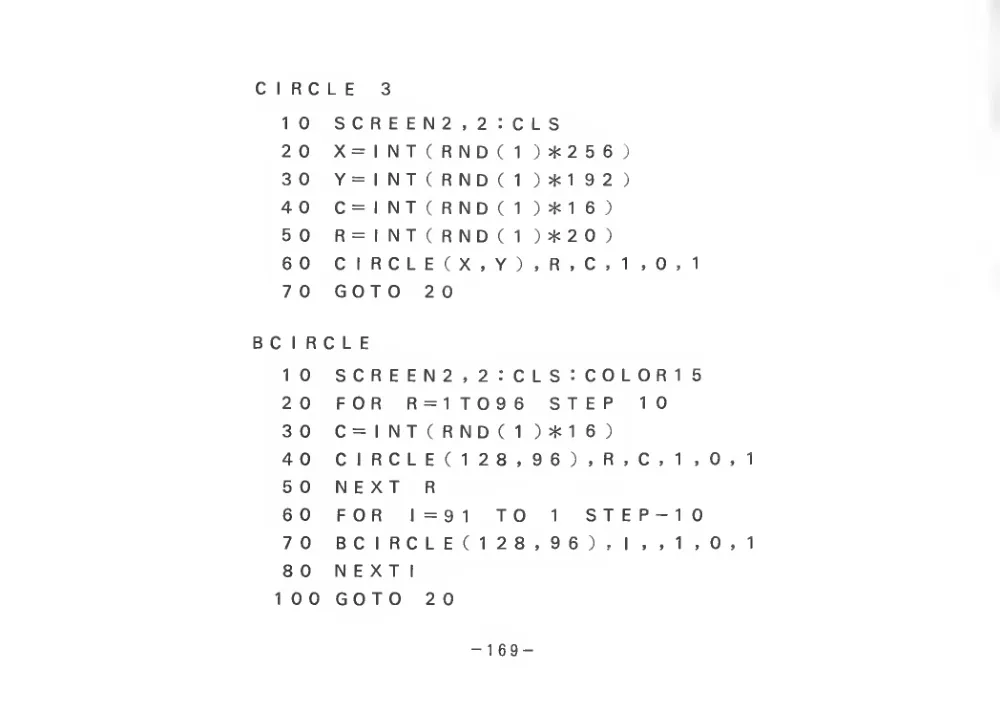
CIRCLE
3
1 0
SCREE N 2
,
2
C L S
2 0
X =
1 N T
( R N D
(
1
) * 2 5 6
)
3 0
Y =
1 N T
( R N D
(
1
) *
1
9 2
)
4 0
C =
1 N T
( R N D
(
1
) *
1
6
;
5 0
R =
1 N T
( R N D
(
1
) * 2 0
)
6 0
C
1
R C L
E
( X
, Y
)
» R
, C
9 1,0,1
7 0
GOTO
2 0
B C
I R C L E
1 0
SCREE N 2
9 2
: C L S
: COLOR
1
5
2 0
FOR
R =
1 T 0 9 6
S T E P
1 0
3 0
C =
1 N T
( R N D
(
1
) *
1
6
)
4 0
C
1 R C L E
(
1
2 8
,
9 6
)
, R
, C
,
1
9 0
5 0
NEXT
R
6 0
FOR
1 = 9
1
T 0
1
S T E P -
1 0
7 0
B C
1
R C L E
(
1
2 8
9
9 6
)
,
1
9
9
1
9 0
8 0
N E X T
1
0 0 GOTO
2 0
- 169 -
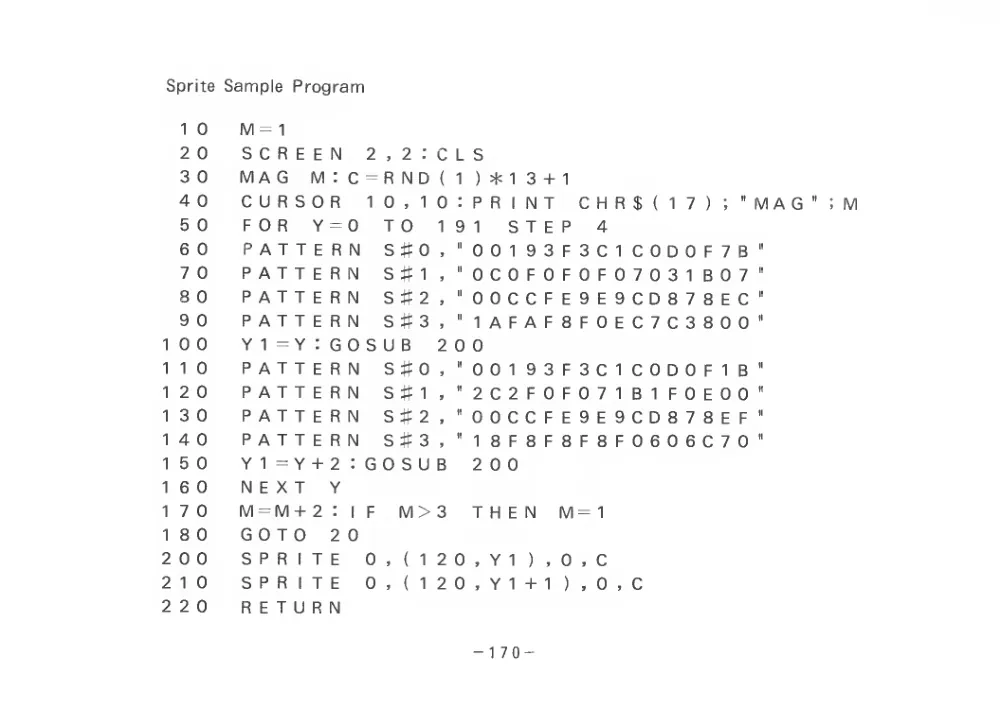
Sprite Sample Program
1 0
M =
1
2 0
SCREE N
2
,
2
: C L S
3 0
MAG
M
C = R N D
{
1
) *
1
3 +
1
4 0
C U R S 0 R
1 0
,
1 0
;
P R
1 N T
C H R $(17
)
MAG"
5 0
FOR
Y = 0
T 0
1
9
1
S T E P
4
6 0
P A T T
E R N
S # 0
0 0 19 3 F 3 C
1 C 0 D 0 F 7 B
II
7 0
P A T T
E R N
s #
1
0 C 0 F 0
F 0
F 0 7 0 3
1
B 0 7
11
8 0
P A T T E R N
S # 2
0 0 C C
F E 9 E 9 C D 8 7 8 E C
11
9 0
P A T T E R N
S # 3
1 A F A F 8 F 0 E C 7 C 3 8 0 0
II
1 0 0
Y
1 = Y
; G 0 S U B
2 0 0
1
1 0
P A T T E R N
s#o
0 0 19 3
F 3 C
1 C 0 D 0
F
1
B
11
1
2 0
P A T T E R N
S #
1
2 C 2
F 0
F 0 7
1 B
1
F 0 E 0 0
II
1
3 0
P A T T E R N
S # 2
0 0 C C F E 9 E 9 C D 8 7 8 E
F
II
1 4 0
P A T T E R N
S# 3
1
8 F 8 F 8
F 8
F 0 6 0 6 C 7 0
II
1
5 0
Y
1 = Y + 2
: G 0 S U B
2 0 0
1
6 0
NEXT
Y
1
7 0
M = M+ 2
;
1
F
M> 3
THEN
M =
1
1
8 0
GOTO
2 0
2 0 0
SPRIT E
0
,
(
1
2 0
, Y
1
)
0
, C
2
1 0
SPRIT E
0
,
(
1
2 0
, Y
1 +
1
)
, 0
C
2 2 0
R E T U R N
- 170 -
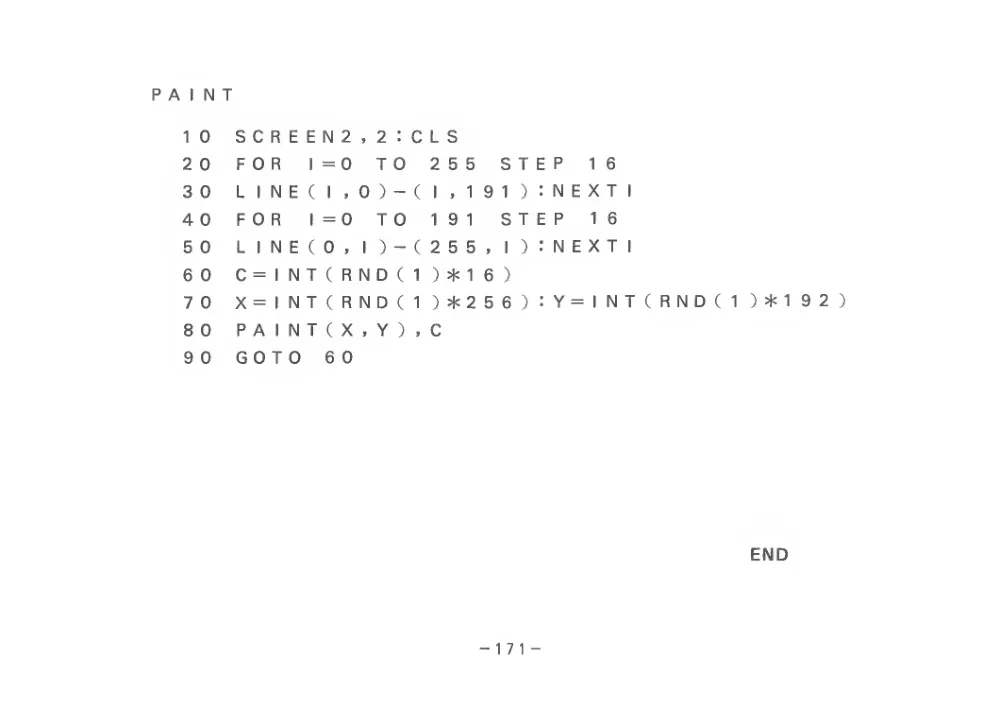
PAINT
1 0
SCREEN2,2:CLS
2 0
FOR
1=0
TO
2 5 5
STEP
16
3 0
L
1 N E
(
1
, 0
) -
(
1
,
1
9
1
)
: N E X T
1
4 0
FOR
1=0
TO
1
9
1
STEP
16
5 0
L
1 N E
( 0
,
1
) -
( 2 5 5
>
1
)
: N E X T
1
6 0
C =
1 N T
( R N D
(
1
) *
1
6
)
7 0
X=
1 N T
( R N D
(
1
) * 2 5 6
)
: Y =
1 N T
8 0
P A
1 N T
( X
, Y
)
, C
9 0
GOTO
60
1
) *
1
9 2
)
END
-17
1 -


John Sands