
Music Editor (1983)
- Pages
- 34
- Source
- scanned, Music_Editor_1983_Au.pdf
- Per page
- about 26 KB — only what you read
- Text layer
- yes — searchable

SMA
MUSIC EDITOR
Personal Compuper
5c-3aaa series


TABLE
OF
CONTENTS
PREFACE
2
I
EXPLANATION OF THE KEYBOARD
3
1.
Layout of the KEYBOARD
3
2.
Input by
keys
4
n
HOW TO USE THE MUSIC EDITOR
7
<1>
Display music names
9
<2>
Composition
9
<3>
Arrangement
19
<4>
Play
21
<5>
Change of instruments
23
<6>
Save
23
<7>
Verify
26
<8>
Load
27
<9>
Delete
28
SEGA
Published
by
:
The
Personal
Computer
Div.,
SEGA
Enterprises,
Ltd.
2 - 12,
Haneda
1 - chome,
Ohta - ku,
Tokyo
144,
Japan
Tel.
03 - 742 - 3171
Reproduction or transmitting any portion of this text
in any form whatsoever,
without the prior written permission of SEGA Enterprises,
Ltd.
is strictly
prohibited.
If any part of this TEXTBOOK
is found to have any page(s) missing
or incorrectly collated, please contact SEGA Enterprises,
Ltd. for a replacement.
-
-
MUSIC
EDITOR
©SEGA
PREFACE
The MUSIC EDITOR
is programmed so that anyone can enjoy music with ease.
The MUSIC EDITOR can perform the following
:
1.
Composition
:
2.
Transcription
:
3.
Arrangement
:
4.
Play
:
5.
Recording
:
Composition of one’s own original music.
Transcribing of well known music.
Arrangement by changing key signatures or using the
treble chord.
To play, select 2 different kinds of tones,
i.
e., piano
tone and organ tone.
Entered music data
is output onto a cassette tape.
The MUSIC EDITOR
is able to do the above in accordance with the instructions
displayed on the TV screen.
- 2 -

I.
EXPLANATION OF THE KEYBOARD
1.
Layout of the KEYBOARD
-/o
tJ
lJ.
7/J'
^
RESET
RESET
I urm
BH
NEXT
Fig.
1
Layout of the KEYBOARD
- 3 -
Some of the SC - 3000 character keys are white and some are black as
in a
piano.
For input of the music notes, use the top layer numeric keys.
Special keys have their own respective functions which are described on the
following pages.
2.
Input by keys
The following 3 modes are used.
(1)
Play mode
:
(2.1)
Character input mode
:
(2.2)
Music input mode
:
<
1 >
Play mode
PLAY
When the
| FUNC
|
key
is pressed, the input mode shifts to the play mode.
PLAY
To return the mode to the input mode from the play mode, press the
| FUNC
I
Allows play by using keys.
Prints music
titles.
Prints music notes on the music paper.
- 4 -
key again.
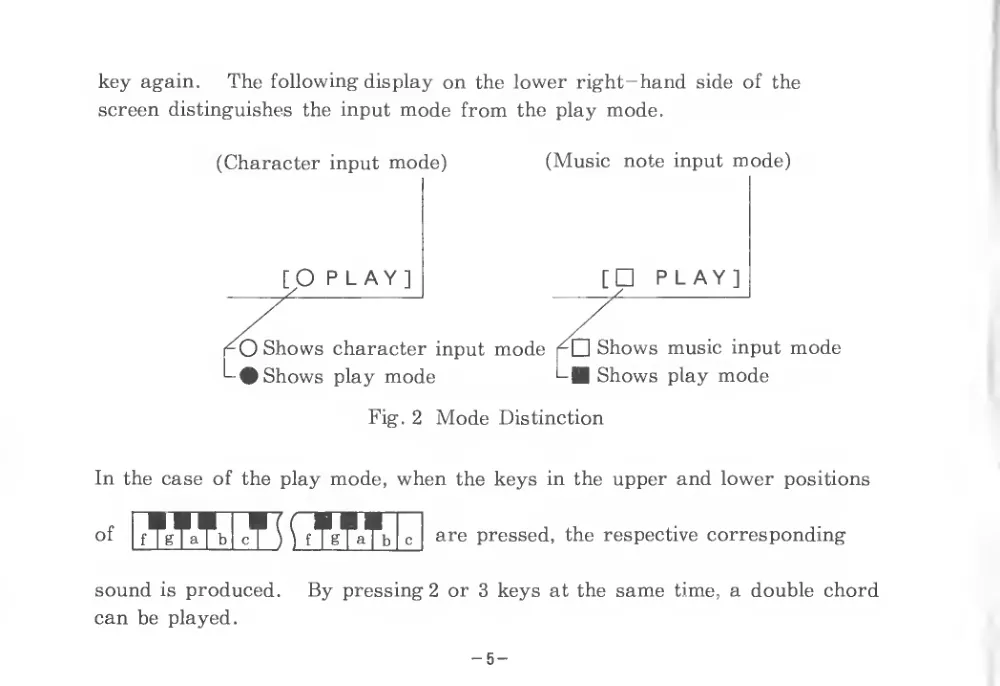
The following display on the lower right-hand side of the
screen distinguishes the input mode from the play mode.
(Character input mode)
[O PLAY]
(Music
note input mode)
[
PLAY]
-O Shows character input mode
Shows music input mode
L# Shows play mode
L|| Shows play mode
Fig. 2 Mode Distinction
In the case of the play mode, when the keys in the upper and lower positions
of
b cT
\
fTsT^Tb
are pressed, the respective corresponding
sound
is produced.
By pressing 2 or 3 keys at the same time, a double chord
can be played.
- 5 -
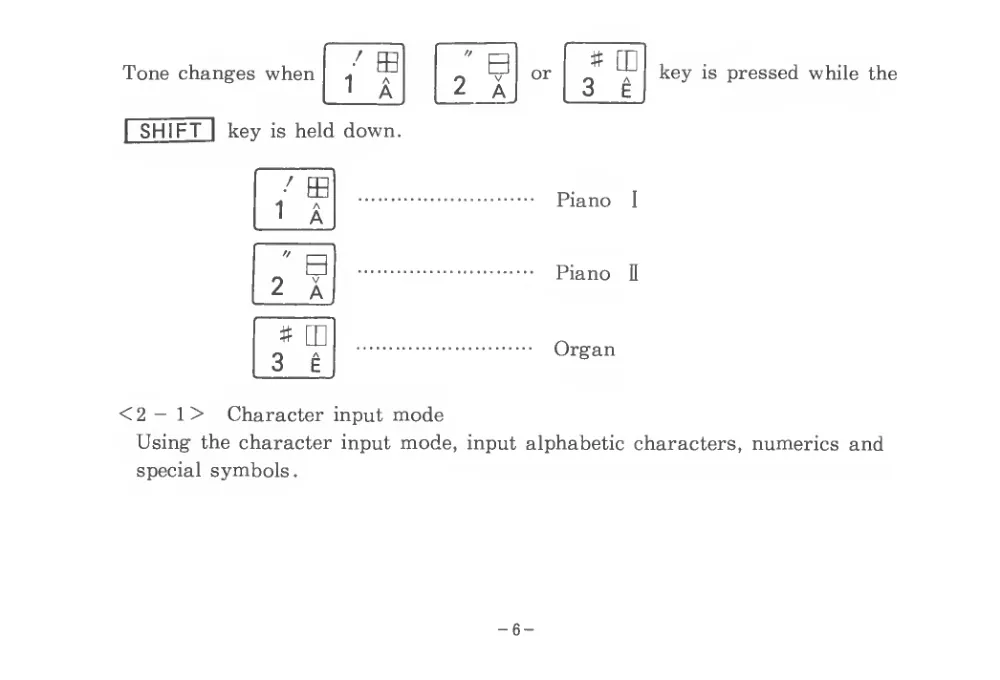
Tone changes when
key
is pressed while the
I SH
I FT~| key
is held down.
or
# m
3
E
'
ffl
1
A
# m
3
E
Piano
I
Piano
n
Organ
< 2 —
1 >
Character input mode
Using the character input mode, input alphabetic characters, numerics and
special symbols.
- 6 -
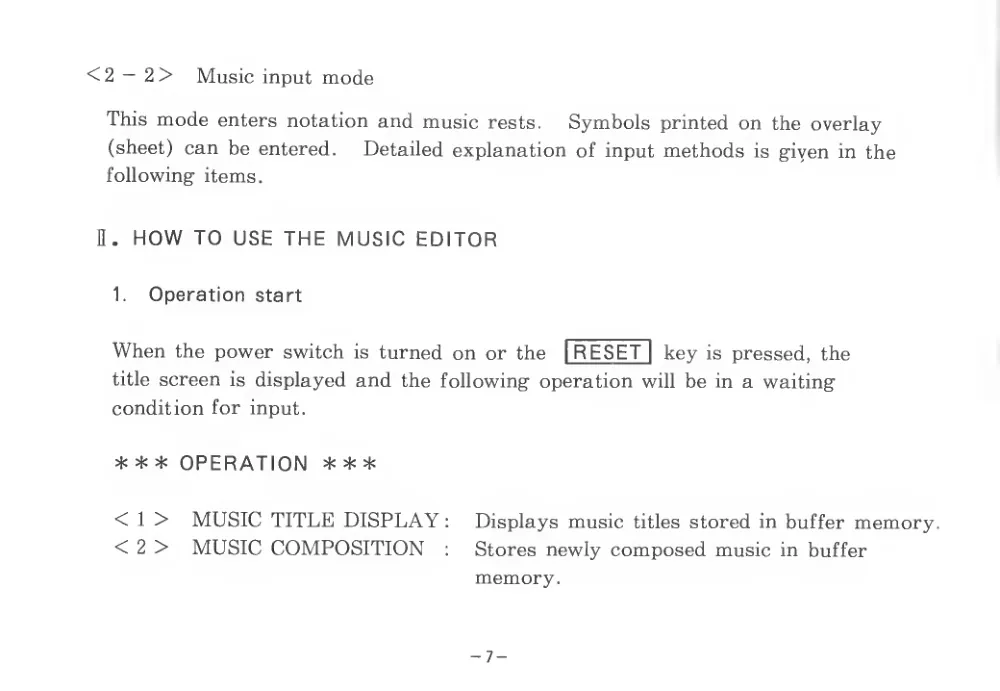
<2 — 2>
Music input mode
This mode enters notation and music rests.
Symbols printed on the overlay
(sheet) can be entered.
Detailed explanation of input methods
is giyen in the
following items.
n. HOW TO USE THE MUSIC EDITOR
1.
Operation
start
When the power switch
is turned on or the
| RESET~| key
is pressed, the
title screen
is displayed and the following operation will be in a waiting
condition for input.
*** OPERATION
* * *
<
1 >
MUSIC TITLE DISPLAY
:
Displays music
titles stored in buffer memory.
< 2 >
MUSIC COMPOSITION
:
Stores newly composed music in buffer
memory.
- 7 -
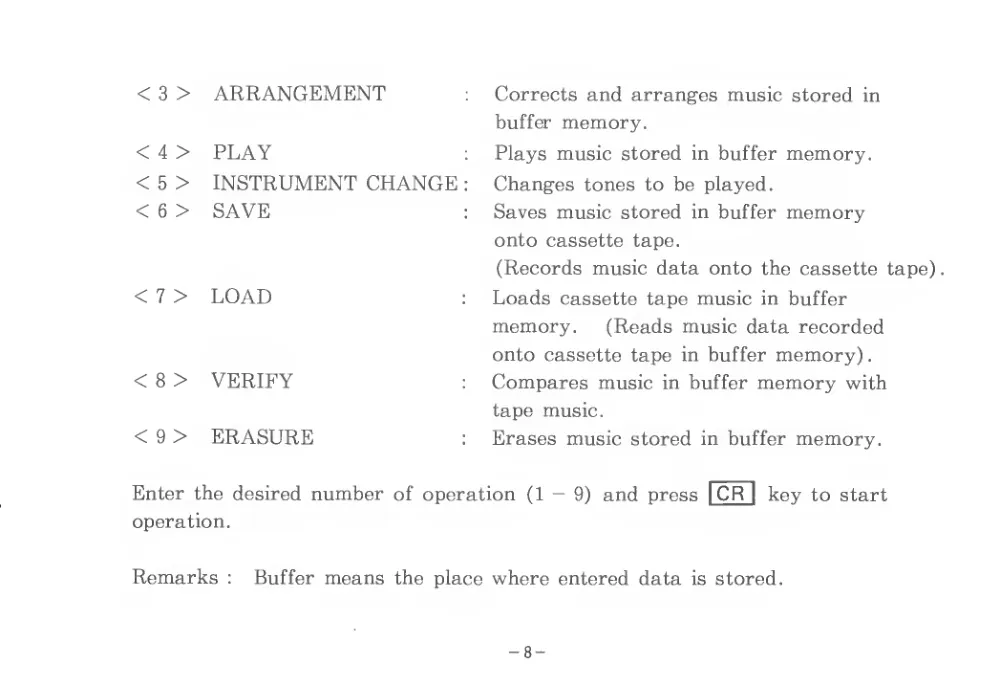
< 3 >
ARRANGEMENT
:
Corrects and arranges music stored in
buffer memory.
< 4 >
PLAY
:
Plays music stored
in buffer memory.
< 5 >
INSTRUMENT CHANGE
:
Changes tones to be played.
< 6 >
SAVE
:
Saves music stored in buffer memory
onto cassette tape.
(Records music data onto the cassette tape)
< 7 >
LOAD
:
Loads cassette tape music in buffer
memory.
(Reads music data recorded
onto cassette tape in buffer memory)
.
< 8 >
VERIFY
:
Compares music in buffer memory with
tape music.
< 9 >
ERASURE
:
Erases music stored in buffer memory.
Enter the desired number of operation
(1 — 9) and press
I CR
| key to start
operation.
Remarks
;
Buffer means the place where entered data
is stored.
- 8 -
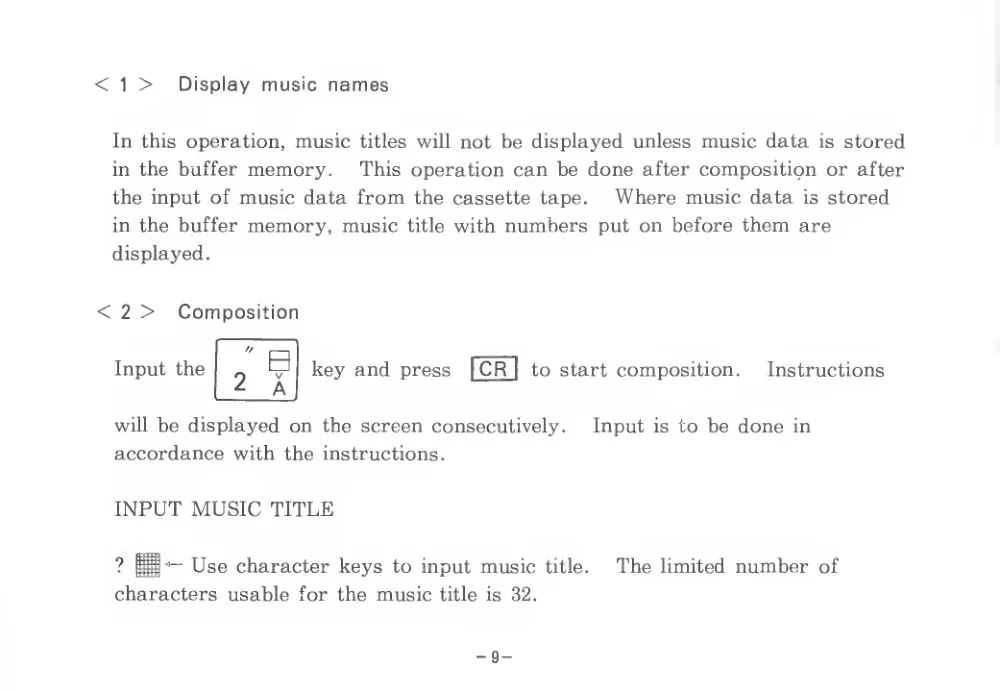
<
1 >
Display music names
In this operation, music
titles
will not be displayed unless music data
is stored
in the buffer memory.
This operation can be done after composition or after
the input of music data from the cassette tape.
Where music data
is stored
in the buffer memory, music
title with numbers put on before them are
displayed.
<
2 >
Composition
Input the
B
2
A
key and press
| CR
|
to start composition.
Instructions
will be displayed on the screen consecutively.
Input
is to be done
in
accordance with the instructions.
INPUT MUSIC TITLE
?
Use character keys to input music
title.
The limited number of
characters usable for the music title
is
32.
- 9 -
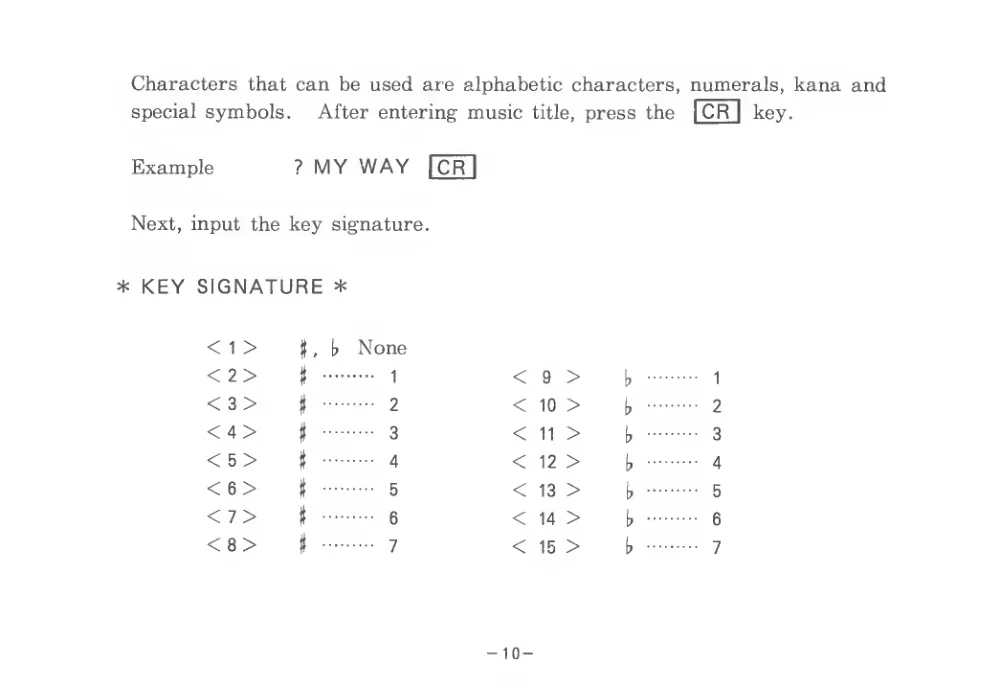
Characters that can be used are alphabetic characters, numerals, kana and
special symbols.
After entering music
title, press the
| CR
|
key.
Example
? MY WAY
Next, input the key signature.
* KEY SIGNATURE *
<
1 >
i,
,
\>
None
b
1
t
2
t
3
t
4
t
5
b
6
b
7
<2>
J
1
<
9
>
<3>
#
2
<
10 >
A
V
3
<
11 >
<5>
#
4
<
12 >
<6>
#
5
13 >
< 7>
ti
6
<
14 >
<8>
#
7
<
15 >
- 10 -
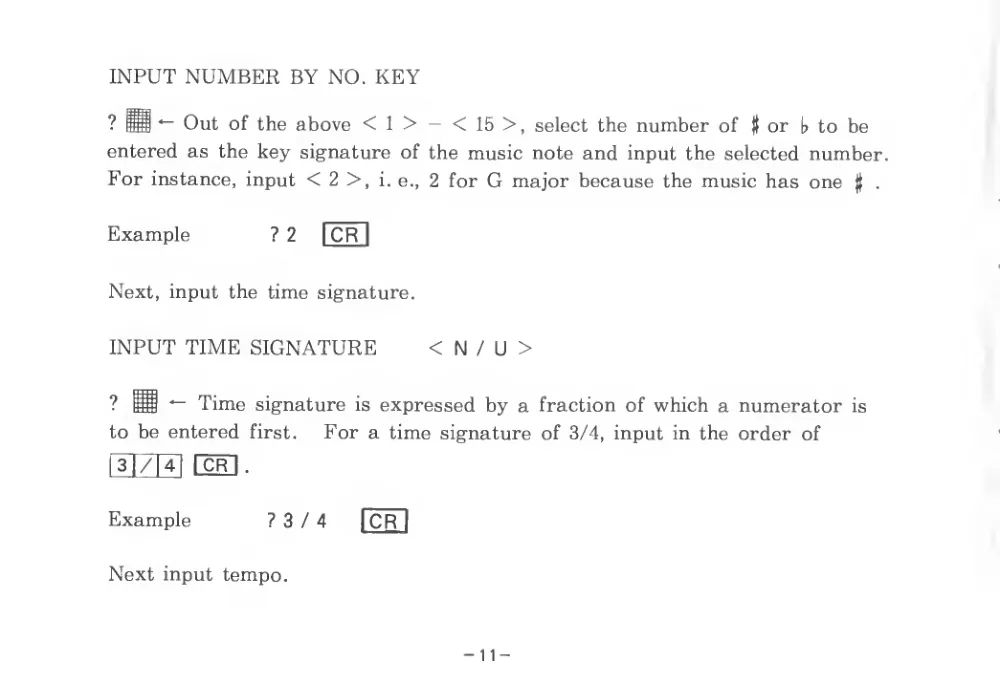
INPUT NUMBER BY NO. KEY
? H
Out of the above <
1 > — <
15 >
, select the number of
jt or
b to be
entered as the key signature of the music note and input the selected number.
For instance, input < 2 >,
i. e., 2 for G major because the music has one
j|
.
Example
? 2
Next, input the time signature.
INPUT TIME SIGNATURE
< N
/ U >
? H
Time signature
is expressed by a fraction of which a numerator
is
to be entered
first.
For a time signature of 3/4, input in the order of
[CR].
3 / 4
Example
? 3 / 4
Next input tempo.
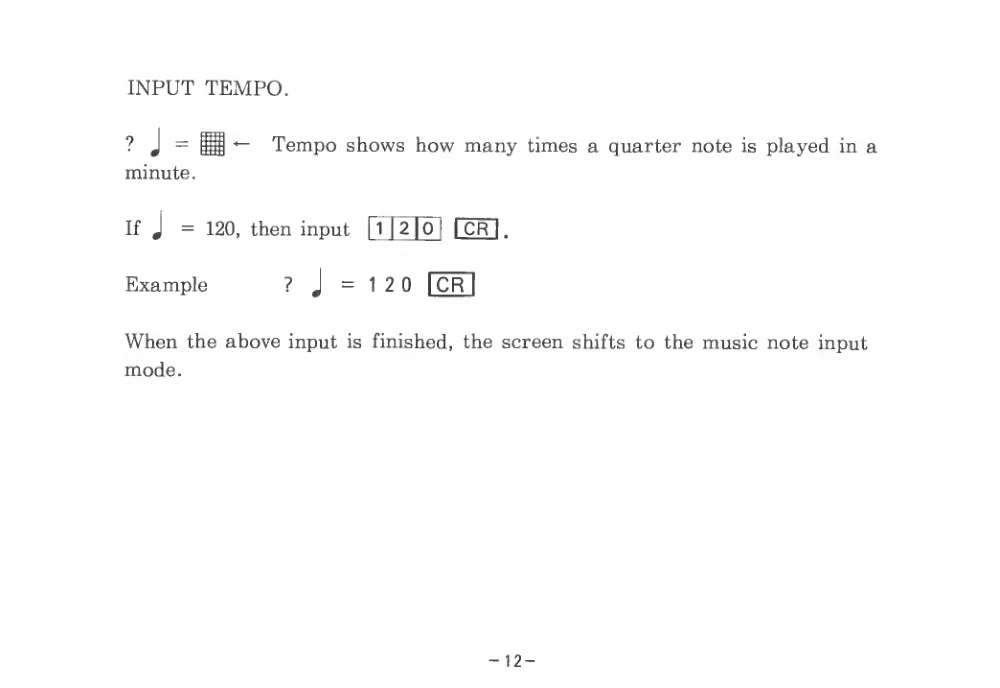
INPUT TEMPO.
?
J
=
i
minute.
Tempo shows how many times a quarter note
is played
in a
If J
=
120, then input
pT 2 |o
|
| CR
I
.
Example
?
J =12 0
| CR
I
When the above input
is finished, the screen shifts to the music note input
mode.
- 12 -
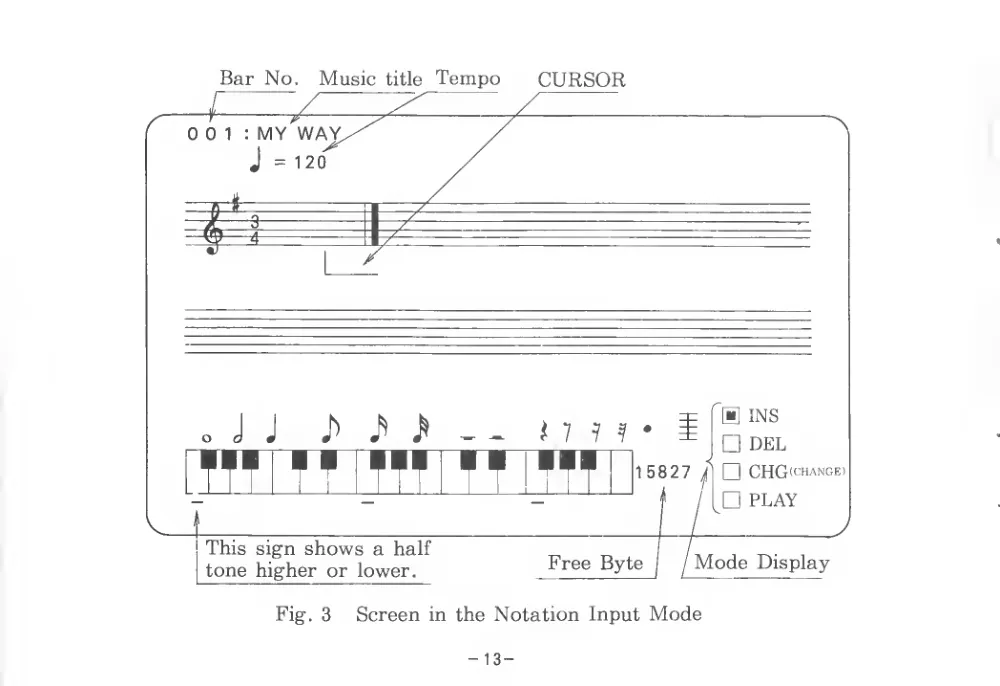
Bar No.
Music
title Tempo
CURSOR
- 13 -

Input notation by referring to Fig.
1.
The
key is for
“do” and
the
key
is for one octave higher.
Hb
B
i
When scales are input, press keys corresponding to the keyboard of musical
instruments, and a mark will be displayed on the keyboard on the screen.
Select the notation to be input from numeral keys
in the upper layer and
then press the selected key.
In this way, musical notes are printed on the
screen.
Consecutively input notation in this procedure.
When entering the double or treble chord, while holding the key which was
pressed
first, simultaneously press the subsequent key and then press
notation keys.
For the addition, insertion, erasure and change of notation, refer to the
explanation given below.
- 14 -
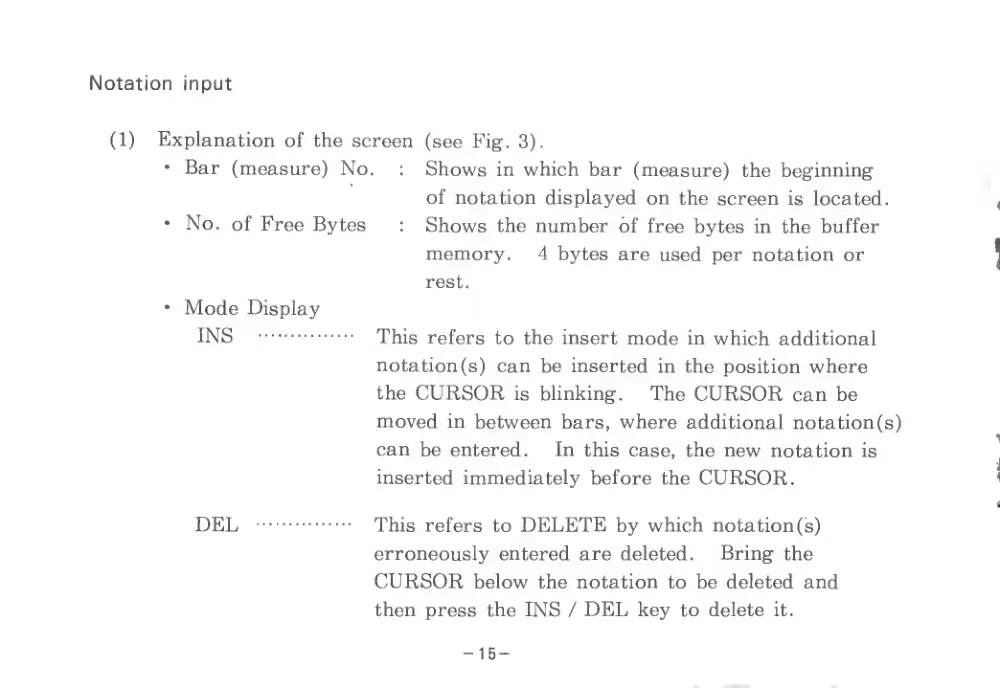
Notation input
(1)
Explanation of the screen
(see Fig. 3).
•
Bar (measure) No.
;
Shows
in which bar (measure)
the beginning
of notation displayed on the screen
is located.
•
No.
of Free Bytes
:
Shows the number of free bytes in the buffer
memory.
4 bytes are used per notation or
rest.
• Mode Display
INS
This refers to the insert mode in which additional
notation (s) can be inserted in the position where
the CURSOR
is blinking.
The CURSOR can be
moved
in between bars, where additional notation (s)
can be entered.
In this case, the new notation
is
inserted immediately before the CURSOR.
DEL
This refers to DELETE by which notation (s)
erroneously entered are deleted.
Bring the
CURSOR below the notation to be deleted and
then press the INS / DEL key to delete
it.
- 15 -

CHANGE
This refers to the change mode in which notation,
rests,
etc., can be changed.
In this case the
notation in the position where the CURSOR
is
will
be changed.
PLAY
This shows that input by keys
is
in the play mode.
(2)
Key input
PLAY
•
I FUNC
END
•
I CTRL
•
I SHIFT
When this key
is pressed once, CH PLAY in the lower
right-hand part of the screen will be marked.
You
can play by using the key.
When the key
is pressed again, the mark will shift to
n INS and thus operation shifts to notation input.
By using this key, notation input ends.
The screen
returns to the WAIT condition.
While holding down this key, the upper part of the
REST / NOTATION key or the INS / DEL key can
be selected.
- 16 -
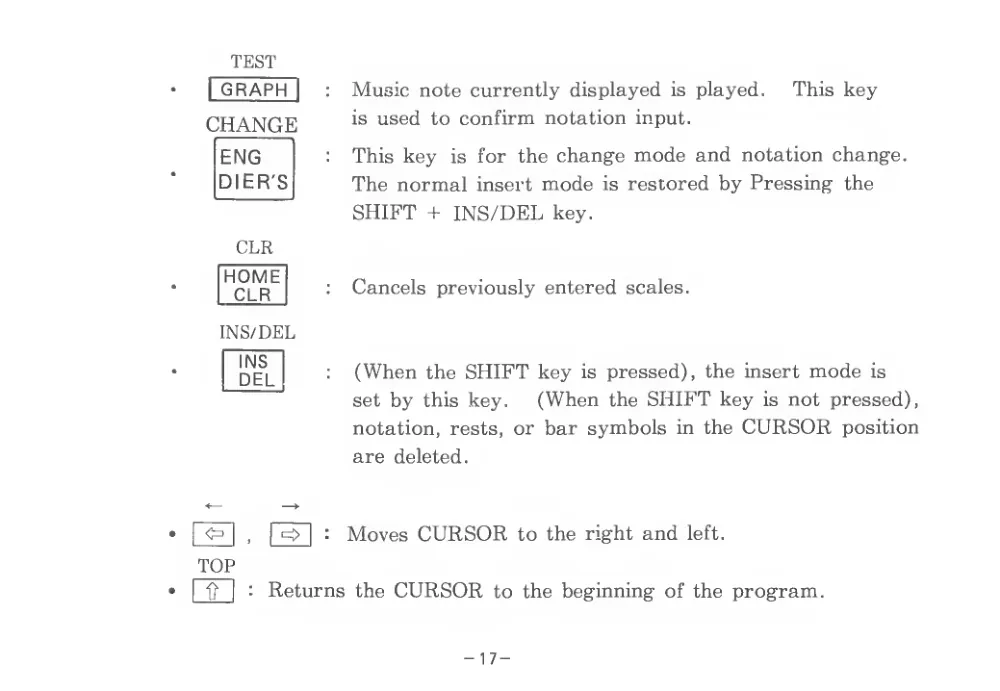
TEST
I GRAPH
CHANGE
ENG
DIER'S
CLR
HOME
CLR
INS/DEL
INS
DEL
Music note currently displayed
is played.
This key
is used to confirm notation input.
This key
is
for
the change mode and notation change.
The normal insert mode
is restored by Pressing the
SHIFT + INS/DEL key.
Cancels previously entered scales.
(When the SHIFT key is pressed), the insert mode
is
set by this key.
(When the SHIFT key
is not pressed),
notation, rests, or bar symbols in the CURSOR position
are deleted.
<>
I
,
I o
I
:
Moves CURSOR to the right and
left.
TOP
1}
I
:
Returns the CURSOR to the beginning of the program.
- 17 -
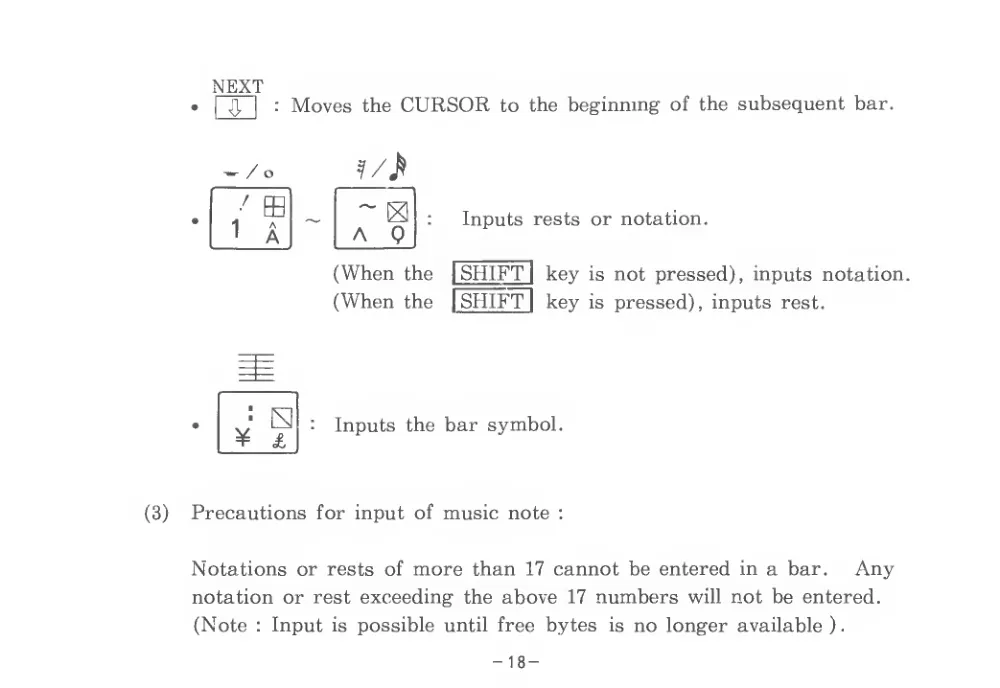
NEXT
•
I
j],
I
: Moves the CURSOR to the beginning of the subsequent bar.
^/o
Inputs rests or notation.
(When the
I SHIFT
I key
is not pressed), inputs notation.
(When the
| SHIFT
| key
is pressed), inputs rest.
AA
A
9
Inputs the bar symbol.
(3)
Precautions for input of music note
:
Notations or rests of more than 17 cannot be entered in a bar.
Any
notation or rest exceeding the above 17 numbers
will not be entered.
(Note
: Input
is possible until free bytes
is no longer available ).
- 18 -
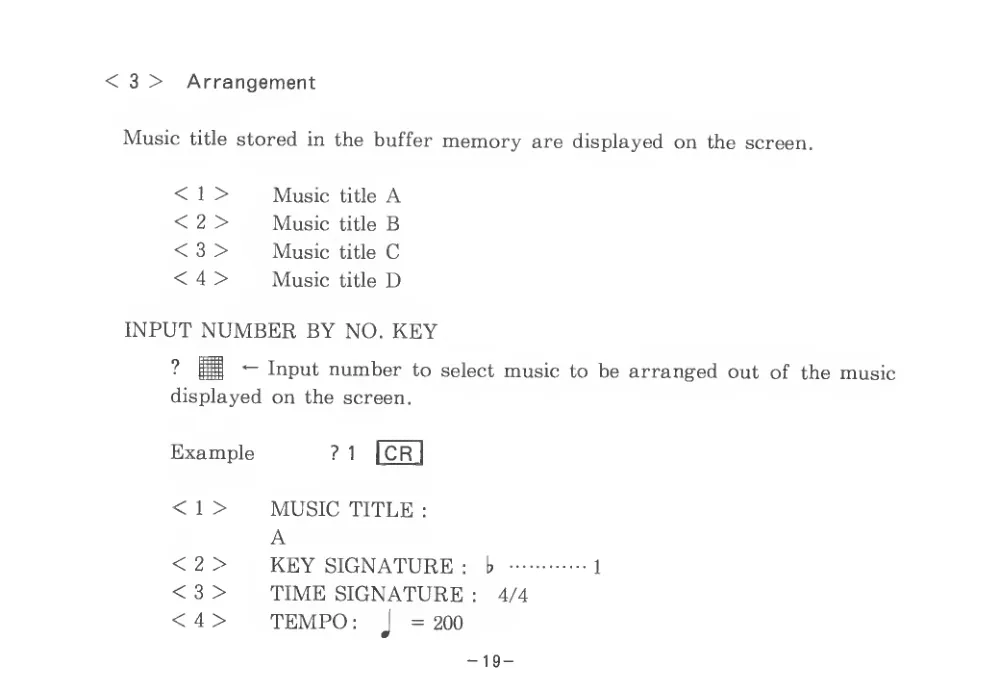
<
3 >
Arrangement
Music
title stored in the buffer memory are displayed on the screen.
<
1 >
Music
title A
< 2 >
Music
title B
< 3 >
Music
title C
< 4 >
Music
title D
INPUT NUMBER BY NO. KEY
? H
Input number to select music to be arranged out
of the music
displayed on the screen.
Example
?
1
| CR
I
<
1 >
MUSIC TITLE
:
< 3 >
< 4 >
< 2 >
A
KEY SIGNATURE
:
b
TIME SIGNATURE
:
4/4
TEMPO
:
J
= 200
- 19 -
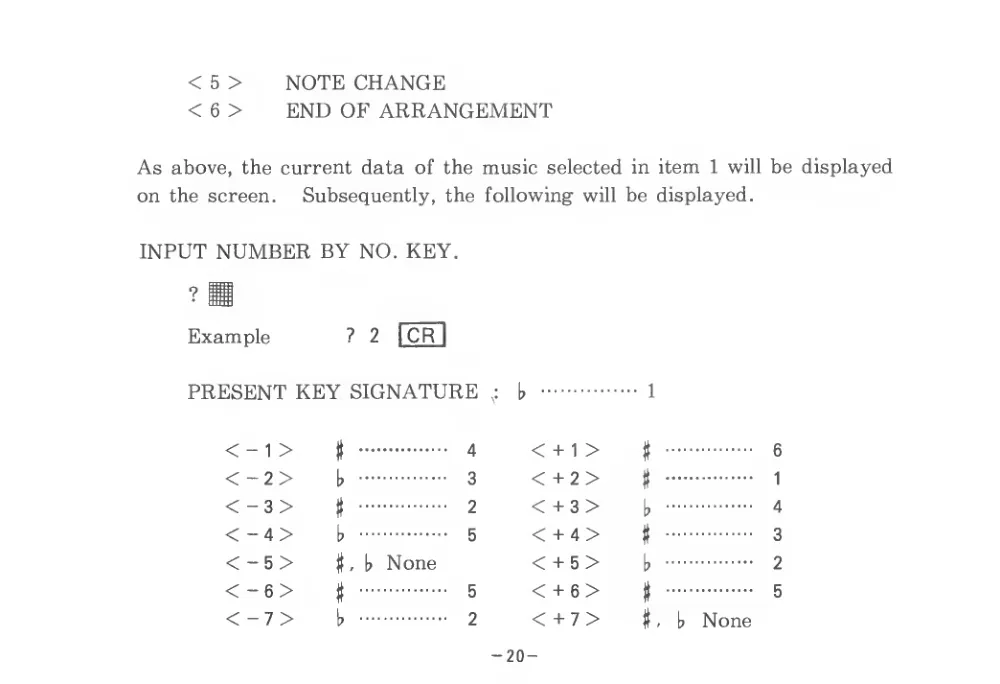
< 5 >
NOTE CHANGE
< 6 >
END OF ARRANGEMENT
As above, the current data of the music selected
in item
1 will be displayed
on the screen.
Subsequently, the following will be displayed.
INPUT NUMBER BY NO. KEY.
Example
?
2
| CR
|
PRESENT KEY SIGNATURE
1
<-
1 >
#
4
< -2>
t
3
<-3>
#
2
< -4 >
\>
5
< - 5 >
jf
,
1? None
<- 6 >
#
< -7>
I?
< +
1 >
jt
6
<+ 2 >
#
1
< +3>
b
4
< +4>
i
3
<+5>
b
2
< +6>
K
5
< + 7 >
jt
,
b
None
5
2
- 20 -
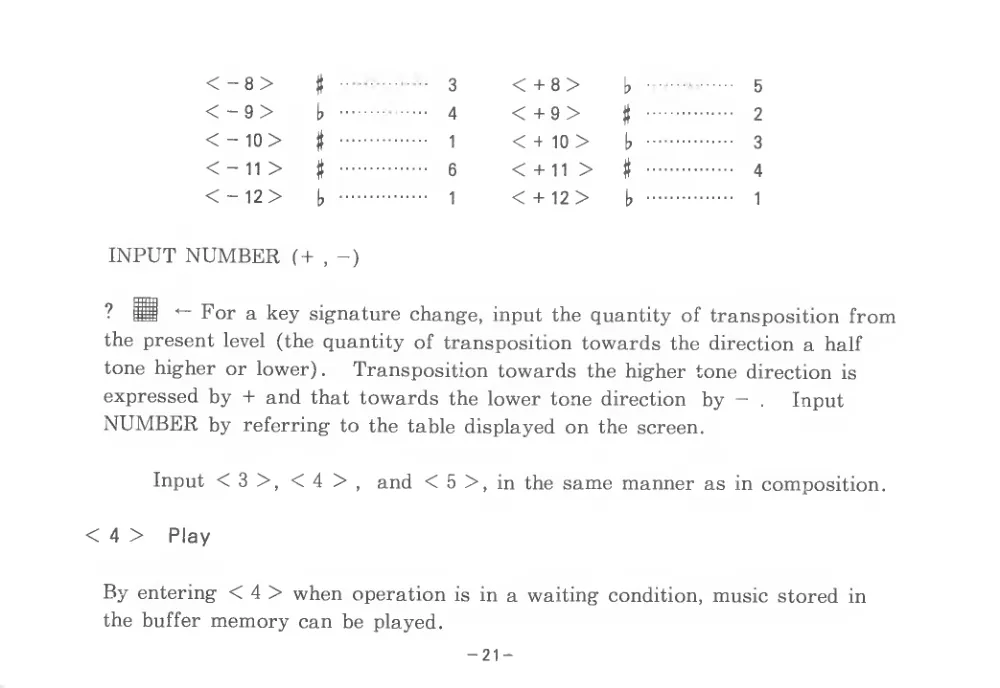
<
-
00 V
3
< + 8 >
b
<
-1
CO V
4
< + 9 >
jt
<
-1
o V
1
<
4- 10 >
\>
<
--ii>
#
6
<
4- 11 >
tt
<
--12>
1,
1
< 4 12 >
1?
INPUT NUMBER (+
, -)
? H
For a key signature change, input the quantity of transposition from
the present level
(the quantity of transposition towards the direction a half
tone higher or lower)
.
Transposition towards the higher tone direction
is
expressed by + and that towards the lower tone direction
by —
.
Input
NUMBER by
referring to the table displayed on the screen.
Input < 3 >, <4 >
,
and < 5 >, in the same manner as
in composition.
<
4 >
Play
By entering < 4 > when operation
is in a waiting condition, music stored in
the buffer memory can be played.
- 21 -
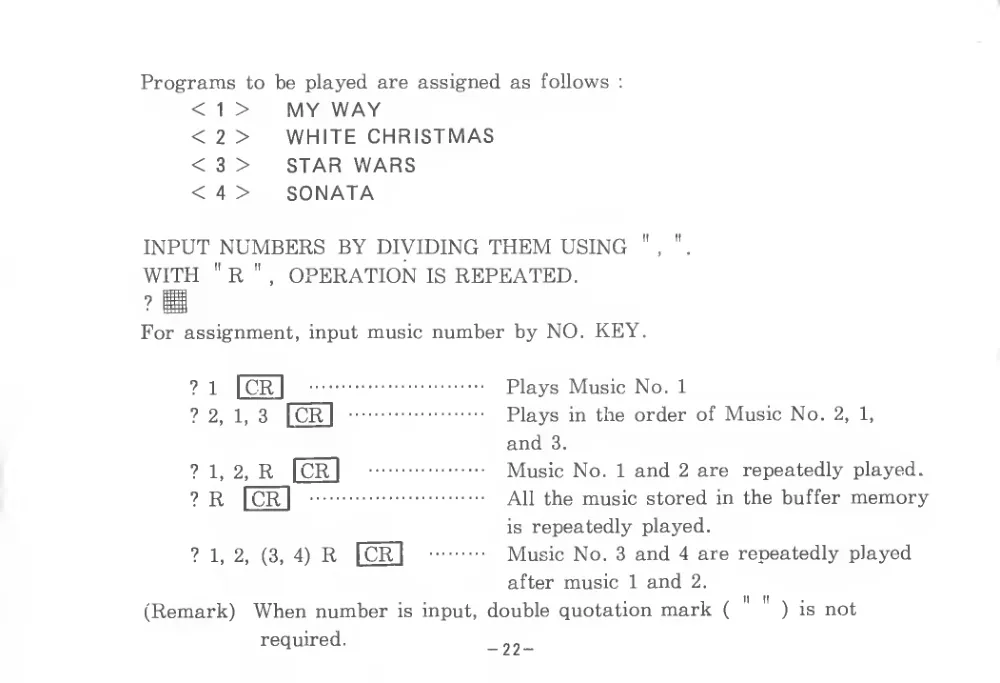
Programs to be played are assigned as follows
:
<
1 >
MY WAY
<
2 >
WHITE CHRISTMAS
<
3 >
STAR WARS
< 4 >
SONATA
INPUT NUMBERS BY DIVIDING THEM USING
WITH
" R
"
, OPERATION IS REPEATED.
For assignment, input music number by NO. KEY.
?
1
I CR
I
Plays Music No.
1
?
2,
1,
3
[CR]
Plays in the order of Music No.
2,
1,
and
3.
?
1,
2, R
ICR
I
Music No.
1 and 2 are
repeatedly played.
? R
I CR
I
All the music stored in the buffer memory
is repeatedly played.
?
1,
2,
(3,
4) R [M]
••
Music No. 3 and 4 are repeatedly played
after music
1 and
2.
(Remark)
When number
is input, double quotation mark
(
'
)
is not
required.
-no-
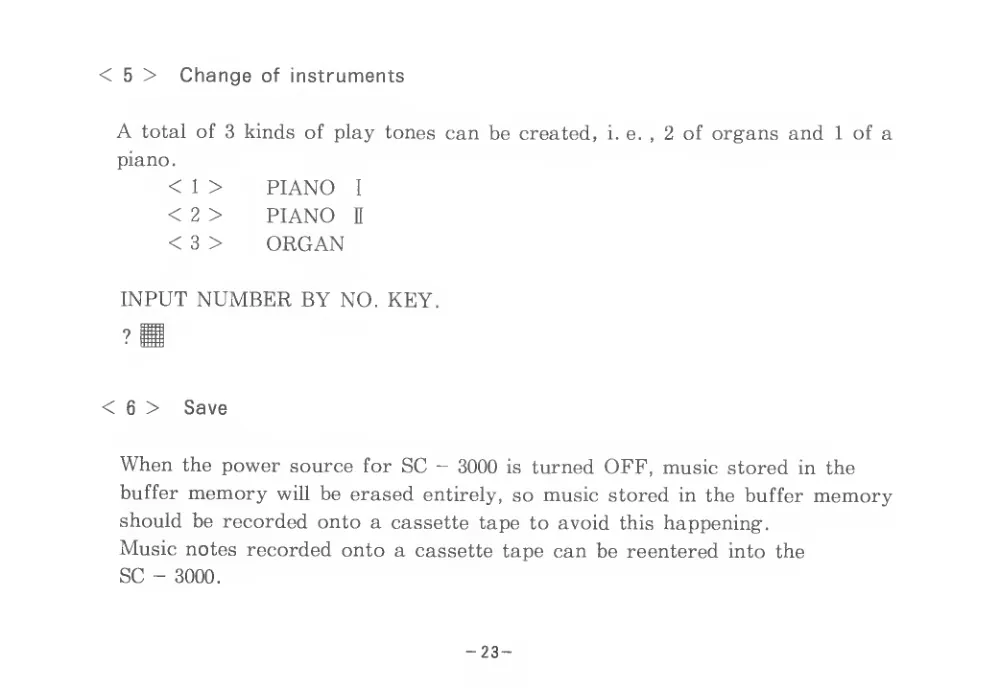
<
5 >
Change of instruments
A total of 3 kinds of play tones can be created,
i. e.
,
2 of organs and
1 of a
piano.
<
1 >
PIANO
I
< 2 >
PIANO
n
< 3 >
ORGAN
INPUT NUMBER BY NO. KEY.
<
6 >
Save
When the power source for SC — 3000
is turned OFF, music stored in the
buffer memory will be erased entirely, so music stored
in the buffer memory
should be recorded onto a cassette tape to avoid this happening.
Music notes recorded onto a cassette tape can be reentered into the
SC - 3000.
- 23 -
•
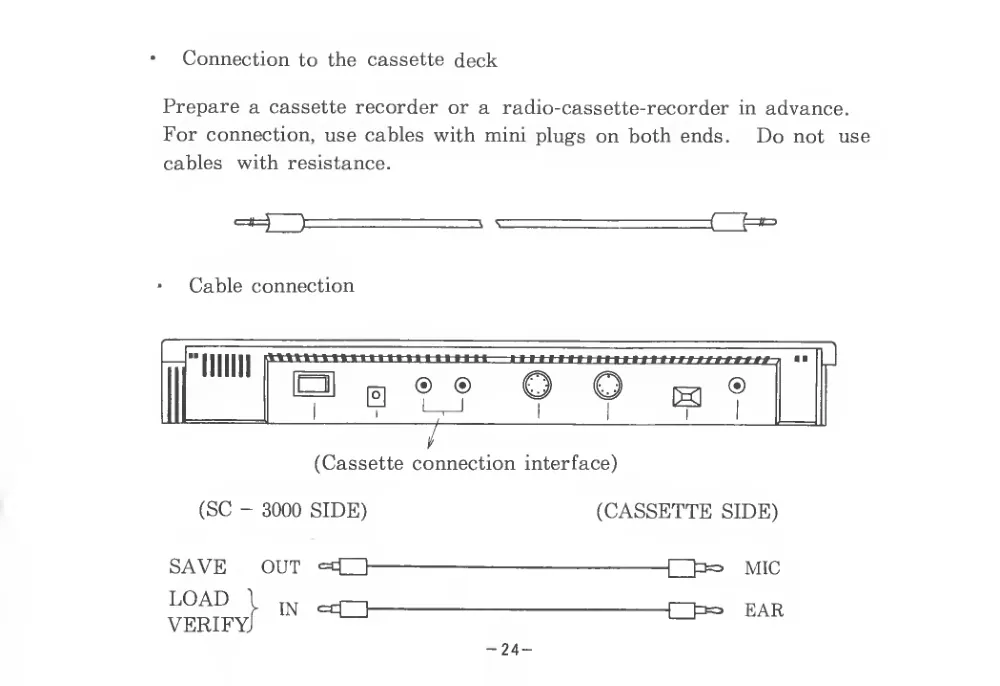
Connection to the cassette deck
Prepare a cassette recorder or a
radio-cassette-recorder in advance.
For connection, use cables with mini plugs on both ends.
Do not
use
cables
with resistance.
)
-
=3
s
z(
Np
Cable connection
(Cassette connection interface)
(SC - 3000 SIDE)
(CASSETTE SIDE)
MIC
SAVE
OUT
<=cO
LOAD
I
verieyJ
- 24 -
EAR

After the connection
is properly made, record the previously entered
music.
Insert a new cassette tape.
Save
Records music stored in the buffer memory onto a cassette tape.
This
is referred to as “SAVE”
.
<
1 >
MY WAY
<
2 >
WHITE CHRISTMAS
<
3 >
STAR WARS
<
4 >
SONATA
INPUT NUMBER BY NO. KEY.
[I [CR
* START *
* END *
- 25 -
1
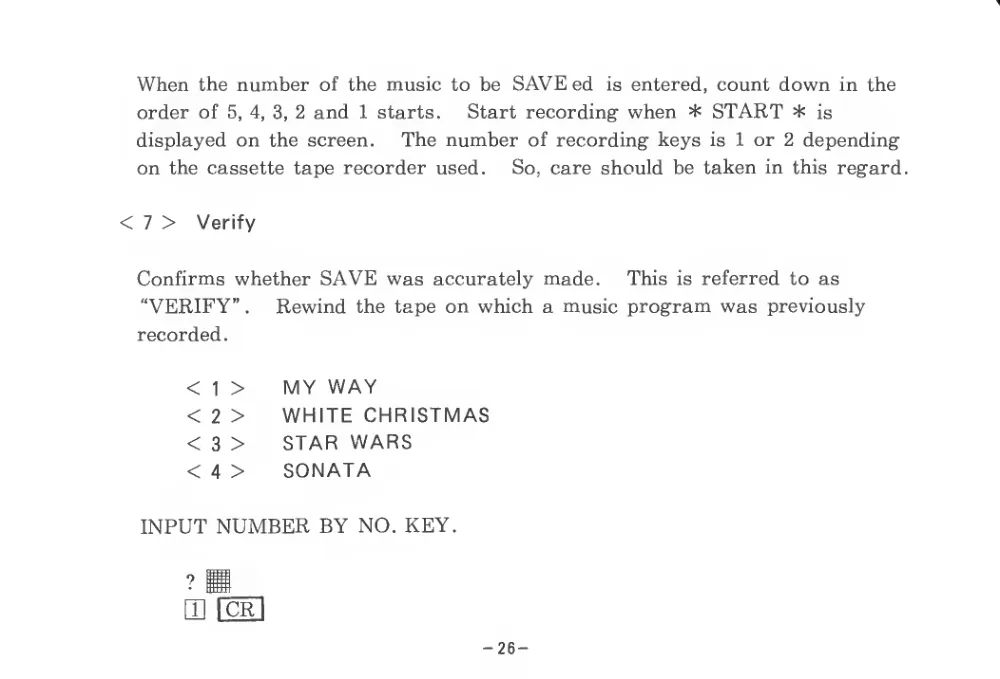
When the number of the music to be SAVE ed
is entered, count down in the
order of
5, 4, 3, 2 and
1 starts.
Start recording when * START *
is
displayed on the screen.
The number of recording keys
is
1 or 2 depending
on the cassette tape recorder used.
So, care should be taken in this regard.
<
7 >
Verify
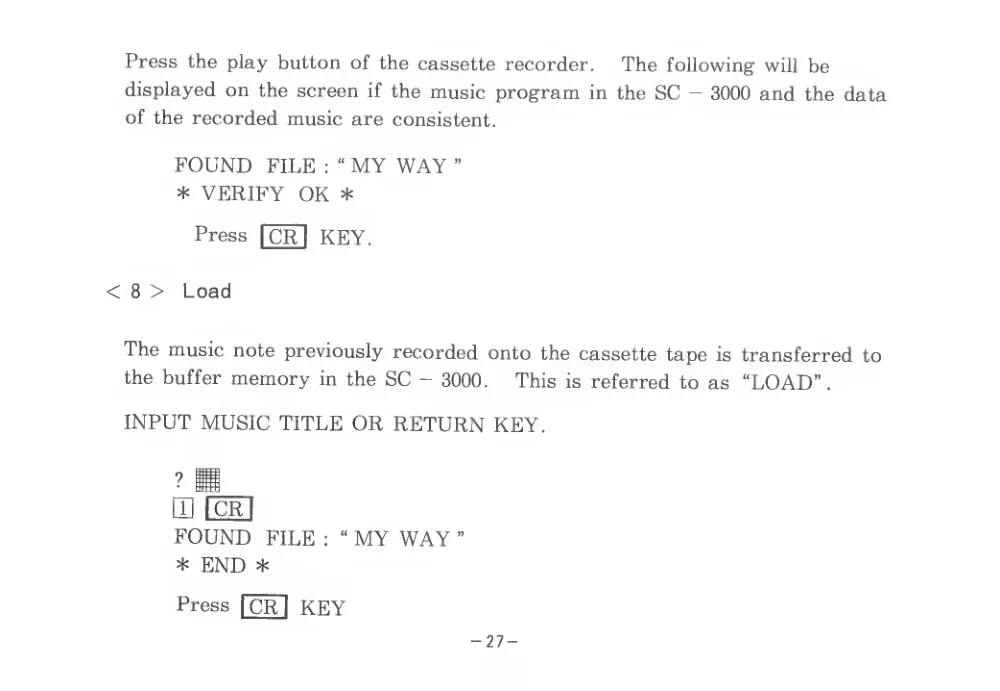
Confirms whether SAVE was accurately made.
This
is referred to as
“VERIFY”
.
Rewind the tape on which a music program was previously
recorded.
<
1 >
MY WAY
<
2 >
WHITE CHRISTMAS
<
3 >
STAR WARS
<
4 >
SONATA
INPUT NUMBER BY NO. KEY.
m fCRl
- 26 -
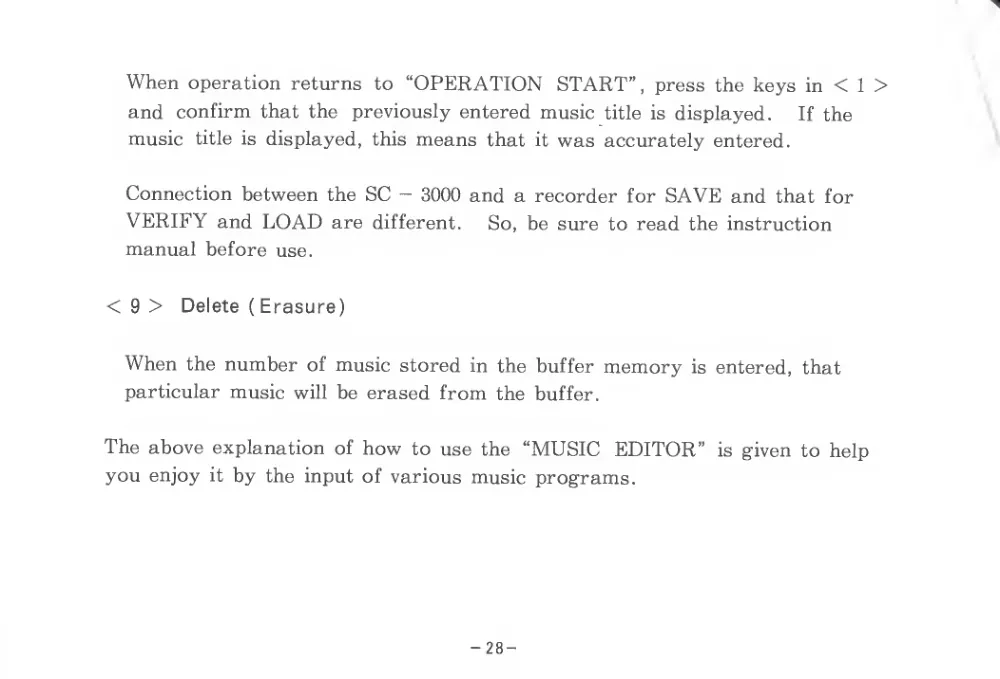
Press the play button of the cassette recorder.
The following will be
displayed on the screen
if the music program in the SC - 3000 and the data
of the recorded music are consistent.
FOUND FILE
:
“ MY WAY
”
* VERIFY OK *
Press ICR
I KEY.
< 8 >
Load
The music note previously recorded onto the cassette tape
is transferred to
the buffer memory in the SC - 3000.
This
is referred to as “LOAD”.
INPUT MUSIC TITLE OR RETURN KEY.
[cr]
FOUND FILE
:
“ MY WAY
”
* END *
Press ICRl KEY
- 27 -
When operation returns
to “OPERATION START”, press the keys in <
1 >
and
confirm that the
previously entered music
title
is displayed.
If the
music
title
is displayed,
this means that
it was accurately entered.
Connection between the SC — 3000 and a recorder for SAVE and that for
VERIFY and LOAD are different.
So, be sure to read the instruction
manual before use.
<
9 >
Delete (Erasure)
When the number of music stored in the buffer memory
is entered, that
particular music will be erased from the buffer.
The above explanation of how to use the “MUSIC EDITOR”
is given to help
you enjoy
it by the input of various music programs.
- 28 -

MEMO
MEMO
SEGA ENTERPRISES LTD.